It is common to use HTML buttons to perform calculations on-demand or to present additional information. For example, rather than display customer notes that take up space in a report or that users view infrequently, you can create an HTML button that, when clicked, displays the information when users want to view the information.
These types of event handlers typically require access to data in the report, such as row data, aggregate data, or report parameter values. To provide event handlers with access to report data, you must do the following:
|
2
|
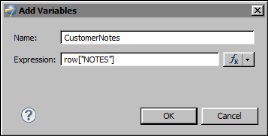
For each type of data, create a variable for the HTML button using the Variables page on Property Editor. Figure 22-6 shows an HTML button variable named CustomerNotes whose value is set to the Notes column.
|
|
Figure 22-6
|
After you create a variable, use dataObject to access the variable in an event handler. For example, to access the variable CustomerNotes, use dataObject.CustomerNotes, as shown in the following event handler code:
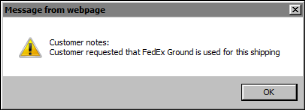
This example uses the JavaScript alert function to display customer notes in a message box, as shown in Figure 22-7.
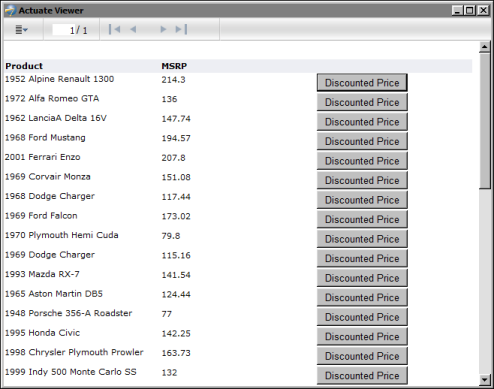
The next example shows how to use an HTML button to calculate the price of a product after applying a discount specified by the user at report view time. Figure 22-8 shows the report in the web viewer. The report lists the products and their MSRP (Manufacturer’s Suggested Retail Price). Each product row contains a Discounted Price button for calculating the discounted price for that product.
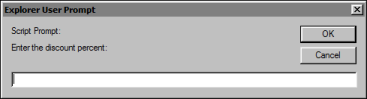
When the user clicks a button, a window prompts the user to enter a discount percent, as shown in Figure 22-9.
|
Figure 22-9
|
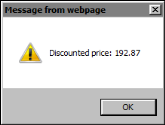
After the user enters a value, such as 10, and chooses OK, another window displays the product’s discounted price, as shown in Figure 22-10.
|
Figure 22-10
|
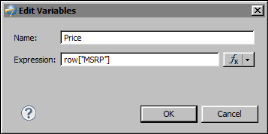
To create this HTML button, a button labeled Discounted Price is inserted in the detail row of a table. The HTML button’s event handler code requires the MSRP values to calculate the discounted price, so a variable is created. Figure 22-11 shows the definition of a variable named Price.
|
Figure 22-11
|
DiscountedPrice = dataObject.Price - (dataObject.Price * (Discount/100));
The first line after the opening brace prompts the user for a discount value and stores the value in the Discount variable. The second line calculates the discounted price using the values in the Price and Discount variables. The third line displays the results in a message box. Note that this event handler code covers only the main tasks. A more complete event handler would also perform data validation to ensure that the input value is a number, and handle the case if the user chooses Cancel at the prompt.