Data Tree provides the following three views to navigate through your data and saved analysis files: My Data, Discrete Values, and My Folders, as shown in Figure 2‑1.
Figure 2‑1 Data Tree showing the tables in the Demo database
My Data works with the Discrete Values viewer, which shows the content of explored fields, their values, and the number of stored entries with each value. Values are sometimes referred to as categories and entries as records.
Using My Data
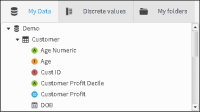
My Data is available from Data Tree. Use My Data to display and navigate through databases, tables, and fields. To view the tables in a database, select the triangle icon beside the database name. To view the fields in a table, select the triangle next to the table, as shown in Figure 2‑2. In this figure, the Demo database and the Customer table in the database are expanded and the fields in the Customer table are visible. Selecting the triangle next to an expanded database or table collapses the view of the items.
Figure 2‑2 My Data showing fields in the Demo Customer table
Data items appear with a different identifying icon for each item type, as shown in Table 2‑1. Unindexed fields appear without color but are otherwise the same as the associated physical field type.
Table 2‑1 Icons for database, table, and field data types
Icon
Data structure or type
Database
Table
Full numeric field
Real numeric field
Text field
Date field
Time field
Date/time field
Calculated field
Unindexed field
In My Data, right-click an item to enable the following field operation options:
Delete: Permanently remove the field or table. Delete is available only for users who have the Delete privilege granted by an administrator.
Edit: Change a calculated field.
Selection: Select a range of values stored in a column.
Make permanent: Write a calculated field as an entry in the database.
Making a calculated field permanent
A calculated field can be stored as a permanent field in the associated table for use by others. Identify a calculated field by the small, gray cog in the lower left corner of the calculated field icon. Unlike a calculated field, a permanent field can be used to sort columns in a report. Making a calculated field permanent replaces the calculated field. The database does not retain the original calculated field definition.
How to make a calculated field permanent
1 Right-click a calculated field appearing in My Data.
2 Choose Make permanent.
Using Discrete Values
Discrete Values is a view that shows the contents of individual database fields. Each unique value, or category, is represented by a total of all its occurrences or records.
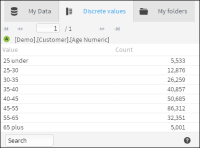
Discrete Values appears when you double-click a database field in My Data. For example, double clicking the Age Numeric field in the Customers table displays a list of age ranges and the number of customer records matching each age range, as shown in Figure 2‑3.
Figure 2‑3 Discrete values showing the values in the Age Numeric field
Discrete Values also supports dragging fields and dropping them in places where selections or segments are used. For example, drag one or more specific categories to Scratchpad to examine the values in detail or store them for future use.
When a field has many categories, the viewer displays them on multiple pages. Typically, the list of discrete values is paginated, because most fields have a large number of categories. By default, the viewer shows 100 categories per page. For example, [Household].[Town] is a field that contains many discrete values. [Order].[Order No] contains more discrete values as there is a unique category for every order.
Categories can be sorted by name and the number of records they contain. The default sort order is by number of records. To sort categories in alphabetical order, click Value. A search engine supports finding particular categories by Name. Select multiple discrete values by holding CTRL while clicking the desired categories.
Using My Folders
My Folders displays the files and folders available to a user, as shown in Figure 2‑4.
Figure 2‑4 My Folders showing a personal folder, Income
Files and folders in the My Folders section in My Folders are available only to you. Files in the Shared section are visible to all users. Files can contain analyses, selections, and exports. There is no fixed limit to the number of folders you can create. To share a file with other users, move the file under the Shared heading.
Create new folders directly or while saving a file:
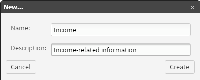
Right-click the red folder labeled My folders. Choose New. Type the name and description of the new folder, as shown in Figure 2‑5.
Figure 2‑5 Creating a new folder named Income
When saving an analysis, choose Save As to create a folder in which to save the analysis.
To save a complete data structure into a file with a .ddw extension, right-click a file and choose Export. The file can be downloaded to your local system. To load previously stored structures, right-click a folder and choose Import.