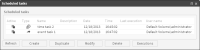
To view all scheduled tasks in BIRT Analytics, choose Workflow—Tasks and events—Scheduled tasks. Scheduled tasks appear, sorted by creation date and time in ascending order. A selected task appears highlighted, as shown in Figure 8‑9.
Figure 8‑9 Selecting one scheduled task
Use Scheduled tasks to complete any of the following activities:
To view current status of all scheduled tasks, choose Refresh.
To create a new scheduled task having no properties, choose Create.
To create a new scheduled task having the same properties as an existing one, select a task and choose Duplicate.
To edit an existing scheduled task, select a scheduled task and choose Modify.
To remove a scheduled task from BIRT Analytics, choose Delete.
To view a list of scheduled tasks already completed, choose Executions.
Duplicating a scheduled task
Duplicate creates a new scheduled task having all properties of an existing, selected task. Duplicating a scheduled task, then modifying one or multiple properties in the duplicated task, saves time spent recreating identical properties for a new task. Only the time attribute, indicating the time at which a task is created, is unique for a new, duplicate task.
How to duplicate a scheduled task
1 In Scheduled tasks, select a task.
2 Choose Duplicate.
3 In Scheduled task detail, choose Save.
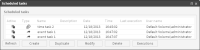
A new task having all properties of the original task appears in Scheduled tasks. The new task has a unique value in Time, as shown in Figure 8‑10.
Figure 8‑10 Examining a duplicated scheduled task
Modifying a scheduled task
You can modify properties of an existing, scheduled task before the time or event set as a trigger for that task occurs. Scheduled task details supports editing and saving changes to task properties.
How to modify a scheduled task
1 In Scheduled tasks, select a task from the list.
2 Choose Modify.
3 Using Scheduled task details, change at least one property of the task. For example, edit the name property.
4 Choose Save.
Using a conditional query to automate actions
Action properties support associating specific actions with defined trigger event conditions. Automating a notification process provides a basic example for associating event-triggered, scheduled tasks and unique trigger events. A basic example demonstrating how to define unique actions that result from evaluating a conditional query follows.
The following example task generates one of two unique email message actions based on evaluating an order quantity in a customer database.
How to specify actions based on query results
1 In a scheduled task, create an event trigger having conditions that monitor the customer order table:
1 In Trigger for task, expand BIRT Analytics. Then drag and drop an Engineering event type in the scheduled task editor.
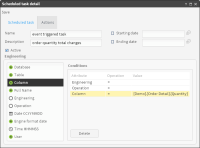
2 In Scheduled task detail—Scheduled task, define conditions and attributes that identify a specific column, as shown in Figure 8‑11.
Figure 8‑11 Defining specific conditions for a scheduled task
2 In Actions for the event-triggered task, expand Conditional. Drag Query and drop it in the visual editor.
3 Specify query conditions for an action using Action details. For example, the selections shown in Figure 8‑12 compare a quantity in a specific field with a defined value. The result returned by the conditional query is Yes or No. Choose OK.
Figure 8‑12 Specifying query conditions for an action
4 In Actions, add two Send email actions, using the visual editor, as follows:
1 Expand Sending. Drag and drop a Send email action on Query. Choose Yes.
2 Configure details for an email message action, appropriate for a Yes result.
3 Drag and drop another Send email action on Query.
4 Configure details for an email message action, appropriate for a No result.
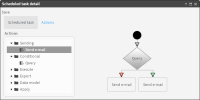
5 Two Send email actions appear, one for each query condition, as shown in Figure 8‑13.
Figure 8‑13 Examining a conditional query and associated actions