A selection is a segment of data, a set of values chosen for a specific purpose. A database is made up of values, and these values internally form groups that have similar features, with these segments being homogeneous. For example, an organization’s customers can be gender = F or gender = M, but not both. You can combine these segments (gender = F, aged between 25 and 35, city = Barcelona, and average purchasing power, for example) and thus specify the target audience for a marketing campaign or promotional offer.
The BIRT Analytics Selections tool supports drag‑and‑drop configuration of elements in a selection. After configuring a selection, save it in Scratchpad or in a shared or private location for reuse. Calculate the selection to return all records meeting the condition defined in the selection. As with full analyses, BIRT Analytics saves any defined parameters for each selection and runs them in real time.
For example, a selection may include only one query returning all rows from a single database table. To create a more complex selection, define multiple blocks. Each block can return records from a specific table or column, use a specific operator to compare values, or define ordering and grouping conditions. By combining elements in logical blocks, you refine the set of records the selection returns.
How to define a selection
1 Choose Analytics—Selections.
2 Choose New to open a new Selections window.
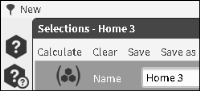
3 In the top-level block, type a name for the selection. As you type your name, the name of the Selection window changes, displaying the name that you are typing, as shown in Figure 3‑1.
Figure 3‑1 Name and title are Home 3
4 From the Selections toolbar, drag a query element and drop it in a block.
5 From My Data, drag a table, column, segment, or report, and drop it in an element.
6 Choose Calculate to execute a selection. Results indicating records selected appear for each element.
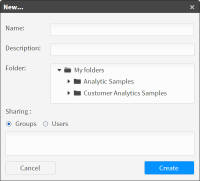
7 Click on “Save” in the toolbar menu and define the name here if you haven’t already done it in Step 3. If you have already named your selection, the name appears in the Name field. You can change the name here. Next, choose a location in which to store the selection and define any desired sharing actions. Click on the “Create” button to save your selection. (See Figure 3‑2).
Figure 3‑2 Saving your selection
8 Optionally, drag the selection name and drop it in Scratchpad.
For example, Figure 3‑3 shows a selection returning all rows from the Customer table in the BIRT Analytics Demo database in which the customer is over 65 years old.
Figure 3‑3 Examining basic elements in a simple selection
How to create a new query
1 Drag New query from Selections toolbar and drop it in a block.
2 Drag a field from the database, for example Gender, and drop it in the query element.
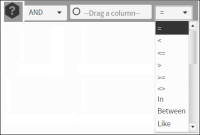
3 Select an operator from the following operators that appear in the drop-down list as shown in Figure 3‑4.
Figure 3‑4 New Query list of available operators
4 Drag a value, for example Female, from Discrete values and drop it after the operator.
5 Choose Calculate. Then follow the same procedure for any other value you want to use. Segments interact with each other by adding or excluding those records that do not match both values. For example, you have the value Female from the Gender field; if you drag the value 25 from the Age field, you can return:
All women and everyone aged 25, regardless of gender
All women aged 25
To accomplish this task, you select an operator from the drop-down list to the left of the dragged column. In the first example, the appropriate operator is Or. In the second example, it is And. By default, the And operator is used for values from different fields in the database. When the values are from the same field in the database, the default operator is Or. For example, if you combine the values Age = 25 with Age = 26, and the operator is And, the number of values that meet both of these conditions is zero.
You can also create a new query by dragging a segment from the data tree or the scratchpad to:
A query in the selection. The new query is entered.
A block. The new query is entered at the end of the block.
To parameterize a query, right-click the query and choose Parameter.
How to create a new parametric query
A parametric query is a query based on a value determined at calculation time, which can be the default value of the parameter. You create a parametric query the same way you create a non-parametric query.
For example, create a selection to calculate the number of customers under 25 years of age with occupation janitor. You can have a query with age, occupation and another third query sentence. In this particular example, our third query sentence is parametric gender. You can include a default value for the parameter, such as Female. When you run the selection, you are prompted to type a parameter value or accept the default. The result is a selection parameterized by gender.
To modify the parameter prompt, right-click the query.
Adding a block
Use a block to group elements in a selection. For example, consider the following basic mathematical operation. If you want to determine the result of the sum of two values multiplied by the sum of two other values, group the sum operations as follows:
(34 + 89)×(23 + 65)
Now consider the following example as it applies to selections:
(Woman + salesperson) or (Woman + director)
If you do not include parentheses in this selection, you cannot be certain that the operators you use are invoked in the intended order. One block is (Woman + salesperson) and another block is (Woman + director). A new selection has one block, in which you name the selection, by default. Every block must include a query element.
How to add a block
1 Drag a block element from Selections toolbar and drop it in an existing block.
2 Drag and drop additional elements in the block, as necessary.
Returning all rows from a table
To return all rows from a database table, add a query, using the “All” element.
How to return all rows from a table
1 Drag All from Selections toolbar and drop it in a block.
2 Drag a database table from My Data and drop it in the All element.
3 Optionally, select an operator from the list.
4 Choose Calculate.
Note: You can create a new “Select All” query by dragging a whole table from the Data Tree and dropping it on a selection item.
Changing resolution
Adding a change resolution element to a selection or block changes the perspective of the selection. For example, to select customers who are both women and directors, you create a selection including query elements that return records for all customers who are female and directors. To see the households where the people who meet these conditions live, add a change resolution element to the selection.
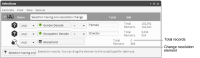
A change resolution element cannot hold the top‑level position in a selection. A change resolution element holding the last position in a selection causes the selection to return all records from the new table linked to all previous conditions. For example, the selection defined in the example shown in Figure 3‑5 returns 868 records for households in which customers who are women directors live.
Figure 3‑5 Examining a selection with one resolution change
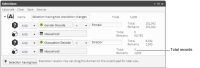
For a contrasting example, add a change resolution element for each query element. This approach changes the perspective of each query in the selection. The selection in the example shown in Figure 3‑6 returns all houses where customers who are female live, intersected with all houses where customers who are directors live; a total of 1009 records.
Figure 3‑6 Examining a selection with two resolution changes
Returning all rows and changing resolution level
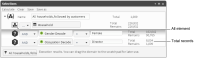
You may choose to create a selection using query elements that return records from different tables. Placing an All query element as the first, or the last element in a selection returns different numbers of records. Placing the All element first in a selection affects all single queries added after the All element by changing the resolution level to the table defined in the All element. An example showing a selection created in this way appears in Figure 3‑7. The selection returns all houses, intersected with houses where female customers live, intersected with houses where director customers live.
Figure 3‑7 Selecting all records from a table first
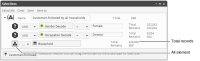
Placing an All element last in a selection affects the selection by changing the resolution level to the table defined in the All element. In this case, the selection returns all female customers, intersected with director customers, intersected with all customers that have a house. In other words, this selection returns all female customers who are directors and have a house. In the BIRT Analytics Demo database, 868 records match this condition. An example showing a selection created in this way appears in Figure 3‑8.
Figure 3‑8 Selecting all records from a table last
Inverting a selection
To return the inverse set of values in a selection, drag Invert and drop it in a selection. For example, consider a selection that returns customer records containing Woman and Director; in other words, the set of women who are directors. Adding Invert to this selection causes this section to return all records in the database for customers who are not women directors.
Selecting discrete values
Add a Discrete Values element to a selection to return specific values. Drag Discrete Values from the Selections toolbar and drop it in a block. Next, drag a database field name from My Data and drop it in the element. Choose Calculate to return the field values. For example, a discrete values element using the Age field returns seventy two values from the Age field.
Sorting values
Add a Sort element to a selection to sort the values in the selection. Drag a column and drop it in the Sort element, then select Ascending or Descending order.
Specifying a sample in a selection
Add a Sample element to a selection to return a defined range of N records for a block or a selection. Sample requires that you select a range parameter and number of values that define the sample. For example, select Top and type 10 to sample the top ten records of a selection.
Creating an inner selection
Use an Inner selection element to add an existing filter to a selection. For example, consider how to create a selection of female directors who are 50 years old, using an existing selection of female directors.
How to create an inner selection
1 Create a new selection and provide a name for the block.
2 Drag Inner selection from the toolbar and drop it in the block element.
3 From a shared location in My Folders, drag the Female directors selection and drop it in the Drag a report box in the inner selection element.
4 To the current selection, add a query element, Age = 50.
5 Choose Calculate to return the number of female directors who are 50 years old.
Discrete values
Use this function to select the values that make up the selection. Choose a value from a field in the database. Drag Discrete values from the toolbar followed by the field in the data tree from which you want to select the discrete values, for example Age.
Understanding range selection
You can select a range of values stored in a given column. When the selector is opened the column is selected and a dialog appears. You type the upper and lower limits and choose OK. The Scratchpad shows the new element with the selection result.
Sorting
You can sort the values in a field in ascending or descending order.