Before you can analyze data with BIRT Analytics, you must load the data into FastDB using the Data Loading module wizard. The wizard guides you to create a connection to the data source, create tables, link the tables, and load the data into FastDB. The BIRT Analytics administrator can keep or remove imported tables during future loading processes.
BIRT Analytics supports the following data source types:
Flat file formats
Comma separated values (CSV)
Fixed length flat files
MS Excel 97 - 2013
Relational databases
DB2
MS SQL Server
MySQL
ODBC
Oracle
PostgreSQL
Cloud-based data source
Remote BIRT Analytics
Network data sources
FTP
HTTP
The parameters to load data using the BIRT Analytics web client are the same as the parameters used to load data using Loader.
How to load a data source into BIRT Analytics
The following steps load data into BIRT Analytics for analysis:
1 Log in to the BIRT Analytics web client
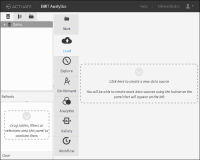
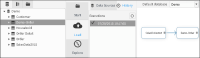
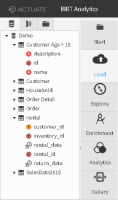
2 Choose Load from the toolbar, as shown in Figure 4‑1.
Figure 4‑1 Preparing to load data into BIRT Analytics
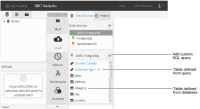
3 Choose the label Click here to create a new data source. Select data source type appears, as shown in Figure 4‑2.
Figure 4‑2 Selecting the data source type to load
4 Choose CSV to load a file in CSV format.
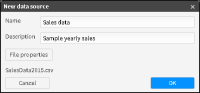
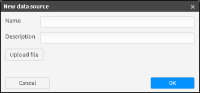
5 In New data source, use the following values:
1 Name: Sales data
2 Description: Sample yearly sales
6 Choose Upload file and navigate to a CSV file. In this example the file is named SalesData2015.csv.
7 After selecting the file to upload, choose Open to return to New data source. Figure 4‑3 shows your new data source before uploading to BIRT Analytics.
Figure 4‑3 Reviewing file properties before uploading data
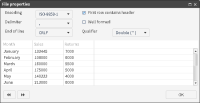
8 Choose File properties to review the data import configuration and make any necessary changes before importing the data. Figure 4‑4 shows how your data source configuration before uploading to BIRT Analytics.
Figure 4‑4 Reviewing the data import configuration
9 In File properties, choose OK to accept the data import configuration.
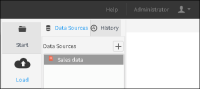
10 In New data source, choose OK to import the new data into BIRT Analytics. Figure 4‑5 shows your data source connection.
Figure 4‑5 Reviewing the new data source connector
Using a data source connection
After adding one or more data source connections you can explore the tables in each data source, edit the data import configuration, and test the data import. The following steps explore and test the data from a CSV formatted file named SalesData2015.csv.
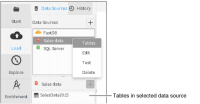
1 Right-click the data source connection to display options. Choose Tables, as shown in Figure 4‑6. The tables within the data source appear. In this example the table in the CSV file is named SalesData2015.
Figure 4‑6 Reviewing tables in the data source connector
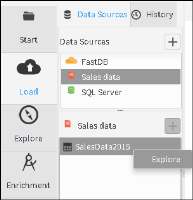
2 Right-click one of the tables in the data source and choose Explore, as shown in Figure 4‑7.
Figure 4‑7 Exploring a table from a data source
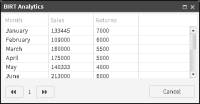
3 When you finish reviewing the table choose Cancel, as shown in Figure 4‑8.
Figure 4‑8 Reviewing table data
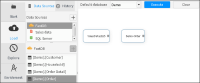
4 Drag the table and drop it in the loading space. Figure 4‑9 shows the SalesData2015 table dragged and dropped in the loading process space.
Figure 4‑9 Dropping a table in the loading space
5 Drag additional tables that you want to link together into the loading space. This example uses a connection to the BIRT Analytics demo data. Figure 4‑10 shows the Demo.Order table dragged to the loading process space.
Figure 4‑10 Dropping a second table in the loading space
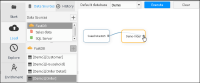
6 Link the tables together by dragging the connector from one table and dropping it on another table. Figure 4‑11 shows the SalesData2015 table linked to the Demo-Order table.
Figure 4‑11 Linking tables together
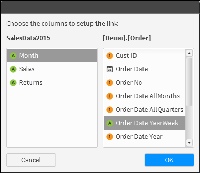
7 When two or more tables are linked together, the link editor appears, as shown in Figure 4‑12. You can define which columns to link or use the link editor suggestions. Choose OK when you finish linking columns together.
Figure 4‑12 Linking columns together
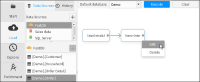
8 You can right-click a table in the loader space and choose Edit to view and change table properties, as shown in Figure 4‑13.
Figure 4‑13 Editing a table before import
9 Table properties appear for the selected table. You can change the import method from creating a new table to creating and overwriting an existing table or appending to an existing table. You can also select the database and table name for the new table.
Double-click in cells that define the table to change a value. For example, to change the data type for Cust ID, double-click in the cell that defines the data type for Cust ID and select a new value. These properties for define how the data imports into FastDB.
Choose OK when you are finished editing the table properties, as shown in Figure 4‑14. If you have changed a property, select an empty cell to save the new value before choosing OK.
Figure 4‑14 Reviewing table properties before import
10 Choose Execute.
11 You can start the data loading process for all data records or to import a selected quantity of records as a sample. Figure 4‑15 shows the data loading confirmation. Choose OK when you are ready to start the data loading process.
Figure 4‑15 Confirming the data loading process
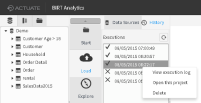
12 Choose OK when the loading process is finished and you can begin to analyze your new data. The new tables appear in the My Data list of data tables and the load history displays the finished load process, as shown in Figure 4‑16.
Figure 4‑16 Accessing the loaded data for analysis
You can double-click the load history execution date for a summary of the load process.
Reviewing data loading history
You can review the history of each data loading process. Right-click a load process to access the following actions:
Choose Open this project to load the data loading definition. Then you can edit or run again the loading process.
Importing from a file
You can import from a supported file types using the following options, shown in Figure 4‑18.
Figure 4‑18 Importing from a file
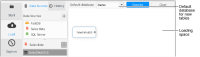
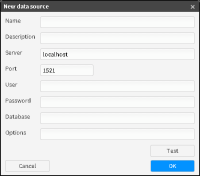
Importing from a database
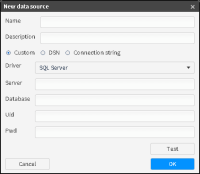
You can import from a supported database using the following options, shown in Figure 4‑19. Verify with your system administrator which database drivers are installed with your BIRT Analytics server. Database data sources support custom SQL queries.
Figure 4‑19 Importing from a database
Importing from an ODBC data source
You can import from an ODBC data source using the following options, shown in Figure 4‑20.
Figure 4‑20 Importing from an ODBC data source
Available ODBC database drivers are shown when Custom data source is selected. ODBC data sources support custom SQL queries.
Importing from BIRT Analytics
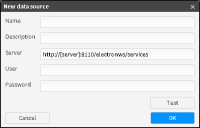
You can import from a FastDB database using the following options, shown in Figure 4‑21. Replace [server] with the name of the server running ApplicationWS, also known as electronws.
Figure 4‑21 Importing from a FastDB database
Importing from BIRT Analytics can be used, for example, to pass data from a testing / development / pre-production machine to a production server.
Importing from an HTTP data source
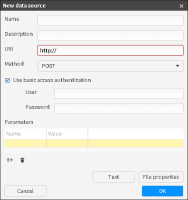
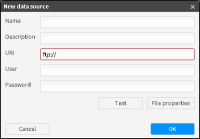
You can import from an HTTP or HTTPS data source using the following options, shown in Figure 4‑22. The supported data format is CSV.
Figure 4‑22 Importing from an HTTP data source
The following HTTP options are available:
POST and GET methods
Basic access authentication
Parameters
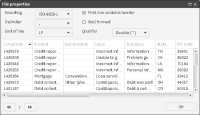
Use Test to verify that a connection can be made. Use File Properties to set the format of the CSV file. Figure 4‑23 shows the file properties of a CSV file accessed by HTTP.
Figure 4‑23 Reviewing file properties for a CSV file
The following file properties are supported for reading a CSV file:
Encoding
Delimiter
End of file
Qualifier
Well formed
First row contains header
Importing from an FTP data source
You can import from an FTP or FTPS data source using the following options, shown in Figure 4‑24. The supported data format is CSV.
Figure 4‑24 Importing from an FTP data source
Creating tables from queries
When your data source is a database or an ODBC connection to a database, you can create a table from a SQL query and import this table into FastDB. You can select data from one or more tables in the data source using a SQL query, such as the following:
SELECT id, name, description FROM customers WHERE customer_age > 18;
After defining the new table you can link it to other tables and import the data into FastDB.
How to create a table from a custom query
These steps use the BIRT Analytics web client and an ODBC connection to a PostgreSQL database.
1 In Load Data Sources, double-click a database. In this example, double-click the ODBC PostgreSQL data source.
2 In the tables of the data source, choose +, as shown in Figure 4‑25.
Figure 4‑25 Adding a table using a custom SQL query
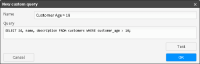
3 In New custom query —Name, type a name for the new table.
4 In New custom query —Query, type a query to build the table from. Figure 4‑26 shows an example query that searches for customers older than 18 years.
Figure 4‑26 Defining a query to build a table
5 Select Test to preview data from your query. Choose OK to add the query-based table to your data source.
6 Drag the query-based table and drop it in the loading space.
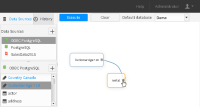
7 Add additional tables to the loading space and link them together. Figure 4‑27 shows a query-based table linked to a database table.
Figure 4‑27 Linking a query-based table to a database table
8 Choose Execute to import the data to your FastDB for analysis. The loading progress shows each table imported.
9 Choose OK to close Loading progress.
10 Verify the new tables appear in your FastDB data tables. Figure 4‑28 shows a query-based table linked to a database table.