BIRT Analytics provides many ways to analyze data. The analyses make it possible to get new perspectives on your organization’s information by crossing various fields, searching for characteristics that are or are not shared by groups, identifying suitable targets for each purpose, showing the evolution over time of different variables, and grouping values in different clusters.
BIRT Analytics supports the following types of data analysis: Crosstabs, Venn diagrams, Bubbles, Evolutions, Profiles, Maps, and Pareto. You can save the definition of the analyses (the means of generating them) for reuse or export them as PDF, CSV or BIRT (.rptdesign) files. Analyses exported as BIRT files are edited in BIRT Designer Professional and published on the BIRT iHub platform.
When you run a saved analysis, any changes in the data appear in the current result of your analysis. You can also share your analyses with other users and user groups.
Analysis tool bars
The main window of each Analysis tool presents a tool bar. Although most operations are available to each analytics tool, some tools have fewer operations than others. In particular, the Evolution, Map and Pareto tools have neither the Export nor the Convert operations in their toolbar. The Convert operation is also not available in the Venn and Profile tools. The following list presents all available toolbar options:
Calculate: Calculate the analysis results in accordance with the set parameters.
Export: Export analysis results after they have been calculated. Depending on the type of analysis, the output format will be a CSV file (Comma Separated Values file), a BIRT file (.rptdesign), or as a new table in a FastDB database.
Analytic DB: Export a crosstab to another FastDB database by creating a new table in the database.
BIRT: Export a crosstab as a BIRT report design file. This file can be displayed in BIRT iHub and edited in BIRT Designer Professional.
File: Export a crosstab as a CSV file
Export visualization: Export the visualization as an image or PDF.
Exporting Charts: Export a chart as a PNG image file from the Chart view.
Export icon: Export your analysis as a PDF file from the Chart view.
Clear: Clear the configuration window of the analysis, leaving it empty.
Convert: Convert one type of analysis to another. For example, in certain cases, you can convert a Crosstab analysis into a Bubble, an Evolution, or a Map analysis.
Save: Save the analysis in a personal folder. If the analysis in question has been saved previously and a change has been made, the existing one will be overwritten and the changes recorded.
Save as: Save the analysis in a personal folder. Here, if you select “Save as”, no existing analysis will be overwritten and the file will be saved as a different analysis.
Use sharing to set access permissions when saving a an analysis. Groups and Users being shared with appear in a list in the sharing panel. A different “person” icon appears beside a user depending on whether or not he/she has read or write permissions, as shown in Figure 4‑29. An icon with a barred cog beside it means that person in the list has no sharing permissions and will not see the analysis being shared. A cog that is not barred indicates “read” permission. An icon without an accompanying cog means that the person has “write” permission.
Figure 4‑29 Setting user access permission
Using the BIRT report design file
Export a BIRT Analytics analysis to a BIRT report design file (rptdesign) when you want to deploy the data to BIRT iHub. You can also use the design file in BIRT Designer Professional to create applications, reports, and visualizations for use in BIRT iHub.
BIRT iHub enables scheduling the collection of the analysis data, using the analysis in BIRT iHub dashboards, embedding the analysis data in web pages using the BIRT iHub JavaScript API, and to export the analysis data to external applications using the BIRT iHub REST API. You can also use the BIRT report design content in other reports or edit the analysis data using BIRT Designer Professional.
For example, export a cross tab as a BIRT report design file (rptdesign). Then load that file in to BIRT iHub to use the analysis data in the BIRT iHub server.
Access to analysis data in BIRT Analytics requires the Open Data Access (ODA) analysis connector for Big Data Analytics. Install the connector into BIRT iHub to deploy the report using BIRT iHub. Install the connector into BIRT Designer Professional to edit a BIRT design file or data object file before the file is deployed to a BIRT iHub server.
The connector uses the Open Data Access framework of Eclipse DTP Project and supports both basic and advanced analysis in Big Data Analytics.
Export to a BIRT report design creates a report with data from the analysis. If you want to export a visualization from BIRT Analytics, export the analysis, such as a Venn diagram, as a PDF or a PNG image. Sample BIRT reports created with the ODA analysis connector are available at the following URL:
HTTPS access to BIRT Analytics using an ODA connector requires BIRT Analytics to use a security certificate signed by a trusted certification authority.
Installing the ODA analysis connector in BIRT Designer Professional
There are two ODA connectors, one to load existing analysis data from BIRT Analytics and another to load data direct from the FastDB engine. These steps discuss the ODA connector to load data from an existing analysis.
1 Download the ODA connector file ODA_BIRT_Analytics.zip from the following URL:
3 Copy the following files to the plugins folder of your BIRT Designer Professional. In Windows this folder is located at C:\Actuate3\BDPro\eclipse\plugins.
Copy all of the files in the dependencies folder, such as commons-codec-1.10.jar, org.apache.commons.codec_1.6.0.v201305230611.jar, and org.apache.commons.logging_1.1.1.v201101211721.jar. If you are asked to replace an existing file in your BIRT Designer Professional installation choose skip.
4 Restart BIRT Designer Professional.
Editing a rptdesign file from BIRT Analytics
These steps require that the BIRT Analytics ODA analysis connector is installed in BIRT Designer Professional.
1 Import the rptdesign file that you exported from BIRT Analytics.
2 Open the report in BIRT Designer Professional
3 Verify that the Data source and Data sets appear correctly in the Data Explorer, as shown in Figure 4‑30. If the Data Source does not appear correctly, verify that you have installed the ODA Connector
Figure 4‑30 Verifying the Data Source and Data Set appear
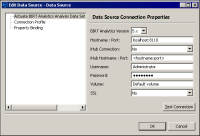
4 Open the data source to verify the connection properties are correct, as shown in Figure 4‑31. Reports exported from BIRT Analytics set the hostname to localhost.
Figure 4‑31 Verifying the data source connection properties.
Update any configuration changes necessary to connect to your installation of BIRT Analytics:
If BIRT Analytics is installed on a different computer, replace localhost with the IP address or computer name of the computer running BIRT Analytics.
If you are using a specific user account to access the BIRT Analytics results change the username and password.
If your BIRT Analytics server uses a secured HTTPS connection set SSL to Yes and change the port number used to access the secured connection. This is often port 8109.
5 Choose Test Connection to verify that network connectivity to BIRT Analytics is available. If the connection test fails, verify the hostname of the computer running BIRT Analytics and that a network firewall is not blocking access to the 8110 port used by BIRT Analytics.
6 Close Edit Data Source by choosing OK.
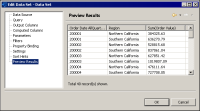
7 Open Data Set and select Preview Results. This loads the data set from BIRT Analytics. Figure 4‑32 shows an example data set connected to BIRT Analytics. This verifies that the BIRT Analytics server is accessible and that the results of the analysis is available.
Figure 4‑32 Verifying the results of an the analysis are available
8 Close Edit Data Set by choosing OK.
9 Run the report. Save the report if you made any changes to it.
Using analysis results from BIRT Analytics
These steps require that the BIRT Analytics ODA analysis connector is installed in BIRT Designer Professional.
1 Open a new, blank report.
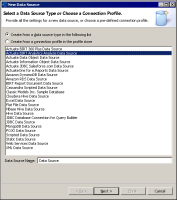
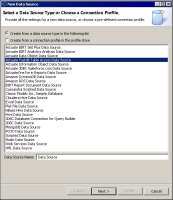
2 Create a new data source and select the Actuate BIRT Analytics Analysis Data Source, as shown in Figure 4‑33.
Figure 4‑33 Creating a new data source to access BIRT Analytics
Choose Next.
3 Set the correct connection properties to access your BIRT Analytics server:
Select the version of BIRT Analytics that you will access.
In Hostname:port type the hostname and port of the BIRT Analytics server
In Username type the name of a user account on the BIRT Analytics server
In Password type the password of the user account.
If the BIRT Analytics server uses a secured connection, set SSL to Yes.
4 Choose Test Connection to verify that a connection to the BIRT Analytics server is possible with the connection properties.
5 Choose Finish to complete the data source configuration.
6 Create a new data set and select the BIRT Analytics data source that you created.
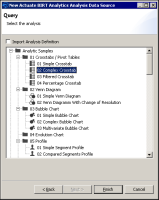
7 Select an existing analysis in the BIRT Analytics server, as shown in Figure 4‑34.
Figure 4‑34 Selecting an existing analysis in BIRT Analytics
Choose Finish to create the new data set. Edit Data Set appears.
8 In Edit Data Set, select preview results to verify the data is correct. Choose Finish.
9 Use the data set in your report design.
Installing the ODA analysis connector in BIRT iHub
There are two ODA connectors, one to load existing analysis data from BIRT Analytics and another to load data direct from the FastDB engine. These steps discuss the ODA connector to load data from an existing analysis.
1 Download the ODA connector file ODA_BIRT_Analytics.zip from the following URL:
3 Copy the following files to the BIRT plugins folder of your BIRT iHub. If you are asked to replace an existing file in your iHub installation choose no.
The BIRT plugins folder is in the following location:
ACTUATE_HOME\iHub\Jar\BIRT\platform\plugins
Replace Actuate Home with the installation location of BIRT iHub. In Windows this folder is located at C:\Actuate3\BIRTiHubVisualization\modules\BIRTiHub\iHub\Jar\BIRT\platform\plugins. If you are asked to replace an existing file choose skip.
4 Restart the BIRT iHub service.
Using FastDB data in a BIRT design
You can analyze data sets directly from the BIRT Analytics FastDB in BIRT iHub using the ODA FastDB connector. BIRT iHub enables scheduling the creation of reports, using BIRT iHub dashboards to explore data, embedding data in web pages using the BIRT iHub JavaScript API, and to export the data to external applications using the BIRT iHub REST API.
The ODA FastDB connector supports one or more filters to limit the data retrieved from FastDB. After the first filter, additional filters use the “AND” operator to link the second and additional filters. Filters support a report input parameter when the value of the filter is set to the following string:
?parameterName?
Download and install the Open Data Access (ODA) FastDB connector for Big Data Analytics to access FastDB tables of data. Install the connector into BIRT Designer Professional to edit a BIRT design file or data object file before the file is deployed to a BIRT iHub server.
HTTPS access to BIRT Analytics using an ODA connector requires BIRT Analytics to use a security certificate signed by a trusted certification authority.
Installing the ODA FastDB connector in BIRT Designer Professional
There are two ODA connectors, one to load existing analysis data from BIRT Analytics and another to load data direct from the FastDB engine. These steps discuss the ODA connector to load tables of data from FastDB.
1 Download the ODA connector file ODA_BIRT_Analytics.zip from the following URL:
3 Copy the following files to the plugins folder of your BIRT Designer Professional. In Windows this folder is located at C:\Actuate3\BDPro\eclipse\plugins.
Copy all of the files in the dependencies folder, such as commons-codec-1.10.jar, org.apache.commons.codec_1.6.0.v201305230611.jar, and org.apache.commons.logging_1.1.1.v201101211721.jar. If you are asked to replace an existing file in your BIRT Designer Professional installation choose skip.
4 Restart BIRT Designer Professional.
Using FastDB tables in a BIRT design
These steps require that the ODA FastDB connector is installed in BIRT Designer Professional.
1 Open a new, blank report.
2 Create a new data source and select the Actuate Fastdb Table Access Data Source, as shown in Figure 4‑35.
Figure 4‑35 Creating a new data source to access FastDB tables
Choose Next.
3 Set the correct connection properties to access your BIRT Analytics server:
In FastDB address type the hostname of the BIRT Analytics server.
In Port type the TCP port of the BIRT Analytics server.
In Username type the name of a FastDB user account.
In Password type the password of the FastDB user account.
In Rows per Page, type the numbers of rows to retrieve in each call to FastDB. FastDB returns information in a pagination mode.
If the BIRT Analytics server uses a secured connection, set SSL to Yes.
4 Choose Test Connection to verify that a connection to the BIRT Analytics server is possible with the connection properties.
5 Choose Finish to complete the data source configuration.
6 Create a new data set and select the BIRT Analytics data source that you created.
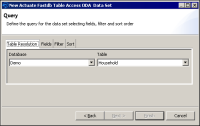
7 In Table Resolution, select a table from the BIRT Analytics FastDB server, as shown in Figure 4‑36.
Figure 4‑36 Selecting a FastDB table
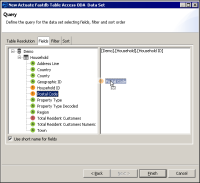
8 In Fields drag the fields you want to retrieve from the table and drop them on the loading space. The fields you select appear in text format that identifies the origin of the field, such as [Demo].[Household].[Household ID]. Figure 4‑37 shows an example of selecting a field to load into the report.
Figure 4‑37 Selecting fields to retrieve from a FastDB table
Optionally select Filter or Sort to manage the fields you load.
Choose Finish to create the new data set. Edit Data Set appears.
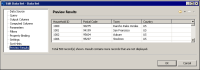
9 In Edit Data Set, select preview results to verify the data is correct. Choose OK, as shown in Figure 4‑38.
Figure 4‑38 Previewing results from FastDB
10 Use the data set in your report design.
Installing the ODA FastDB connector in BIRT iHub
There are two ODA connectors, one to load existing analysis data from BIRT Analytics and another to load data direct from the FastDB engine. These steps discuss the ODA connector to load tables of data from FastDB.
1 Download the ODA connector file ODA_BIRT_Analytics.zip from the following URL:
3 Copy the following files to the BIRT plugins folder of your BIRT iHub. If you are asked to replace an existing file in your iHub installation choose no.
The BIRT plugins folder is in the following location:
ACTUATE_HOME\iHub\Jar\BIRT\platform\plugins
Replace Actuate Home with the installation location of BIRT iHub. In Windows this folder is located at C:\Actuate3\BIRTiHubVisualization\modules\BIRTiHub\iHub\Jar\BIRT\platform\plugins. If you are asked to replace an existing file choose skip.
4 Restart the BIRT iHub service.
Using ODA connectors and HTTPS
For the purpose of testing the ODA drivers using HTTPS, BIRT Analytics provides a self-signed security certificate using the computer name localhost. To use this certificate, install BIRT Analytics and BIRT Designer Professional on the same computer as BIRT iHub. If you want to use ODA connectors and HTTPS to access BIRT Analytics on a different computer, you must to make your own self-signed certificate and trust it or use a certificate signed by a certificate authority. Check with your system administrator how they have secured your installation of BIRT Analytics.
A secured HTTPS connection with an ODA connector requires that your computer trusts the security certificate used by BIRT Analytics. Commercial security certificates are signed by a certificate authority that your computer trusts. A self-signed certificate, such as the certificate used in the trial version of BIRT Analytics, is not trusted by your computer. Without this trust, the ODA connector cannot use HTTPS to communicate with your BIRT Analytic server.
You can enable a computer to trust of a self-signed certificate by creating a Java Secure Socket Extension certificate (JSSECACERTS) file.
Trusting a self-signed certificate in BIRT Analytics
The following steps create a jssecacerts file that enables your system to trust a self-signed certificate. This task is required to use the ODA connector with the self-signed certificate included with BIRT Analytics or if you use your own self-signed certificate:
1 Download and install the Java JDK 1.7 from Oracle
2 Download InstallCert.java from the following URL:
3 Compile the InstallCert.java file with the following command:
javac InstallCert.java
4 Run the InstallCert class and add the URL and port. For example, if you have installed BIRT Analytics on the same machine you are running BIRT Designer Professional or BIRT iHub, use the following command:
java InstallCert localhost:8109
5 Type 1 when asked to enter certificate to add to trusted keystore or ‘q’ to quit. This process generates a file named jssecacerts.
6 Copy this jssecacerts file to your Java_Home\jre\lib\security folder. For example, in a Windows installation of BIRT Designer Professional this folder is in the following location:
C:\Actuate3\BDPro\eclipse\jre\lib\security
In a Windows installation of BIRT iHub, this folder is in the following location: