Running a campaign includes the following activities:
Planning
Configuring
Starting
Managing
Executing
Reviewing
This section describes how to start, manage, and execute a campaign that is already planned and configured.
Starting a campaign
Before starting a campaign, lock the campaign to block any changes to campaign properties. Then, start the stage and workflow that contains the first campaign activity or action.
How to start a campaign
1 Choose Campaign Workflow—Planning.
2 In Planning, expand Strategies.
3 Select and expand a specific strategy, if necessary.
4 In a specific strategy, double-click a campaign to open it for editing. You can also do this by making a right-click it and choose Modify campaign.
5 To prevent changes to campaign properties, in Campaign detail, choose Lock.
6 Select Stage actions and choose Start campaign.
7 In Workflow, select the workflow that includes the first action in the campaign.
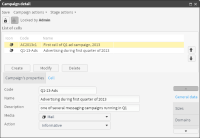
8 Choose OK. The current workflow and stage appear in Campaign detail, as shown in Figure 7‑30.
Figure 7‑30 Examining the Campaign Manager workflow in stage 1 of a campaign
Managing campaign stages
You can manage and monitor campaign stages and workflows manually. You can also automate many actions in a campaign by definition. The following procedure summarizes the processes completed in a typical campaign.
1 Start campaign.
2 Start initial workflow.
3 Start initial stage.
Cells defined in a stage execute, according to defined properties.
4 Start next stage.
5 Start next workflow.
6 Repeat steps 4–5 until all tasks in all stages and workflows have completed.
7 Execute campaign.
8 Evaluate campaign results.
How to manage stages in a campaign
1 In Campaign detail, select Stage actions and make one of the following choices:
To start a subsequent stage, choose Next stage.
If you do not have permissions required to execute a stage, choose Accept in the message describing the permissions you lack.
To review a preceding stage, choose Previous stage.
To review a list of transitions between stages, choose Show History.
2 To close Campaign History, choose OK.
How to evaluate a campaign
1 Log in to BIRT Analytics as a user who has the Evaluate permission.
2 In Campaign detail, select Campaign actions and choose Evaluate.
3 In Results of the evaluation, examine the following levels of information:
To see details of records generated during completed stages, choose Table.
To see a summary of records generated by each completed cell, choose Chart.
Viewing campaign summaries
Campaign management supports viewing summary information using a Gantt chart display. This view presents a time‑line background on which multiple campaigns appear. Options include viewing a summary of all campaigns, or only campaigns having current activity.
How to view campaigns on a Gantt chart
1 Choose Campaign Workflow—Campaigns Management.
2 In List of campaigns, select All campaigns, then choose Refresh.
3 To view information about a selected campaign, select one of the following options:
To limit campaigns appearing on the Gantt chart to only active ones, in List of campaigns, select Current.
To view information about a campaign, hover the cursor over a campaign icon on the chart.
To view details for a campaign, double‑click the image for a single campaign on the Gantt chart.
Executing a campaign
Executing a campaign completes the set of campaign activities. Executing a campaign loads all data generated to date by campaign activities into the history and response database tables defined for the campaign.
How to save campaign results and responses in a database table
1 After all stages in all workflows complete, select Campaign actions and choose Execute.
2 In Execution options, to manage loading data in the Workflow history table, select one of the following options:
To create a file containing all campaign result records, select Just generate file.
To load campaign result records in your database, select Generate file and load it on history table.
To delete cached result records after loading them in the history table, select Generate file, load it and remove it.
3 To generate response records in a file, select Campaign actions and choose Response.
How to review campaign results
1 To explore a column in CWorkflow, drag the column from My Data, or a segment from Discrete Values and drop it in Data Explorer.
2 To view summary of history records for this campaign in Data Explorer, choose Summary.
3 To view details about the response records for this campaign in Data Explorer, choose Record view.