Creates a dynamic decoding column. You can decode any column that contains up to 100 discrete values. For example, gender is usually encoded as M and F, or even as 0 and 1. BIRT Analytics makes it possible to change the name to something more recognizable, such as Male and Female.
A Decode instruction must have the following syntax:
The name of the file containing decoding values. The file format must comply with the text file formats supported by BIRT Analytics Loader. Use the File Upload icon in the Files panel of in the Data tab to upload the decoding file and make it available in BIRT Analytics Loader.
Code position in file
The position of a code in the file.
Decode position in file
The position of a decoding value in the file.
Encoding
Defines the file encoding.
End line
The end‑of‑line character. Select a character from the drop-down list.
Delimiter
Separates the values in the file. Select a delimiter from the list of supported characters.
Qualifier
Surrounds the values in the file. Select a qualifier from the list of supported characters.
How to create a decoding column
Before creating a new decoding column, you must create a text file with the decoding values and deploy the file to BIRT Analytics Loader.
1 In the Transform tab, choose “New”. The list of transformation instructions appears.
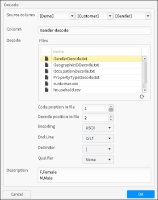
2 In the list of transformation instructions, select DECODE. Decode appears, as shown in Figure 5‑11.
Figure 5‑11 Creating a decoding column
3 In the Source column fields, select a database, table, and column name from the drop‑down lists.
4 In the Column field, type a name for the new column.
5 In the Files panel, select a file with decoding values. In this example, decode-gender.txt contains the following two comma‑separated columns with the following coding and decoding values:
F,Female
M,Male
6 In the Code position in file field, type or select the number of the code column in the file. In this example, the position of the code is 1.
7 In the Decode position in file field, type or select the position of the decoding column. It is 2 in this example.
8 In the End line field, select the end line character used in the file from the drop-down list.
9 In the Delimiter field, select the delimiter used in the file from the drop-down-list.
10 In the Qualifier field, select the qualifier from the list.
11 In the Description panel, type a description of the column.
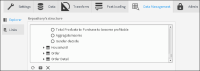
12 Click on the OK button at the bottom of the Decode screen. The Decode instruction appears in the list of transformation commands, as shown in Figure 5‑12.
Figure 5‑12 Creating a Decode instruction
13 Click on the Save tool at the top of the Loader Project screen to save the project.
14 Run the project to validate the new column that was created.
1 Go to the Explorer in the Data Management tab to select your database and expand the list of tables.
2 Double-click the table you added the column to. The new decode column, in this example “Gender-decode”, appears in the list of columns as shown in Figure 5‑13.