A quantile range dynamic column is created from a numeric column. QUANTILE creates groups that contain the same number of values. These groups are created by sorting the values in ascending order so that the first range contains the smallest values and the last range contains the largest values. For example, you can identify customers that generate the greatest profit.
A Quantile instruction must have the following syntax:
Syntax
QUANTILE [Source column] [Target column] [Number of parts] ([Filter])
Parameters
Source column
Defines a numeric column.
Target column
Defines the name of the new target column.
Number of parts
Defines the parts the data must be grouped into.
Filter
Defines a domain, if the data requires filtering.
How to create a quantile range column
The following example describes how to create a quantile column that creates four groups that span the range of income values found in a set of customer records. Table 5‑8 lists the resulting quantile ranges and the customer records in each range.
Table 5‑8 Quantile ranges
#
Income range
Number of records
1
479-14081
56232
2
14082-19627
56232
3
19628-36390
56232
4
36391-113334
56232
1 In the Transform tab, choose “New”. The list of transformation instructions appears.
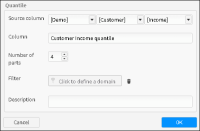
2 In the list of transformation instructions, choose QUANTILE. The Quantile screen appears, as shown in Figure 5‑27.
Figure 5‑27 Creating a quantile column
3 In the Source column fields, select a database, a table, and a numeric column.
4 In the Column field, type the name of the new column.
5 In the Number of parts field, use the arrows to provide quantiles, groups, or ranges that the column will contain.
6 Click on the Filter field to define a domain, if you need to filter the data.
7 Click “OK” in the Quantile screen to confirm your choices and go back to the main Transform tab screen. The Quantile instruction appears in Main file.
8 Save the project.
9 Run the instruction without loading data.
1 In Main file, select each instruction. Then choose (-) to make them inactive, as shown in Figure 5‑28.
2 Remove the selection for the Load box in the Data tab, as shown in Figure 5‑28.
Figure 5‑28 Removing the Load selection
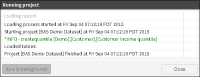
3 Run the project. Messages describing each stage of the project appear in the Running project screen, as shown in Figure 5‑29.