Defines the object to where the data is exported. The export target can be:
Analytical database and table
Defines new or existing database and table names.
CSV file (with the following delimiters available: coma, colon, semicolon, at, sharp, quote, plus, minus, apos, tilde)
Defines a CSV file name. Columns are delimited by the pipe (|) character. The file is stored in:
C:\Program Files\BIRTAnalytics\data\FastDB
Fixed‑length file
Defines a file name. The columns have fixed length and the file is saved in:
C:\Program Files\BIRTAnalytics\data\FastDB
Query resolution table
Defines the table you are exporting data from.
Query columns
Defines the query columns. Each column must be defined on a separate line, using the full name in the following format:
[Database].[Table].[Column]
To export the whole table, do not define columns.
Filter
Defines a domain you are using to filter the data. Filter is a required parameter.
How to export to a database
You have to choose the database where you want the new table to be created, the name of the new table, and the columns to be created in the destination table.
1 In the Transform tab, choose “New”. The list of transformation instructions appears.
2 In the list of instructions, choose EXPORT. The Export screen appears, as shown in Figure 5‑42.
Figure 5‑42 Exporting data to a table
3 In the Export target options, select Table. As you can see in Figure 5‑42, several fields are not activated for this option.
4 In the Export target fields, type the new database and table names either by typing them into the fields or selecting them from the drop-down lists.
5 In the Resolution table fields, select the table from which you want to export data.
6 In the Enter columns field, type the name of the columns, using the required format. Leave it empty if you want to export the whole table. You can double-click in the field to open a text editor and type the column list.
7 Click on the Click to define a domain field to define a domain that would filter the data. Defining a domain is required.
8 In the Description field, type a short description of the instruction’s purpose.
9 In the Order by panel, choose the column that you want to sort with and the direction of the sort: ascending or descending.
10 Click “OK” to confirm your choices and go back to the main Transform screen.
11 Save the project.
12 Run the Export instruction.
13 To verify the export, go to Explorer in the Data tab and refresh the database. The new table with the chosen column data should appear.
How to export data to a text file
1 In the Transform tab, choose “New”. The list of transformation instructions appears.
2 In the list of transformation instructions, choose EXPORT. The Export screen that we worked with in Figure 5‑42 appears again. This time choose “CSV file” as your Export target and type the name of your CSV file in the Target field at the top.
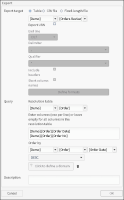
3 Now the previously disabled CSV configuration fields are accessible and need to be filled in as in figure Figure 5‑43. Here we chose “CrLf” for the End line entry, the “pipe” symbol (|) for the Delimiter entry and a quotation mark (“) for the Qualifier entry.
Figure 5‑43 Exporting data to configured CSV file
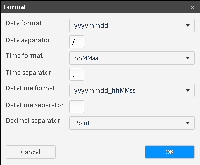
4 Click on the Define formats field to open the Format screen and define your desired formats as shown in Figure 5‑44. Here you can set your local date, time and datetime formats if needed.
Figure 5‑44 Defining your local date, time and datetime formats
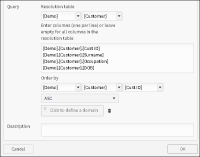
5 Fill in the rest of the fields, as shown in Figure 5‑45.
Figure 5‑45 Entering the Export information
6 In the Resolution table fields, select the table from which you want to export data.
7 In the Enter columns field, type the name of the columns, using the required format. Leave it empty if you want to export the whole table.
8 Click in the Click to define a domain field to define a domain that would filter the data, as shown in Figure 5‑46. Defining a domain is required.
Figure 5‑46 Selecting domain information
Choose OK when you finished defining the domain.
9 In the Description field, type a short description of the instruction’s purpose.
10 Click “OK” to confirm your definition choices.
11 Save the project.
12 Run the Export instruction. The exported file is now saved on the machine where BIRT Analytics Loader is installed. The file is located in:
C:\Program Files\BIRTAnalytics\data\FastDB
As you can see in the sample of the file contents, the chosen file formats have been respected:
13|Lilly|OW|19420709
21|Aucote|PR|19620113
53|Wathers|SE|19560606
58|Lampit|MW|19610818
How to export to a fixed‑length file
1 In the Transform tab, choose “New”. Then choose EXPORT in the list of transformation instructions that appears.
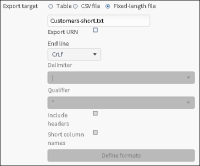
2 The same Export screen that we worked with in the previous Export procedures, shown in Figure 5‑42, appears again. This time choose “Fixed length file” as your Export target and type the name of this target file in the Target field at the top.
3 Now the End line field is accessible and needs to be filled in as in Figure 5‑47. Here we chose “CrLf” for the End line entry and “Customer-short.txt” as the name of the Target file.
Figure 5‑47 Exporting data to a fixed‑length file
4 Fill in the rest of the fields as shown in Figure 5‑48.
Figure 5‑48 Entering the Export information
5 In the Resolution table fields, select the table from which you want to export data.
6 In the Enter columns field, type the name of the columns, using the required format. Leave it empty if you want to export the whole table.
7 Click in the Click to define a domain field to define a domain that would filter the data, as shown in Figure 5‑50. Defining a domain is required.
Figure 5‑49
8 In the Description field, type a short description of the instruction’s purpose.
9 Click “OK” to confirm your definition choices.
10 Save the project.
11 Run the Export instruction. The exported file is saved on the machine where BIRT Analytics Loader is installed. The file is located in:
C:\Program Files\BIRTAnalytics\data\FastDB
12 The file format uses fixed length for saving the data column, as shown in the following file sample, as shown in Figure 5‑51.