BIRT Analytics Loader supports connections to relational databases and flat files. Data source connections are accessible across multiple projects associated with the same user. File connections are associated only with the project where they are defined. You cannot share file connections across multiple projects.
Connecting to databases
You can create and name any number of data source connections for your load process. The data sources can be of different types. For example, a load process can use data from a database and data from a flat file repository. Each type of data source requires different connection information.
BIRT Analytics Loader connects to databases using both native and ODBC drivers. BIRT Analytics Loader supports native drivers for the following database types:
Microsoft SQL Server
MySQL Database Server
Oracle Database
PostgreSQL
Use an ODBC driver to connect to a data source not supported by BIRT Analytics Loader. After installing the driver and configuring an ODBC connection, you can access data from the data source.
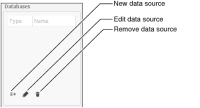
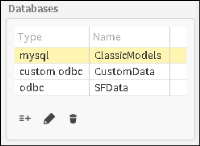
In BIRT Analytics Loader you can define a new data source, edit an existing one, or remove a data source by clicking on the corresponding icon, as shown in Figure 3‑2.
Figure 3‑2 Managing data sources
Updating data source definitions
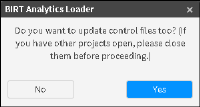
Choose Edit data source to update data source definitions. You also need to update the related table definitions. When you save your changes after updating, the following message appears asking you to confirm the updating operations, as shown in Figure 3‑3.
Figure 3‑3 Updating data source definitions and their related tables
Sharing data sources
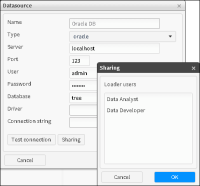
This option makes it possible to share data sources with other Loader users, whether using ODBC or Native drivers. This is done via the “Sharing” button which is available when you are editing an existing data source definition. Clicking on the “Sharing” button opens a window where you can select the Loader users that you want to share with. (See Figure 3‑4).
Figure 3‑4 Sharing data source access with selected users
Testing a Datasource connection
You can test the connection to an external database when you are creating or editing an existing data source. Figure 3‑5 shows the option to test a database connection.
Figure 3‑5 Testing a data source connection
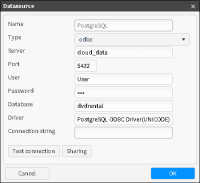
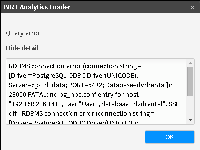
Errors returned from the database are displayed. Figure 3‑6 shows the results of a connection error to a PostgreSQL database configuration. After correcting the error you can retry the connection test. Other error types can be:
Authentication error
Host not found
Server not responding
ODBC driver not found
Native database client not found
Figure 3‑6 Reviewing a database connection error
Using native drivers
Before creating a connection using a native driver confirm the driver is installed on the computer running Loader. For example, verify if the path to the driver is in the System Path. To see the System Path using the Windows command line use the following command:
echo %PATH%
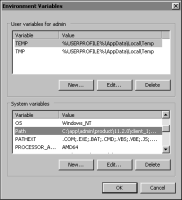
To see the System Path using the Windows Control Panel➛System➛Advanced System Settings➛Environment Variables➛Path, as shown in Figure 3‑7.
Figure 3‑7 Editing Path variable
To create a data source connection, provide the database connection information, as shown in Table 3‑1. Contact your database administrator to obtain this information.
Table 3‑1 Database connection properties
Property
Description
Name
The name of the database connection, which must be unique
Type
The type of connection, selected from the values in the drop-down list
Server
The database server, which can be a machine name or an IP address
Port
The connection port
User
A valid user name to connect to the database
Password
A valid password to connect to the database
Database
The name of the database
Driver
The driver name, required for ODBC drivers only
Connection string
Custom connection properties, required for custom ODBC drivers only
Downloading native database drivers
The following locations contain native database drivers:
MS SQL Server client software, SQLServer2008R2SP2-KB2630458-x64-ENU.exe
How to connect to a database using a native driver
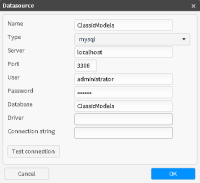
1 In Databases, choose the New datasource icon. Datasource appears, as shown in Figure 3‑8.
Figure 3‑8 Using a native driver
2 In Datasource, define the following properties:
In Name, type a unique name. Using a name that describes the database content helps identify different databases you define as data sources.
In Type, select the source database type from the list of available types. In this example, mysql is the source database type.
In Server, type the name of the server that hosts the source database. In this example, an IP address identifies that server.
In Port, type the connection port. The mysql database installation in this example uses the default port 3306.
In User, type a valid user name defined for the source database.
In Password, type a valid password defined for the source database.
In Database, type the name of a database that contains source data.
In Driver, optionally type a native driver name, or type no characters. A connection that uses a native driver requires no name.
In Connection string, optionally add any parameters you want to send to the data source.
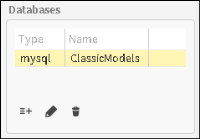
3 Choose OK to create the named data source connection. A new data source connection name and type appear in the Databases panel, as shown in Figure 3‑9.
Figure 3‑9 Reviewing a data source from a native database driver
Using ODBC drivers
Creating a connection using an ODBC driver is very similar to the native driver connections. The difference is that you must provide a driver name as a connection property. As well as the predefined ODBC data source types, a custom ODBC data source is available. To use the custom ODBC data source, you must type the required connection parameters as a text value.
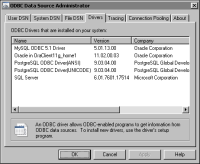
To determine the name of your ODBC driver, open Control Panel➛ODBC Data Source Administrator. The driver name appears in the Drivers tab, as shown in Figure 3‑10.
Figure 3‑10 Finding an ODBC driver name
Downloading ODBC drivers
The following locations contain ODBC database drivers:
1 In Databases, choose the + sign. Datasource appears.
2 Define the following properties for a standard ODBC data source, as shown in Figure 3‑11:
Figure 3‑11 Using an ODBC driver
In Name, type a unique name. Using a name that describes the database content helps identify different databases you define as data sources.
In Type, select odbc from the list of available connection types.
In Server, type the name of the server that hosts the source database. In this example, a machine name, CloudHosting, identifies that server.
In Port, type the connection port. The mssql database installation in this example uses the default port, 1433.
In User, type a valid user name defined for the source database.
In Password, type a valid password defined for the source database.
In Database, type the name of a database that contains source data.
In Driver, type the driver name, as defined in the ODBC Data Source Administrator. In this example, the name of the ODBC Microsoft SQL Server driver is SQL Server.
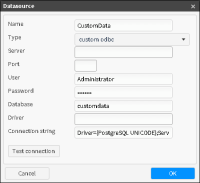
Alternatively, for a custom ODBC data source, define the following properties, as shown in Figure 3‑12:
Figure 3‑12 Custom ODBC driver
In Name, type a unique name. Using a name that describes the database content helps identify different databases you define as data sources.
In Type, select Custom ODBC from the list of available connection types.
In User, type a valid user name defined for the source database.
In Password, type a valid password defined for the source database.
In Database, type the name of a database that contains source data.
In Connection string, type the parameters required to connect to the custom data source.
3 Choose OK to create the named data source connection. A new data source connection name and type appear in the Databases panel, as shown in Figure 3‑13.
Figure 3‑13 Reviewing Database connections
Connecting to files
BIRT Analytics Loader can access data from a text file, or flat file, that conforms to a defined and consistent structure. These files are typically generated by business systems and applications that create logs. These files can also be spreadsheets saved as comma‑separated values (CSV) files. Before using text file data in a load process, confirm the file uses a valid structure. There is no limit to the size of text files.
BIRT Analytics Loader supports the following options for defining flat file data sources:
Loading a file from a local system folder
Loading a CSV file from a remote system using FTP or HTTP
Loading multiple files using a file list
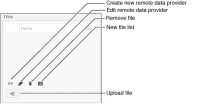
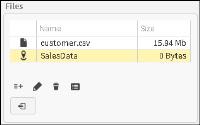
In the Files panel located in the Data tab of your BIRT Analytics Loader project, you can manage data uploads from data files stored on local and remote systems, using the toolset shown in Figure 3‑14.
Figure 3‑14 File data sources
To access your text files you must know the file name and location.
Loading local files
After selecting the file from your local file system, it uploads into the data folder of your load project. There are no file size limitations. See Creating a load transaction for more information about character encoding and end of line methods if you are unsure how to identify these values in your file.
How to upload a file from a local file system
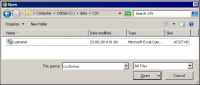
1 In the Files panel, choose the upload icon. The File Upload screen from your operating system appears, as shown in Figure 3‑15.
Figure 3‑15 Uploading a local file
2 In File Upload, navigate to the folder where the file is located.
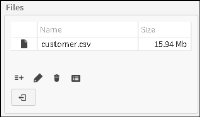
3 Select the file and choose Open. The file appears in the Files panel, as shown in Figure 3‑16. The local file is stored in the data folder of your project.
Figure 3‑16 Creating a local file data source
Loading remote files
The Remote data provider option enables you to load CSV files using a Uniform Resource Identifier (URI) such as a web address. After selecting the file transfer protocol such as FTP or HTTP, you select the transfer method. The transfer method options are GET and PUT.
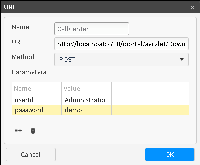
For example, to load a CSV file from a BIRT iHub server you POST a URL request for the file such as the following:
Add parameters for the user authentication as parameters. Figure 3‑17 shows a URI to download a CSV file stored in a BIRT iHub server. You can add additional parameters and values that your remote data provider supports, such as location and date for a web site that offers weather information.
Figure 3‑17 Loading a CSV file from a server using HTTP
How to load a file using the URI screen
1 In Files, select the Create a new remote data provider icon. The URI screen appears.
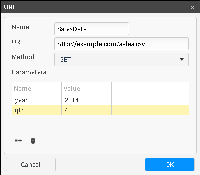
2 In URI, type the following information, as shown in Figure 3‑18:
In Name, type the name you want to assign to this data source.
In URI, type the URL that specifies the file location or the URL that generates the file.
In Method, select the method for obtaining the file. Contact the file provider to identify the method.
In Parameters, type any required parameters. Some web services support selecting data using parameters such as a location name or date.
To add a parameter, choose Add new parameter icon again, near the bottom of the URI screen.
In Name, type the parameter name. In Value, type the parameter value, as shown in Figure 3‑18.
To modify a parameter, select a column and change the entry.
To remove a parameter, Click Trash next to the Create a new remote data provider icon.
Figure 3‑18 Providing URI properties
3 Choose OK. The new remote file data source appears in the Files panel, as shown in Figure 3‑19.
Figure 3‑19 Reviewing remote file data sources
Loading files using a file list
On many occasions, due to a large data volume, it is convenient to break the data into multiple files. In such cases you must use a file list to create a file data source and upload the data into a single table.
How to load files using a file list
1 In the Files panel, upload all the files you want to include in a list, the same way you upload local files.
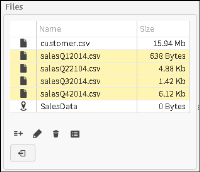
2 Press and hold the Ctrl key while using the mouse to select multiple file names, as shown in Figure 3‑20.
Figure 3‑20 Selecting multiple data source files
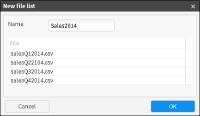
3 In the Files panel, choose the New file list iconat the bottom of the panel. The File names that you selected in step 2 appear, as shown in Figure 3‑21.
Figure 3‑21 Naming a file list
4 In the Name field, type a name for data source of the new list file, then choose OK.
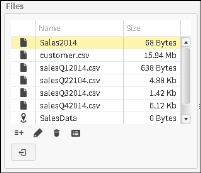
The list file data source appears in the Files panel, as shown in Figure 3‑22.