The mapping process requires defining the source and the target data. The software enables you to validate the data connection and create the table column definitions. You can automatically import the target table structure from the source file or manually create the column definitions. When the table structure does not map the source file data precisely, the loading process cannot identify the data to load for each table column and finishes unsuccessfully.
To map data from files you need to complete the following procedures:
To define the target database table and the way the data is loaded, you need to open the Table Declaration screen by clicking on the New from file button in the Options panel of the Data tab.
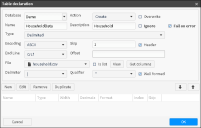
Fill in the fields of the Table declaration screen as shown in Figure 3‑25:
Figure 3‑25 Creating a table mapping to a file
Action
For complete loads, choose “Create”, for incremental loads choose “Append”.
Database
Type a name for the target database, or select a listed database name.
Fail on error
Stop processing the table if there is an error. This is the same as the On error parameter when the table is viewed in the Data tab.
Ignore
Disable processing of the table when this option is enabled. This is the same as the Action parameter when the table is viewed in the Data tab or the Transform tab.
Description
Optionally, type characters that describe the target data table.
Name
Type a unique name for a target data table.
Overwrite
Replace an existing table with the same name with the new table.
Defining a source file format
Based on your knowledge of source file properties, select formatting properties that most closely match those of the source file. More accurately selecting source file properties minimizes manual definition of target table properties.
Type
Select the file type. The files can be flat, or delimited. The flat files do not have delimiters and qualifiers.
Encoding
Select an encoding type from the list. Table 3‑2 lists and describes the file encoding types that BIRT Analytics supports.
Table 3‑2 Supported encoding
Encoding
Description
ASCII
American Standard Code for Information Interchange
CP1252
Windows Latin-1
BIG5
Chinese character encoding method used in Taiwan, Hong Kong, and Macau for Traditional Chinese characters
BIG5-HKSCS
Standard supplementary character set used for information exchange in Chinese between the public and the Hong Kong SAR Government
CP1252
Windows Latin-1
GB18030
Chinese government standard describing the required language and character support necessary for software in China
GB2312
Official character set of the People’s Republic of China, used for simplified Chinese characters
GBK
An extension of the GB2312 character set for simplified Chinese characters, used in the People’s Republic of China
ISO-8859-1
ISO 8859-1, Latin Alphabet No. 1
ISO-8859-2
Latin Alphabet No. 2
ISO-8859-3
Latin Alphabet No. 3
ISO-8859-4
Latin Alphabet No. 4
ISO-8859-5
Latin/Cyrillic Alphabet
ISO-8859-6
Latin/Arabic Alphabet
ISO-8859-7
Latin/Greek Alphabet
ISO-8859-8
Latin/Hebrew Alphabet
ISO-8859-9
Latin Alphabet No. 5
ISO-8859-13
Latin Alphabet No. 7
ISO-8859-15
Latin Alphabet No. 9
UTF8
8-bit UCS Transformation Format
UTF16
16-bit UCS Transformation Format, byte order identified by an optional byte-order mark
UTF16LE
16-bit Unicode Transformation Format, little‑endian byte order
UTF16BE
16-bit Unicode Transformation Format, big‑endian byte order
WINDOWS-1252
Windows Latin-1
End Line
Select an end-of-line character from the list. Table 3‑3 lists and describes the end-of-line characters and results supported by BIRT Analytics Loader.
Table 3‑3 End-of-line characters and results
End-of-line character
Result description
CRLF
Carriage return and linefeed
CR
Carriage return only
LF
Line feed only
File
Select a source file name from the list.
Delimiter
Select the character used to delimit or separate values in a delimited file only. The following delimiter characters are supported by BIRT Analytics Loader:
, Tab | : ; @ # " + - = ~ '
Header
Select Header option if the source file includes information in a header. A file header contains multiple column names, each separated by a delimiter character.
Skip
In Skip, type a number that sets how many blank rows to insert between header information and record information in a file. If you select Header option, 1 appears in Skip by default.
Offset
Define the initial position of each column when the file format is flat file.
Qualifier
Select a qualifier character. BIRT Analytics Loader supports the following qualifier characters:
" ' ~
Choose None, if the file format does not use a qualifier.
Well-formed
Select the Wellformed option to enforce verification that each record contains all columns.
Wellformed explanation:
Enabled- indicates the same number of columns in data source and table definition
Disabled- means that extra columns are ignored and Null values are set for missing columns
View
Shows the data in the file and verify the connectivity to the file.
Get columns
Choose Get columns to get the column names and type, extracting values from the source file.
Use a text editor to verify parameters such as the character encoding and end of line method in your file if you are unsure of these values. You can view this information by opening your files with a text editor such as Notepad++. Some text editors do not support large text files, such as a multi-gigabyte database dump file. The following text editors are reported to support large text files:
Gvim
Emeditor
010 Editor
EditPadPro
Less
Defining table columns
To automate defining the structure of a target data table, extract data from a source data file using the Get columns option in the Table declaration screen. During extraction, the Get columns option adds column type and index information to each data element. You must review and edit, as necessary, the type and index information for every column. Try using View before using Get columns to verify that data is being read correctly from the file.
Consider removing the index from every column not strictly requiring an index. Removing unnecessary indexes speeds data load and analysis processes, but can limit performing aggregation and link operations. These operations require indexed columns.
To create a target data table manually, define each column using the New, Edit, Remove, and Duplicate options.
While you edit the structure of a target data table, use Get columns to retrieve existing column information from the source file, then use Edit to make modifications.
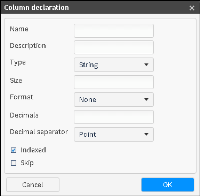
Create a new column by choosing New in the Table declaration screen, then provide information in Column Declaration screen that opens, as shown in Figure 3‑26. Using Get columns overwrites any existing column definitions.
Figure 3‑26 Creating a new column
New
Creates a new column in the target table
Name
Enter the name of the column.
Description
Enter a description of the column.
Type
Choose the data type from the drop-down list in the “Type” field. The supported data types are described in Table 3‑4.
Table 3‑4 Data types
Type
Description
String
A sequence of characters, up to 1024.
Integer
Integer (whole number) data from -2^31 (-2,147,483,648) through 2^31 - 1 (2,147,483,647).
Longint
Integer (whole number) data from -2^63 (‑9,223,372,036,854,775,808) through 2^63-1 (9,223,372,036,854,775,807).
Real
Floating precision number data with the following valid values: ‑3.40E + 38 through -1.18E - 38, 0 and 1.18E - 38 through 3.40E + 38.
Date
The default format is mm_dd_yyyy, where the date separator can be slash (/), comma (,), period (.), or no separator.
Datetime
Date and time data from January 1, 1400, through December 31, 9999, with an accuracy of three-hundredths of a second, or 3.33 milliseconds. The default format is mm_dd_yyyy_hh_MM_ss.
Time
The default format is hhMMss.
Unicode
A sequence of Unicode characters, up to 1024.
Size
The size of the column in characters, or digits.
Format
The format of the columns of type Date, Datetime, and Time.
Decimals
The number of digits to the right of the decimal point, or comma. Applies for data of type Real.
Decimal separator
You can choose Point or Comma to visualize a decimal separator. Applies for data of type Real.
Indexed
Indicates if the column is an index.
Skip
Select Skip to exclude a new column from the load process.
Edit
Opens the Table Declaration editor for a single column.
Remove
Removes a column from the target table.
Duplicate
Creates a new column by copying the properties of an existing column.
How to map data from a CSV file
The following procedure assumes that you have created a data file connection. It uses as an example, a CSV file having the following structure:
P.O. Box 137, 8886 Ut Street|US|Los Angeles|1000|90275|T|Southern California|Rancho Palos Verdes
Ap #687-3359 Eu Road|US|San Francisco|1001|94199|T|Southern California|San Francisco
Ap #839-5476 Eros. Ave|US|Placer|1002|95604|T|Northern California|Auburn
1 In Data-Options, choose New from file.
2 In Table Declaration, fill in the fields to set properties for the target database, as shown in Figure 3‑27.
1 In Database, type a database name. Alternatively, select an existing database name from the list of target databases.
2 In Name, type the name of the target table that receives the mapped data. For example, HouseholdData.
3 In Description, type information about the table contents, such as Household.
4 In Action, select “Create”.
5 Enable “Overwrite”.
Figure 3‑27 Defining file structure
3 Select options that match properties of the source file, as shown in Figure 3‑27.
1 In Type, select Delimited
2 In Encoding, select ASCII
3 Enable Header
4 Edit the value in Skip to match the header rows in the source data file
5 In End Line, select CrLf
6 In File, select a source file name from the list
7 In Delimiter, select pipe (|)
8 In Qualifier, select "
9 Enable Well-formed
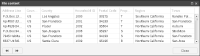
4 Choose View to validate the table declaration. The file content appears, as shown in Figure 3‑28. Choose OK.
Figure 3‑28 Viewing file content
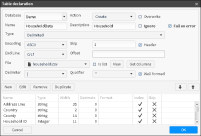
5 Choose Get columns in Table declaration to create column metadata.
During the metadata import process, the Get columns option reads column names from the header row in the source file. It also determines a type for each column and indexes the column.
Definitions for each detected column appear as shown in Figure 3‑29.
Figure 3‑29 Getting column definitions
6 To modify column properties, double-click the column or select the column definition and choose Edit. This opens Column declaration where you can change the definition of the column and the following features:
To speed data loading and analysis, you can remove column index information by removing the selection for Indexed. Indexing is required if the column is used in aggregation and link operations.
To exclude a column from loading, select Skip.
Choose OK.
In this example, modify the column properties for the selected column, as shown in Figure 3‑30.
Figure 3‑30 Editing column definition properties
7 Choose OK in Table Declaration to close the table declaration.
8 In Loader, choose Save to save the current project.