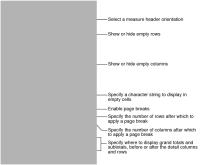
Setting cross-tab display options
This section describes how to specify the following cross-tab options, as shown in
Figure 2‑12:

Select a measures header orientation.
Show or hide empty rows.
Show or hide empty columns.
Specify a character string to display in empty cells.
Enable page breaks for a large cross tab.
Specify the following locations to apply page breaks:
Specify a number of rows after which to apply a page break.
Specify a number of columns after which to apply a page break.
Specify where to display grand totals and subtotals, before or after the detail columns and rows.
Figure 2‑12 Setting cross-tab options
The following topics describe setting cross-tab options.
How to move a measure header
1 Right-click an element in the cross tab. From the menu, choose Options.
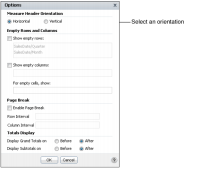
2 In Options, for Measure Header Orientation, select Horizontal or Vertical, as shown in
Figure 2‑13. Choose OK.
Figure 2‑13 Setting the measure header orientation
How to change the appearance of empty cells, columns, or rows
1 Right-click a cross-tab element. From the menu, choose Options.
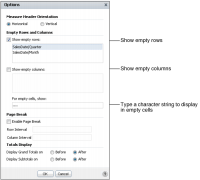
2 In Options, complete the following tasks, as shown in
Figure 2‑14:
Select or deselect the following options:
Show empty rows.
Show empty columns.
In For empty cells, show, type a character string to display in empty cells.
Choose OK.
Figure 2‑14 Setting options for empty cells, columns, and rows
In this example, hyphens appear in the previously empty cells, as shown in
Figure 2‑15.
Figure 2‑15 Displaying hyphens in empty cells
How to set a page break
1 Right-click the cross tab. From the menu, choose Options.
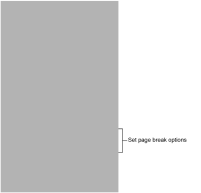
2 In Options, to set page break options, select Enable Page Break. Then, provide values for the row interval and column interval after which to apply the page break, as shown in
Figure 2‑16.
Figure 2‑16 Setting page break options
Choose OK.
How to specify where grand totals and subtotals appear
1 Right-click the cross tab. From the menu, choose Options.
2 In Options, in Totals Display, select Before or After for each of the following options, as shown in
Figure 2‑17:
Display Grand totals on
Selecting Before displays the grand totals before the detail columns and rows. Selecting After displays the grand totals after the detail columns and rows.
Display Subtotals on
Selecting Before displays the subtotals before the detail columns and rows. Selecting After displays the subtotals after the detail columns and rows.
Figure 2‑17 Setting totals display options