Creating a report template
You use Actuate BIRT Designer Professional to create report templates. You design a template in the same way that you design a BIRT report. In fact, you can create a report design then save it as a template. The file-name extension for a template file is .rpttemplate. If you are creating templates for users worldwide, you can localize the text in the templates the same way you localize text in a BIRT report. The templates that ship with BIRT Studio are localized, and the text in each template appears in the language specified by the locale the user chooses when logging in to Actuate Information Console.
This section describes the key steps for creating a template but does not provide information about the report elements you can use in a template. For information about designing BIRT reports and templates, see the book that accompanies open source BIRT Designer, BIRT: A Field Guide.
How to create a report template
1 In the Report Design perspective, create a new template using the following procedure:
1 Choose File➛New➛Other.
2 On New, expand Business Intelligence and Reporting Tools, then select Template. Choose Next.
3 In New Template—Template, select the folder in which to create the template file, specify a file name, then choose Next.
4 In New Template—Set Template Property:
1 In Display Name, specify a display name for the template. This name identifies the template when the template is displayed on the Report Template page in BIRT Studio.
2 In Description, provide a description of the template. This description appears as a tooltip when the user hovers the mouse pointer over the template in BIRT Studio.
3 In Template Image, browse to the thumbnail image of the template. This step assumes that you have already created the image you want to use as the thumbnail image and placed it in Shared Resources.
4 Choose Finish. A blank report page appears in the layout editor.
2 Drag elements from the palette, and drop them in the layout editor.
3 For elements that you want BIRT Studio users to edit for their report designs, identify those elements as template report items. Only labels and tables can be edited in BIRT Studio:
1 Right-click the element, then choose Create Template Report Item.
2 Specify a descriptive name for the element, so the BIRT Studio user can easily identify the purpose of the element.
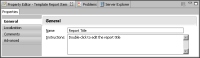
3 Provide instructions for using the element.
Figure 13‑4 shows an example of an element name and instructions for using the element.
Figure 13‑4 Specifying name and instructions for an editable element
4 For elements that you do not want the BIRT Studio user to edit, you should also specify a descriptive name, so that the BIRT Studio user can easily identify the purpose of the element and decide whether to include the element in the report. In Property Editor, type a name for the Name property.
Figure 13‑5 shows setting a label’s name as Copyright.
Figure 13‑5 Specifying a name for a label element that users cannot edit