How to add a new gadget to a dashboard
Use gadgets in the Gadget Gallery to add shared gadgets or gadgets you have saved in your home folder. Use gadgets in New Gadget to create a new gadget. To add a new gadget to a dashboard, complete the following steps:
1 Log in to Information Console and navigate to the existing dashboard where you want to add gadgets.
2 Display the Gadget Gallery and new gadget choices by selecting Add Content, as shown in
Figure 2‑7.
Figure 2‑7 Adding content to a dashboard
New gadget choices appears.
3 Double-click a gadget category folder in New Gadget, as shown in
Figure 2‑8.
Figure 2‑8 Selecting a gadget category
In this example, double-click the Extras folder.
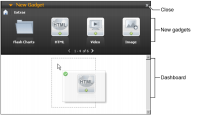
4 Drag a new gadget from the available gadgets, and drop it on the dashboard. This example uses the HTML gadget.
If the active dashboard uses a column layout, an empty box shows possible locations for the new gadget, as shown in
Figure 2‑9.
Figure 2‑9 Adding an Extras gadget
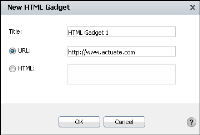
5 The configuration wizard for a gadget type opens to customize the content of a gadget. Each gadget has its own configuration requirements. In this example, type http://www.actuate.com for the URL of the HTML gadget, as shown in
Figure 2‑10.
Figure 2‑10 Adding a URL to an HTML gadget
6 Choose OK when finished with the gadget configuration. The gadget appears in the selected dashboard location and displays the content of the URL. Choosing cancel deletes the gadget.
After adding the gadget to the dashboard, optionally resize it or change its location on the dashboard. If the dashboard uses a column layout, the user can change the gadget height, the column to place the gadget, and the gadget order in a column. If the dashboard uses a free form layout, the user can change the gadget height, width, and placement on the dashboard.


