How to create a connection profile from Data Source Explorer
1 Choose Window➛Show View➛Other.
2 In Show View, expand Data Management and select Data Source Explorer, then choose OK.
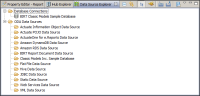
Data Source Explorer lists the data source types for which you can create connection profiles, and any previously defined connection profiles, as shown in
Figure 24‑10.
Figure 24‑10 Data Source Explorer
Database Connections supports creating profiles to connect to databases using drivers shipped with Actuate BIRT Designer. These database drivers provide access to the graphical SQL query builder. Creating a database connection profile is equivalent to creating a data source by selecting JDBC Database Connection for Query Builder in the data source wizard. ODA Data Sources supports creating profiles to connect to all the other types of data sources.
3 Right-click the data source type for which to create a connection profile. Choose New.
4 Specify a name for the connection profile. Use a name that describes the data source, so that you or other report developers can identify it when selecting the profile later.
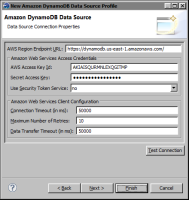
5 Specify the information to connect to the data source. The connection properties are the same as the properties displayed by the data source wizard.
Figure 24‑11 shows an example of connection properties for Amazon DynamoDB.
Figure 24‑11 Connection properties for Amazon DynamoDB
6 Choose Test Connection to verify the connection to the data source.
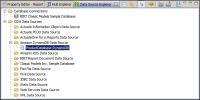
7 Choose Finish. The connection profile appears under the data source type in Data Source Explorer.
Figure 24‑12 shows a connection profile, ProductsDatabase-DynamoDB, under Amazon DynamoDB Data Source.
Figure 24‑12 Data Source Explorer displaying a connection profile for Amazon DynamoDB