Binding a connection profile name to a report parameter
You can also externalize a connection profile name for a data source by binding it to a report parameter. The next example shows how to create a report design that uses a CSV file as a data source, using Actuate BIRT Designer Professional. At design time, the report design uses the CSV file in the folder, C:\ConnProfile\Testing. Typically, the design time CSV file contains only a few records. In the production environment, the CSV file, which contains more records, is in the folder, C:\ConnProfile\Production. You create two connection profiles, one for the testing database and one for the production database, and pass the name of the connection profile as a parameter at run time. In this way, the report runs as expected in development and production environments.
How to bind Connection Profile Store URL property to a report parameter
1 In BIRT Designer Professional, create a new BIRT report.
2 In Data Sources, create a new data source and choose Create from a connection profile in the profile store. Choose Next.
3 In Connection Profile, choose New.
4 In Create a Connection Profile Store, select New.
5 In New Connection Profile, choose Flat File Data Source and enter Products‑testing as a profile name.
6 In Description, type Testing database. Choose Next.
7 In New Flat File Data Source Profile, choose Enter File URI:, and choose Browse to select the testing database file, which is C:\ConnProfile\Testing\csvTestODA.csv, in this example.
8 Choose Test Connection to validate the connection, and select Finish.
Products-testing profile appears in the Create a Connection Profile Store list, as shown in
Figure 24‑17.
Figure 24‑17 Create a connection profile for testing
9 In Create a Connection Profile, choose New to create a connection profile for the production database.
10 In New Connection Profile, choose Flat File Data Source and enter Products‑Production as a connection profile name.
11 Choose Next.
12 In New Flat File Data Source Profile, enter the file URI:
C:\ConnProfile\Production\csvTestODA.csv.
13 Select Test Connection to validate the connection.
14 Choose Finish.
Products-production appears in Create a Connection Profile Store list.
15 In Select the connection profiles, select Products-testing and Products‑production, as shown in
Figure 24‑18.
16 In Specify a file name, choose Browse.
Create a Connection Profile store appears, showing Resources folder.
Figure 24‑18 Creating a relative path connection profile store
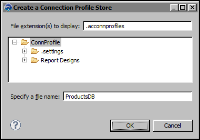
17 In Connection Profile Store choose the root project folder, ConnProfile, as shown in
Figure 24‑19.
Figure 24‑19 Specifying a store file name and location
18 Enter ProductsDB as a file name, and choose OK.
19 In Connection Profile Store, choose OK.
Select Connection Profile appears, as shown in
Figure 24‑20, prompting you to select a connection profile for the data source.
20 In Connection Profile select the testing database connection profile, Products‑testing, as shown in
Figure 24‑20.
21 Deselect Use the default data source name and change the data source name to ProductsDB.
22 Choose Next.
Figure 24‑20 Selecting a connection profile
23 Select Test Connection to validate the connection. Choose Finish.
Products data source appears in Data Explorer.
24 In Data Explorer create a new data set named Products from the Products data source.
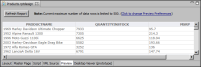
25 Add the Products data set to the layout and preview the report, as shown in
Figure 24‑21. In the example the report displays only six rows of data.
Figure 24‑21 Previewing the report with testing data
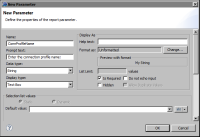
26 Select Layout and create a new report parameter in Data Explorer.
27 Name the parameter ConnProfileName, as shown in
Figure 24‑22.
28 In Prompt text enter:
Select the connection profile name:
29 Choose OK to create the parameter.
Figure 24‑22 Creating a report parameter
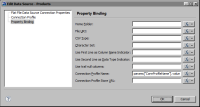
30 In Data Explorer double-click, Products data set to open the properties.
31 Choose Property Binding, as shown in
Figure 24‑23, and enter the expression:
params["ConnProfileName"].value
Alternatively, you can select Fx to use Expression Builder to create the expression.
Figure 24‑23 Binding a connection profile name to a report parameter
32 Choose OK.
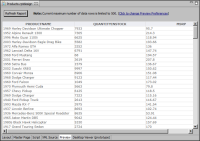
33 Select Preview. In Parameters, enter Products-production to choose the production database as a data source. The report displays a large set of data, as shown in
Figure 24‑24.
Figure 24‑24 Previewing the report with the production data