Task 5: Create a plug-in
Data provided to any Flash object must be in the specific XML format that the object requires. To use the dataURL variable to pass data to the Flash object, you create a Java class to generate an XML document, and deploy the class as a plug‑in. In this procedure, you create the plug-in using the Eclipse Plug‑in Development Environment (PDE).
1 In the main menu, choose Window➛Open Perspective➛Other.
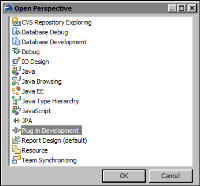
2 In Open Perspective, choose Plug-in Development, as shown in
Figure 15‑23.
Figure 15‑23 Selecting the Plug-in Development perspective
Choose OK. The Plug-in Development perspective displays the views and tools for creating and managing plug-ins.
3 Choose File➛New➛Project.
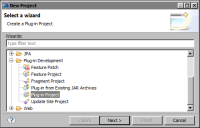
4 In New Project, expand Plug-in Development, and select Plug-in Project, as shown in
Figure 15‑24.
Figure 15‑24 Selecting Plug-in Project
Choose Next.
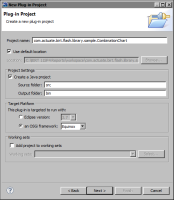
5 In New Plug-in Project, specify the following project information:
1 In Project Name, type:
com.actuate.birt.flash.library.sample.CombinationChart
This name follows the naming convention used by Actuate BIRT plug-ins.
2 In Target Platform, select the following option:
OSGi framework: Equinox
OSGi is a framework specification for developing and deploying modular Java applications. Equinox is an Eclipse project that implements the OSGi framework and is the plug-in technology used by Eclipse and BIRT.
3 Use the default values for the other properties.
Figure 15‑25 shows the information specified for the plug-in project.
Figure 15‑25 Properties of the plug-in project
Choose Next.
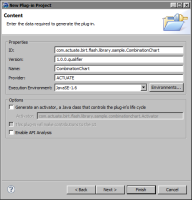
6 In New Plug-in Project—Content, specify the information for generating the plug‑in.
1 In Properties, use all the default values.

ID identifies the plug-in. By default, the value you specified as the project name in the previous step is used as the ID value.

Version is the version number to assign to this plug-in.

Name is the plug‑in’s display name, which appears in general descriptions about the plug‑in.

Provider is the name of the plug‑in contributor.

Execution Environment specifies the JRE (Java run‑time environment) to use.
2 In Options, uncheck the first option, Generate an activator, a Java class that controls the plug‑in’s life cycle.
Figure 15‑26 shows the information for generating the plug‑in.
Figure 15‑26 Information for generating the plug-in
Choose Finish.
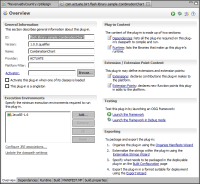
Eclipse creates the plug-in. The Plug-in editor displays an Overview page, as shown in
Figure 15‑27. This page shows the properties of the plug‑in and provides links to pages about developing, testing, and deploying a plug‑in.
Figure 15‑27 Plug-in editor displaying overview information
