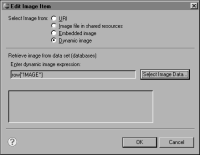
How to insert images that are stored in a data source
1 In Data Explorer, create a data set that includes the image field.
2 In the layout editor, insert a table element on the page.
3 Bind the table to the data set in the following manner:
1 Select the table and, in Property Editor, choose Binding.
2 In the Binding page, in Data Set, choose the data set that contains the image field. BIRT creates a column binding for each field in the data set.
4 Drag the image element from the palette, and drop it in the detail row of the table.
5 In Edit Image Item, select Dynamic image.
6 Choose Select Image Data. Select Data Binding displays the column bindings available to the image element, as shown in
Figure 6‑22. The image element has access to all the column bindings defined for the table, its container.
Figure 6‑22 Select Data Binding showing column bindings
7 Select the column binding that references the image field by clicking the check box next to the column binding. Choose OK.
In Edit Image Item, under Enter dynamic image expression, an expression that refers to the selected column binding appears, as shown in
Figure 6‑23.
Figure 6‑23 New Image Item showing the dynamic image expression
8 Choose OK. The image element appears on the page in the layout editor. It shows an X. The actual images appear only when the report is generated.
Resizing an image
The image element displays an image at its actual size. If you cannot change the size of the original image, you can resize the image element in the report. Note, however, that images are designed to display optimally at a specific size. Resizing an image in the report typically results in the degradation of its appearance.
To resize an image, select the image element, then in Property Editor, select General. Specify a width and height for the image element. Typically, you want to resize an image so that its aspect ratio is maintained to avoid stretching the graphic out of proportion. To maintain an image’s aspect ratio, specify the width and height as a percentage of the original size. For example, setting both the width and height to 80%, as shown in
Figure 6‑24, reduces the image size to 80% of the original size.
Figure 6‑24 Setting the width and height of an image element
Providing a text alternative
A standard practice in HTML document design is to display a text alternative for an image. Sometimes, a document cannot access or display an image, or a user configures the browser to not display images. In these cases, rather than not display anything, the report should display a textual description of the missing image. The rule of thumb is that the text alternative should always describe the content of the image, but the description should also be short and succinct.
To specify a text alternative, select the image element, then in Property Editor, under Properties, choose Alt Text. In Alternative text, type the text to display in place of a missing image. For an image of a company logo, for example, type Company logo, as shown in
Figure 6‑25.
Figure 6‑25 Providing a text alternative for an image
To display the text in the language determined by the locale of the user’s machine, specify a resource key in Alternative text key. A resource key is a value that maps to translated strings. For information about resource keys and displaying text in different languages, see Localizing Text.


