Task 7: Format the cross tab
Now that the cross tab displays the correct data, you can focus on improving the presentation of data in the cross tab. You perform the following tasks in this section:
Expand the width of the cross tab to fit the data
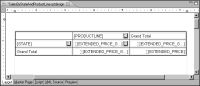
The default report layout preference, Fixed Layout, displays a cross tab with columns of equal size within a display area determined by the page size and margins set in the master page. In the report preview, notice that the EXTENDED_PRICE labels and some of the numbers are truncated.
To avoid losing content, you can do one of the following:

Change the page orientation from portrait to landscape.
Increase the page width.
If designing for HTML output, specify that the report width expand automatically to fit the data.
The following procedure uses the third option.
1 Choose Layout to resume editing the cross tab.
2 In the layout editor, click on an empty area of the report page.
3 In Property Editor, under Properties, choose General.
4 Set Layout Preference to Auto Layout.
5 Preview the report.
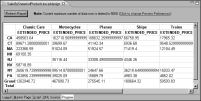
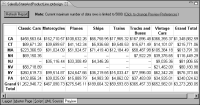
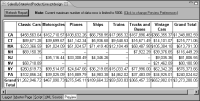
Figure 18‑14 shows a portion of the data that the cross tab displays. Each column in the cross tab expands to accommodate its content.
Figure 18‑14 Preview of the cross tab when the layout preference is set to Auto Layout
Note that this auto-expand feature applies only to HTML output. In other output formats, the size of the cross tab is always constrained by the page dimensions.
Display a string in empty cells
If there are no sales for a particular product in a particular state, the cell displays nothing. Because an empty cell can be interpreted as missing data, you can display a string, such as 0.00 or --, to indicate that the value is zero.
1 Choose Layout to resume editing the cross tab.
2 Select the cross tab by clicking on the tab in the lower left corner of the cross tab.
3 In Property Editor, choose Properties, then choose Empty Rows/Columns.
4 In the “For empty cells, show:” field, type the following text:
--
Figure 18‑15 Empty Rows/Columns properties of the cross tab
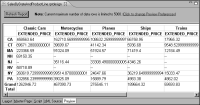
5 Preview the report. Cells that were previously empty now display --, as shown in
Figure 18‑16.
Figure 18‑16 Preview of the cross tab showing -- to indicate no data
Change the format of the numbers
To indicate that the numbers displayed in the cross tab are dollar amounts, use the currency format. It is also easier to read the numbers if they are aligned to the right.
1 Choose Layout to resume editing the cross tab.
2 Click in an empty area on the report page.
3 Choose Element➛Style➛New Style.
4 In Custom Style, type the following name for the new style:
crosstab_currency
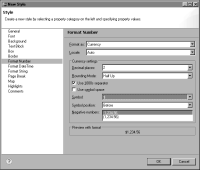
5 Specify a currency format, using the following steps:
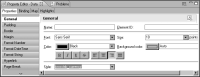
1 Choose Format Number from the list of property categories.
2 In Format As, select Currency from the drop-down list.
3 In Currency Settings, specify the following values:
Set Decimal places to 2.
Select Use 1000s separator.
In Symbol, select $.
Use the default values for the other currency settings.
Figure 18‑17 Format Number showing the currency settings
6 Specify the text alignment, using the following steps:
1 Choose Text Block from the list of property categories.
2 In Text alignment, select Right.
7 Choose OK to save the crosstab_currency style.
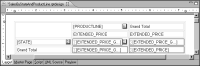
8 Apply the crosstab_currency style to the data elements, using the following steps:
1 In the layout editor, select the four [EXTENDED_PRICE] data elements, as shown in
Figure 18‑18.
Figure 18‑18 Data elements selected
2 In Property Editor, choose Properties, then choose General. In Style, select crosstab_currency, as shown in
Figure 18‑19.
Figure 18‑19 Style showing crosstab_currency selected
9 Preview the report to verify the formatting change.
Edit the column headings
When you insert a summary field or measure, BIRT adds a label that displays the field name as a column heading. In the generated cross tab, the heading EXTENDED_PRICE appears in every column, above the sales data. Because the cross tab displays values from one measure only, the heading is not necessary.
1 Choose Layout to resume editing the cross tab.
2 Select the cross tab.
3 In Property Editor, choose Properties, then choose General.
Figure 18‑20 Hide Measure Header selected
5 Preview the report. The row that displays the measure headings is hidden.
Figure 18‑21 shows a portion of the generated cross tab.
Figure 18‑21 Preview of the cross tab with the measure header hidden
Use darker lines around the cross tab and the cells
BIRT uses two predefined styles, crosstab and crosstab-cell, to set the default appearance of the overall cross tab and the cells, respectively. To change any of the cross tab or cell formats, such as the width or color of borders, edit these styles.
1 Choose Layout to resume editing the cross tab.
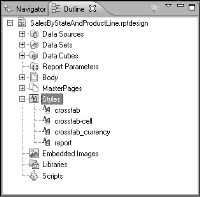
2 Choose the Outline view, located next to Navigator.
3 Expand the Styles item to show the crosstab and crosstab-cell styles, as shown in
Figure 18‑22.
Figure 18‑22 Outline view displaying the cross-tab styles
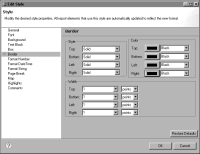
4 Right-click the crosstab style, then choose Edit Style.
5 In Edit Style, choose Border. The colors of the borders are set to Gray.
6 Change the color of all the borders to Black, as shown in
Figure 18‑23.
Figure 18‑23 Border colors set to Black
7 Choose OK to save your change to the crosstab style.
8 In Outline, right-click the crosstab-cell style, then choose Edit Style.
9 In Edit Style, choose Border.
10 Change the color of all the borders to Black. Choose OK.
In the layout editor, the lines around the cells and around the cross tab appear in black, as shown in
Figure 18‑24.
Figure 18‑24 Cross tab design showing black borders
11 Preview the report.
Figure 18‑25 shows a portion of the generated cross tab.
Figure 18‑25 Preview of the finished cross tab
You just learned how to build a basic cross tab that displays data from three fields. The rest of this chapter shows how to build more complex cross tabs.