How to specify a new Encyclopedia volume
1 To specify a new Encyclopedia volume, perform the following tasks:
1 On Volumes, point to the icon next to an Encyclopedia volume schema and choose Add Volume, as shown in
Figure 6‑36.
Figure 6‑36 Adding a new volume
2 On New Volume—General, perform the following steps:
1 Type a name for the new volume. For example, type corp.
2 In Primary partition, select an unassigned partition. For example, accept ac_corp_partition, as shown in
Figure 6‑37.
Figure 6‑37 Specifying general volume properties
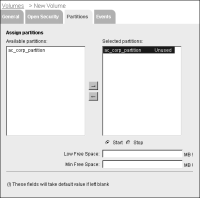
3 On New Volume, choose Partitions, and start the partition for the new Encyclopedia volume by performing the following steps:
1 In Available partitions, select a partition, then move it to Selected by choosing the right arrow.
2 In Selected partitions, select the partition. Choose Start, as shown in
Figure 6‑38.
Figure 6‑38 Starting the partition
Choose OK.
4 In Volumes, point to the arrow next to the new volume name, and choose Take online, as shown in
Figure 6‑39.
Figure 6‑39 Taking a volume online
5 In Volumes, check that the status of the new volume changes to ONLINE, as shown in
Figure 6‑40.
If the volume does not go online, check for insufficient free disk space for the partition and consider configuring the free space threshold.
Figure 6‑40 Viewing the online volume
6 Log in to Management Console to inspect the new volume by choosing the shortcut. Alternatively, open a browser manually and enter the following URL, as shown in
Figure 6‑41:
http://localhost:8900/acadmin/
Figure 6‑41 Logging in to Management Console
7 In Files and Folders, the default Encyclopedia volume appears with an empty Resources folder, as shown in
Figure 6‑42.
Figure 6‑42 Viewing new volume contents


