Preparing the iHub cluster environment
This section assumes the administrator has already performed a typical, wizard‑based installation to create a stand‑alone iHub instance on one computer. This machine contains the shared configuration directory, which all nodes in the cluster access. This section refers to the machine containing the shared configuration directory as node1.
In the section,
“Performing a wizard-based cluster node installation,” later in this chapter, the administrator chooses the custom installation option in the wizard‑based install program to create a cluster node. This cluster node, referred to as node2, accesses the shared resources on node1.
Before performing a cluster node installation, the administrator performs the following tasks:

On node1:

Shares the folders that all cluster nodes access

Turns off the Windows firewall

Obtains the machine host name and IP address

Tests the network accessibility of the machine

Reconfigures the partition path for the default partition in Configuration Console using UNC format

Edits acserverconfig.xml and sets a property to make the metadata database visible to all nodes

On node2:

Turns off the Windows firewall

Obtains the machine host name and IP address

Tests the network accessibility of the machine
The following instructions provide a basic example of the operations required to configure network sharing and firewall settings in the Windows environment. It is the responsibility of the administrator performing the installation to make sure that all settings conform to the security policies in force for the environment.
How to share the encyc and config\iHub2 folders
In an iHub installation, cluster nodes must have read‑write access to AC_DATA_HOME\encyc and AC_DATA_HOME\config\iHub2 folders on node1. To give a cluster node read-write access to the folders and files in the encyc folder and to the files in the config\iHub2 folder, perform the following tasks on node1:
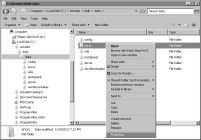
1 Using Windows Explorer on node1, right‑click the folder, AC_DATA_HOME\encyc. Choose Properties, as shown in
Figure 5‑1.
Figure 5‑1 Choosing Sharing and Security
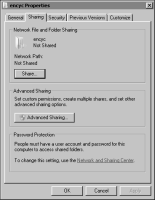
2 On encyc Properties, choose Sharing, as shown in
Figure 5‑2.
On Sharing, choose Advanced Sharing.
Figure 5‑2 Sharing the Encyclopedia volume
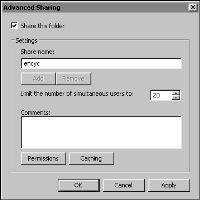
3 On Advanced Sharing, select Share this folder, as shown in
Figure 5‑3 Figure 5‑3 Selecting Share this folder
On Advanced Sharing, choose Permissions.
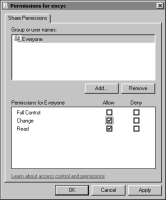
4 On Permissions for encyc, in Share Permissions, select Allow for Change and Read, as shown in
Figure 5‑4.
Figure 5‑4 Selecting Change and Read permission
Choose OK.
On Advanced Sharing, choose OK.
On encyc Properties, choose Close.
5 Repeat steps 1 through 4 for the \config\iHub2 folder. Make sure that all settings conform to the security policies in force for the environment.
Close Windows Explorer.
How to turn off the Windows firewall
Perform the following steps on node1 and node2:
1 Choose Start➛Control Panel➛System and Security➛Windows Firewall.
2 On Windows Firewall, choose Turn Windows Firewall on or off. Make sure that all settings conform to the security policies in force for the environment.
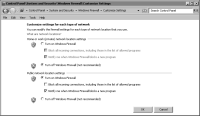
3 On Customize Settings, in Home or work (private) network location settings, choose Turn off Windows Firewall, as shown in
Figure 5‑5.
Figure 5‑5 Turning off the home or work network location firewall
Close Windows Firewall.
How to display a computer’s IP address
To obtain the host names of node1 and the computer on which you will install the cluster node, perform the following tasks on node1 and node2:
1 Choose Start➛Programs➛Accessories➛Command Prompt.
2 In Command Prompt, type the following command:
ipconfig /all
Press Enter. The host name appears, as shown in
Figure 5‑6. In this example, the host name for node1 is urup.
Figure 5‑6 Displaying the host name
3 Write the host names and IP addresses of the computers to be clustered, as shown in
Table 5‑1.
Table 5‑1 Host names and IP addresses of computers to be clustered
iHub | Host name | IP address |
Node1 | urup | 192.168.30.246 |
Node2 | kozu | 192.168.30.233 |
How to test the connection between computers
Perform the following steps on both computers:
1 In Command Prompt, type the ping command followed by the IP address or host name of the other computer. For example, type the following command to ping a computer named kozu:
ping kozu
Press Enter.
If your computer reaches the other computer, Command Prompt displays a series of replies, as shown in
Figure 5‑7.
Figure 5‑7 Receiving a reply to a ping command
2 Close Command Prompt.
How to prepare node1 for clustering
On node1, or urup in this example, perform the following tasks:
1 Log in to Configuration Console and choose Advanced view. From the side menu, choose Volumes. On Volumes, point to the icon next to the default volume, corp in this example, and choose Take offline, as shown in
Figure 5‑8.
Figure 5‑8 Taking a volume offline
In Volume Offline Grace Period, choose OK.
From the side menu, choose Partitions.
2 On Partitions, point to the icon next to DefaultPartition and choose Template settings, as shown in
Figure 5‑9.
Figure 5‑9 Choosing Template settings
On Template Settings, choose Change. In Partition Path, type the path to the encyc folder, using UNC format. For example, if the hostname of node1 is urup, type:
\\urup\encyc
Figure 5‑10 Typing the partition path
To verify that iHub can access the encyc folder, choose Test.
A message appears, stating that the test was successful, as shown in
Figure 5‑11. Choose OK.
Figure 5‑11 Verifying a successful partition path test
On Template Settings, choose OK.
From the side menu, choose System.
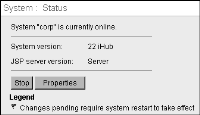
3 On System—Status, choose Stop to stop the system, as shown in
Figure 5‑12.
Figure 5‑12 Choosing to stop the system on System Status
4 Log out of Configuration Console.
5 Choose Start➛Settings➛Control Panel.
In Control Panel, choose Administrative Tools—Services.
On Services, stop the Actuate BIRT iHub service.
6 Open Windows Explorer, and navigate to AC_DATA_HOME/config/iHub2. Make a backup copy of acserverconfig.xml, then open acserverconfig.xml and perform the following tasks:
1 Locate the <ConnectionProperties> element under the <MetadataDatabase> element.
2 Under <ConnectionProperties>, locate:
<ConnectionProperty
Name="server"
Value="localhost"/>
3 Change Value from localhost to the name of the machine on which the volume resides, in this example “urup”. For urup, the volume is located on localhost, but in a cluster setting the administrator has to specify the machine name, since the volume is not on a localhost from the reference point of the other nodes.
4 Save acserverconfig.xml, and exit the file.
7 On Services, start the Actuate BIRT iHub service.
