How to install using a script
1 Download the required files from the FTP software distribution site. Extract the files.
2 To install the Information Console files, type:
sh ./infoconsoleinstall.sh
The script displays a series of prompts. Respond to the prompts as described in the following procedures.
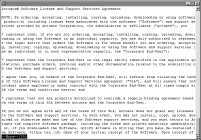
3 The license agreement appears, as shown in
Figure 7‑1.
Figure 7‑1 The license agreement
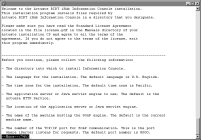
4 Read the license agreement and press Enter to continue installation. At the prompt, type y for yes if you accept the licensing terms, as shown in
Figure 7‑2.
Figure 7‑2 Specifying whether you accept the license agreement
5 The introduction to the installation appears, as shown in
Figure 7‑3. Review the information, then press Enter to continue.
Figure 7‑3 Viewing the introduction
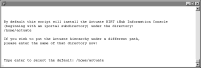
6 Type the path for the Information Console installation, for example /home/actuate/IC, as shown in
Figure 7‑4. Alternatively, press Enter to accept the default directory.
Figure 7‑4 Specifying the Information Console install directory
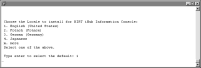
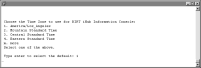
7 Press Enter to select the default locale, which is English, as shown in
Figure 7‑5. Alternatively, select a different locale. If you do not see the locale for your region, type m for more and press Enter.
Figure 7‑5 Specifying a locale
8 Press Enter to select the default time zone, which is America/Los_Angeles as shown in
Figure 7‑6. Alternatively, select another time zone from the numbered list.
Figure 7‑6 Specifying a time zone
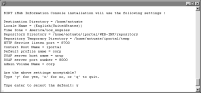
9 Type a default profile name that you will use in Information Console, as shown in
Figure 7‑7.
Figure 7‑7 Specifying the default profile name
10 Type the IP address or host name of the machine where iHub runs, or accept the default, your machine name, as shown in
Figure 7‑8.
Figure 7‑8 Specifying the machine on which the iHub runs
11 Type the number of the port where iHub listens for requests, or accept the default, 8000, as shown in
Figure 7‑9.
Figure 7‑9 Specifying the port number on which iHub listens
12 Type the Encyclopedia volume name that you want to use, or accept the default, your machine name, as shown in
Figure 7‑10.
Figure 7‑10 Specifying the Encyclopedia volume name
13 The installation program displays the settings that you specified during the install process. Review these settings, as shown in
Figure 7‑11, then specify whether you accept them. Press Enter to accept the default option, y for yes. Alternatively, type n for no, or type q to quit.
Figure 7‑11 Reviewing your settings
14 The installation program installs Information Console, and displays an indicator showing the progress of the installation, as shown in
Figure 7‑12.
Figure 7‑12 The install program copies files to your destination folder
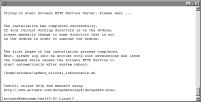
15 When the installation completes, review the information, as shown in
Figure 7‑13. Issuing the command: sh ./update_rclocal_infoconsole.sh starts the Information Console service at system startup.
Figure 7‑13 Typing the command to start the service