How to create a channel
1 On Channels, choose Create Channel.
2 On New Channel—General, shown in
Figure 6‑2, specify a value for Name, and for Auto delete after:
n days, where
n is a number you specify.
iHub requires these properties.
Figure 6‑2 Specifying values for properties on New Channel—General
If you specify an icon URL for the channel, choose Get Images to refresh the channel icon.
Choose Privileges.
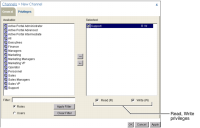
3 On Privileges, perform the following tasks:
1 Select Roles or Users to view the list of security roles or users from which to select in Available.
2 Move roles or users from Available to Selected.
3 Select a user or role in Selected and assign privileges on the channel by selecting Read, Write, or both privileges. For example, assign read and write privileges on the new Support channel to the Support role, as shown in
Figure 6‑3.
Choose OK.
Figure 6‑3 Assigning privileges on a new channel