How to create a user account
The following steps create a user account for a newly hired sales manager, Eriza Senoadi:
1 On Users, choose Create User.
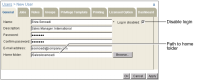
2 On New User—General, shown in
Figure 2‑2, complete the following tasks:

Type a user name, description, and password for this user. Confirm the password.
User names and passwords are strings of 1 to 50 characters.
Name is a required field. A user name can include any character except a control character. The user name is not case-sensitive. The Encyclopedia volume stores the user name in mixed case and displays the name exactly as you typed it during creation.
The description and password are not required. If you use a password, security experts recommend a password containing at least eight characters, including numeric and mixed-case alphabetic characters. A password is case-sensitive and cannot include a control character or space.
Type the user’s e-mail address. iHub uses this address for e-mail notification of jobs that succeed and fail.
Optionally, specify a path and folder name as the home folder. If you use a home folder name that does not exist, iHub creates the folder, and any folders in the path that do not exist. iHub assigns visible privilege to the user on the new folders in the path and assigns visible, read, and write privileges to the user on the home folder.
If the home folder is on a pre-existing path, the user must have visible privilege on all folders in the path. For example, on a volume named widgetco, if the home folder location is /widgetco/sales/esenoadi, the user, esenoadi, must have visible privilege on each of the following folders:
/widgetco
/sales
If the Encyclopedia volume uses an Open Security RSSE application, you must assign privileges to the user home folder manually. The user home folder privileges are not automatically updated.
To prevent the user from logging in, such as when you create a user account before the user begins work at the company, select Log in disabled, as shown in
Figure 2‑2.
Figure 2‑2 Making selections on New User—General
Choose Jobs.
3 On Jobs, specify job-related preferences, such as how iHub notifies the user when a job succeeds or fails, as shown in
Figure 2‑3.
Figure 2‑3 Making selections on New User—Jobs
Specify job-related preferences as follows:
Maximum job priority
Specify the maximum job priority level the user can assign to a job, from 1–1000.
Send e-mail notification
iHub notifies the user by e-mail when a job completes. The e‑mail notification contains a hyperlink to the document.
Attach document
iHub sends the document as an attachment to the e-mail notification. The user must have read privilege on the document. If the user does not have read privilege, only the hyperlink to the document appears in the e-mail notification.
Place a job completion notice in the user’s Personal Channel
iHub sends a notice to that channel. Selecting Place a job completion notice in the user’s Personal Channel enables the following options:
Delete notice according to volume settings
iHub purges job notices from the volume after the number of days and hours that Default user notice purging setting for this volume specifies in Volume—Properties—Archiving and Purging. The default time for purging notices is 2:15 a.m. On Configuration Console Advanced view, in Volumes—General, Schedule for purging notices specifies the time to purge job notices.
Delete notice after n days n hours, where n is a number you specify
iHub does not delete job notices until after the specified number of days and hours expires.
Do not automatically delete notice
iHub does not delete this user’s job notices.
Choose Roles.
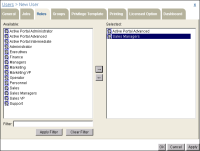
4 On Roles, assign membership in one or more security roles. To assign a user to a security role, select the role in Available and choose the right arrow to move the role to Selected. For example, assign Eriza Senoadi to the Sales Managers role by selecting Sales Managers in Available and moving the role to Selected, as shown in
Figure 2‑4.
Figure 2‑4 Assigning a user to a security role in New User—Roles
Choose Groups.
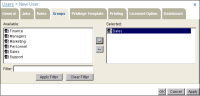
5 On Groups, assign a new user to one or more notification groups. To assign a user to a group, select the group in Available and choose the right arrow to move the group to Selected. For example, to assign Eriza Senoadi to the Sales group, in Available, select Sales and move it to Selected, as shown in
Figure 2‑5.
Figure 2‑5 Assigning a user to a notification group in New User—Groups
Choose Privilege Template.
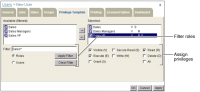
6 On Privilege Template, assign privileges to other users and security roles for access to items that the new user creates by performing the following steps:
1 Display the list of roles in Available by selecting Roles. Display the list of users by selecting Users.
2 Select one or more security roles from Available and move the role or roles to Selected.
3 Assign privileges by selecting the role or roles in Selected and choosing privileges from the list of privileges below Selected.
For example, select Roles. Use Filter to display security roles that include the word Sales. Move the following roles from Available to Selected:
Sales
Sales Managers
Sales VP
Assign visible and secure read privileges to the Sales role. Assign visible and read privileges to the Sales Managers role. Assign visible, read, and execute privileges to the Sales VP role, as shown in
Figure 2‑6.
The privileges you assign to the roles in Selected apply to items that the new user creates.
Figure 2‑6 Assigning privileges on New User—Privilege Template
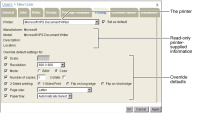
Choose Printing.
7 On Printing, you can specify a default printer and other printer settings for the new user. These preferences override volume-level settings. For example, in
Figure 2‑7, you specify the printer named Microsoft XPS Document Writer as the new user’s default printer. You also make selections for the following options:
Scale
Resolution
Printer mode, meaning black-and-white or color
Default number of copies
1-sided or 2-sided printing
Page size
Paper tray
Figure 2‑7 Selecting printing options on New User—Printing
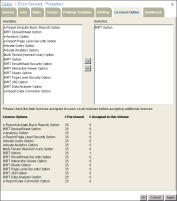
Choose Licensed Option.
8 On Licensed Option, assign and remove licensed options available to a user by performing the following tasks:
Assign licensed options by moving one or more options from Available to Selected. For example, to support a user executing a BIRT design executable (.rptdesign), assign the BIRT option, as shown in
Figure 2‑8.
Remove licensed options by moving one or more options from Selected to Available.
The licensed options table shows the number of purchased options and the number of options assigned to users on the volume. Choosing Apply or OK updates # Assigned to this Volume and creates the user.
Figure 2‑8 Assigning license options on New User—Licensed Option
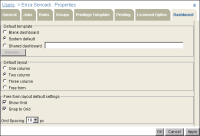
Choose Dashboard.
9 On Dashboard, specify default Information Console dashboard settings for a user. You can configure the default dashboard template and the default dashboard layout. The default template can be a blank dashboard, the system default dashboard, or you can assign an existing dashboard to the user. You can configure the default layout to show one, two, or three columns. Alternatively, you can select a free form dashboard layout, and specify grid settings for it.
Configuring dashboard settings for a new user supports the user being able to use a dashboard in Information Console immediately, using a pre-determined dashboard configuration.
Figure 2‑9 Configuring default dashboard property settings