In this tutorial, you use the Apache Axis WSDL2Java tool to generate, compile, and deploy the com.actuate.schemas code library from the Actuate WSDL document using the build.bat script file packaged with Actuate iServer Integration Technology. You perform the following tasks:
To use the build.bat script file in this tutorial, you also need the Apache Ant build tool and environment variables set to access the iHub JDK and Apache Ant installations.
Task 1: Set the JAVA_HOME, ANT_HOME, and Path environment variables
To configure the Apache Ant to build iHub Integration Technology Java RSSE applications, you must set the JAVA_HOME, ANT_HOME, and Path variables on your computer.
1 Choose Start➛Settings➛Control Panel. In Windows 7, choose Start➛Computer➛System Properties.
Control Panel appears.
2 On Control Panel, double-click System.
System Properties—General appears.
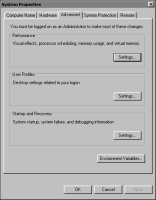
3 On System Properties—General, choose Advanced.
System Properties—Advanced appears, as shown in Figure 21‑1.
Figure 21‑1 System Properties—Advanced
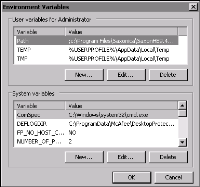
4 On System Properties—Advanced, choose Environment Variables.
Environment Variables appears, as shown in Figure 21‑2.
Figure 21‑2 Environment Variables
5 If not already set, add the JAVA_HOME environment variable by performing the following tasks:
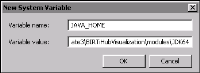
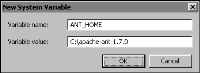
1 In System Variables, choose New.
New System Variable appears.
2 In New System Variable, in Variable Name, type:
JAVA_HOME
3 In Variable Value, type the following path specifying the directory where Actuate installed the Java, similar to the following:
C:\Actuate3\BIRTiHubVisualization\modules\JDK64
4 New System Variable appears as shown in Figure 21‑3.
Figure 21‑3 Creating a new JAVA_HOME system variable
Choose OK.
6 If already set, perform the following tasks to change the JAVA_HOME environment variable:
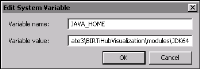
1 In System Variables, select JAVA_HOME. Choose Edit.
Edit System Variable appears.
2 On Edit System Variable, in Variable Name, type:
JAVA_HOME
3 In Variable Value, type the following path specifying the directory where Actuate installed the Java SDK, similar to the following:
C:\Actuate3\BIRTiHubVisualization\modules\JDK64
4 Edit System Variable appears as shown in Figure 21‑4.
Figure 21‑4 Editing the JAVA_HOME system variable
Choose OK.
7 On Environment Variables, add the ANT_HOME environment variable by performing the following tasks:
1 In System Variables, choose New.
New System Variable appears.
2 On New System Variable, in Variable Name, type:
ANT_HOME
3 In Variable Value, type the path for the directory where WinZip extracted the Apache Ant files, similar to the following:
C:\apache-ant-1.7.0
New System Variable appears, as shown in Figure 21‑5.
Figure 21‑5 Creating a new ANT_HOME system variable
4 Choose OK.
8 On Environment Variables, edit the Path environment variable by performing the following tasks:
1 In System Variables, select Path. Choose Edit.
Edit System Variable appears.
2 In Variable Value, if not already set, append a semicolon at the end of the Path specification to separate the new path from the existing paths. Then, append the following text to the existing Variable Value text:
%JAVA_HOME%\bin;%ANT_HOME%\bin;
3 Edit System Variable appears, as shown in Figure 21‑6.
Figure 21‑6 Editing the Path system variable
4 Choose OK.
9 On Environment Variables, choose OK.
10 To close System Properties, choose OK.
11 To close Control Panel, choose File➛Close.
Task 2: Access the Actuate WSDL document using a web browser
You can use a web browser to view the Actuate 11 WSDL document on the volume.
1 In Windows, choose Start➛Programs➛Internet Explorer.
Internet Explorer appears.
2 Access the following URL:
http://localhost:8000/wsdl
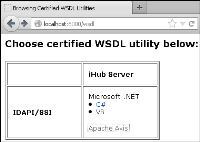
Browsing Certified WSDL Utilities—Microsoft Internet Explorer appears, displaying links to the versions of Actuate WSDL documents, as shown in Figure 21‑7.
Figure 21‑7 Links to environment-specific versions of the Actuate WSDL documents
3 In IDAPI Actuate 11, choose Apache Axis.
Browsing APIs—Microsoft Internet Explorer appears.
4 Choose Login.
The login page appears.
5 Examine the Login WSDL definition the WSDL utility displays, including the following elements:
Namespace and attribute declarations
Types
Messages
PortType
Bindings
Services
Ports
Task 3: Generate the com.actuate.schemas library from the Actuate WSDL document
In this task, you generate the com.actuate.schemas library using the online version of the Actuate WSDL document. You run the WSDL2Java tool from a command window using the build.bat file.