Tutorial 15: Catching a SOAP message with Axis TCPMonitor
In this tutorial, you use AXIS TCPMonitor (tcpmon) utility to monitor the SOAP messages between an application and the volume. You configure TCPMonitor to listen at a port for an incoming message to the volume. You direct the client application to send a request message to the port to which TCPMonitor listens.
TCPMonitor intercepts the message, displays the SOAP message in the request panel, then resends the message to the volume. When the volume responds, TCPMonitor intercepts the message, displays the SOAP response in the response panel, and resends the message to the client application.
TCPMonitor logs each request-response message pair. You can view a message pair by choosing an entry row in the top panel. You can also remove an entry, edit and resend a message, and save a message pair to a file.
Figure 21‑8 shows a request-response message pair in TCPMonitor.
Figure 21‑8 TCPMonitor displaying a request-response message pair
To complete this tutorial, you need access to the following resources:
Archive files in \Actuate3\ServerIntTech3\Web Services\Examples\Axis Client\lib, including:
com.actuate.schemas (idapi.jar)
org.apache.axis.utils.tcpmon.class (axis.jar)
Other related JAR files
Task 1: Configure and run TCPMonitor
This task uses the graphical interface of the TCPMonitor utility. This utility is in the org.apache.axis.utils package in axis.jar. You can also run TCPMonitor from the command line using the following syntax:
2 Add the axis client libraries to the CLASSPATH environment variable. At the command prompt, type:
set CLASSPATH=C:\Actuate3\ServerIntTech3\Web Services\Examples\Axis Client\lib\*
Press Enter.
3 At the command prompt, type:
java org.apache.axis.utils.tcpmon
Press Enter.
TCPMonitor—Admin appears.
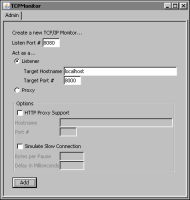
4 In TCPMonitor—Admin:
In Listen Port #, type:
8080
Select Listener.
In Target Hostname, type:
localhost
In Target Port #, type:
8000
TCPMonitor—Admin looks like the one in Figure 21‑9.
Figure 21‑9 TCPMonitor—Admin showing the settings
5 Choose Add.
The Port 8080 tab appears.
If a firewall message appears about blocked ports, select the option to unblock the ports.
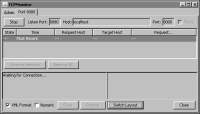
6 Choose Port 8080.
TCPMonitor—Port 8080 appears, as shown in Figure 21‑10.
7 To view the SOAP messages in indented XML format, select XML Format.
8 To change the split pane layout to a left-right panel view instead of the default, top-bottom panel view, choose Switch Layout.
Figure 21‑10 TCPMonitor—Port 8080
Task 2: Creating an IDAPI SOAP login application
In this task, you create a Java application to login to iHub using Java that generates a SOAP message. If you have access to the IDAPI training files, you can copy the necessary Java files from the IDAPI student DVD or download package.
1 Navigate to or create the \ActuateTraining3\IDAPI\source directory and create a new file called ActuateAPIEx.java. Open the file for editing and create an interface that extends com.actuate.schemas.ActuateAPI and includes the get and set methods for a SOAP header, as shown in the following code:
// @return Call object with the SOAP Header element set
public org.apache.axis.client.Call getCall();
}
2 In the \ActuateTraining3\IDAPI\source directory, create a new file called ActuateAPILocatorEx.java. Open the file for editing and create an interface that extends com.actuate.schemas.ActuateAPILocator and implements the ActuateEx interface to construct the soap header after locating the iHub server, as shown in the following code:
import javax.xml.rpc.Call;
import javax.xml.rpc.ServiceException;
import org.apache.axis.message.SOAPHeaderElement;
publicclass ActuateAPILocatorEx
extends com.actuate.schemas.ActuateAPILocator
implements ActuateAPIEx {
private java.lang.String authId = "";
private java.lang.String locale = "en_US";
private java.lang.String targetVolume;
private java.lang.String targetServer;
private java.lang.String connectionHandle;
private java.lang.Boolean delayFlush;
org.apache.axis.client.Call call = null;
/**
* Constructor for ActuateAPILocatorEx
*/
public ActuateAPILocatorEx() {
super();
}
/**
* Create call object and add Actuate's SOAP Header
*/
public Call createCall() throws ServiceException {
3 In the \ActuateTraining3\IDAPI\source directory, create a new file called Arguments.java. Open the file for editing and create a class to parse command line arguments, including the server URL, as shown in the following code:
import java.util.Vector;
import java.util.Enumeration;
import java.util.NoSuchElementException;
publicclass Arguments{
// default server settings
String serverURL = null;
String username = null;
String password = null;
boolean embeddedDownload = false;
Vector arguments = new Vector();
Enumeration enumeration;
Arguments(String args[]){
try {
// check each argument if it's '-h http://something'
4 In the \ActuateTraining3\IDAPI\source directory, create a new file called AcController.java. Open the file for editing and create a class to control the client work flow by calling methods from the Arguments and ActuateEx classes, as shown in the following code:
if ((proxy == null) || !serverURL.equals(actuateServerURL)) {
if (serverURL != null)
actuateServerURL = serverURL;
System.out.println("Setting server to " + actuateServerURL);
proxy = (ActuateSoapBindingStub)
actuateAPI.getActuateSoapPort(
new java.net.URL(actuateServerURL));
}
}
/**
* Sets the password.
* @param password The password to set
*/
publicvoid setPassword(String password) {
if (password == null)
password = "";
this.password = password;
}
/**
* Sets the username.
* @param username The username to set
*/
publicvoid setUsername(String username) {
if (username == null)
return;
this.username = username;
}
/**
* Returns the password.
* @return String
*/
public String getPassword() {
return password;
}
/**
* Returns the username.
* @return String
*/
public String getUsername() {
return username;
}
}
5 In the \ActuateTraining3\IDAPI\source directory, create a new file called AcLogin.java. Open the file for editing and create a class that uses the IDAPI AcController.login method to connect with iHub and return a message, as shown in the following code:
/* This program demonstrates a login to a volume as Administrator: outputs a success message confirming the login or, if an error occurs, a usage statement to the console.
*/
import com.actuate.schemas.*;
publicclass AcLogin {
publicstaticfinal String usage = "Usage:\n"+"
java AcLogin [options]\n";
publicstaticvoid main(String[] args) {
// set command line usage
Arguments.usage = usage;
// get command line arguments
Arguments arguments = new Arguments(args);
try {
// login to actuate server
AcController actuateControl = new AcController(arguments.getURL());
Task 3: Redirect a client SOAP request to TCPMonitor
In this task, you run a Java application from the command line, redirecting the program to send a volume request to the port where TCPMonitor listens. After you type each command at the command prompt, press Enter.
1 Open another command prompt window.
2 At the command prompt, type:
cd C:\ActuateTraining3\IDAPI
3 At the command prompt, type:
mkdir build
4 Add the necessary Axis libraries from your Server Integration Technology installation directory and the new classes to the classpath using a command similar to the following:
set CLASSPATH=C:\Actuate3\ServerIntTech3\Web Services\Examples\Axis Client\lib\*;C:\ActuateTraining3\IDAPI;C:\ActuateTraining3\IDAPI\source;C:\ActuateTraining3\IDAPI\build;
5 Compile the specified Java application by typing the following command:
6 Run the Java application by typing the following command:
java AcLogin -h http://localhost:8080
The Java application writes the message shown in Figure 21‑11 to the command prompt window when you successfully log in to the volume.
Figure 21‑11 Message indicating that the login operation succeeded
Task 4: View a SOAP message in TCPMonitor
In this task, you examine the details of the SOAP request and response messages resulting from a successful volume login operation.
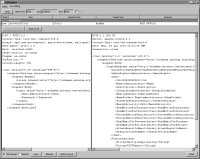
1 In the left panel of TCPMonitor, shown in Figure 21‑12, examine the following elements of the SOAP login request message:
In HTTP header, notice that SOAPAction contains a set of double quotation marks. The volume uses this setting to identify a SOAP message.
In the SOAP envelope, examine the SOAP and XML Schema namespace URIs.
In the SOAP header, notice the locale tag.
In the SOAP body, examine the login tag with references to the http://schemas.actuate.com/actuate11 namespace, the <User> attribute, and the <Password> attribute.
2 In the right panel of TCPMonitor, shown in Figure 21‑12, examine the following parts of the body of the SOAP login response message from the volume:
Examine the <ACTU:LoginResponse> tag.
Examine the <AuthId> tag. A subsequent request for the current session must send this encrypted, authenticated token.
Notice the <AdminRights> tag. This tag indicates that the user is the Administrator.
Notice the <FeatureOptions> tag. This tag indicates available iHub features as attributes in an eight-element string array.
Figure 21‑12 TCPMonitor displaying the SOAP login response message