The XML schema specifies a grammar that you must follow when creating an extension in the Eclipse PDE. When you select an element of an extension in the Extensions page of the PDE, Eclipse uses the XML schema to populate the Extension Element Details section with the list of valid attributes and values for the element.
How to specify the plug-in extension content
1 On PDE Manifest Editor, choose Extensions.
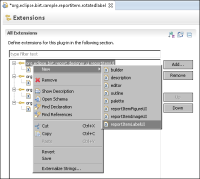
2 In All Extensions, right-click org.eclipse.birt.report.designer.ui.reportItemUI and choose New➛reportItemLabelUI, as shown in Figure 23‑7.
Figure 23‑7 Selecting a report item extension element
All Extensions adds the extension, org.eclipse.birt.sample.reportitem.rotatedlabel.ReportItemLabelUI (rotatedItemLabelUI), and Extension Element Details lists rotatedItemLabelUI properties.
3 In Extension Element Details, type the following fully qualified class name:
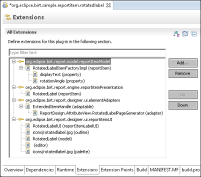
4 In All Extensions, right-click org.eclipse.birt.report.designer.ui.reportitemUI again and repeatedly choose New➛<extension element> to add the extension elements, properties, and values, shown in Table 23‑4. Note that PDE Manifest Editor creates the extension element rotated label model when adding this extension point. Change the default model value.
Table 23‑4 Properties for other reportitemUI extension elements
Extension element
Property
Value
model
extensionName
RotatedLabel
outline
icon
icons/rotatedlabel.jpg
editor
showInMasterPage
true
showInDesigner
true
canResize
true
menuLabel
palette
icon
icons/rotatedlabel.jpg
category
categoryDisplayName
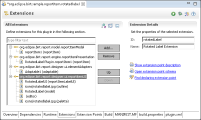
Do not enter a property value in Extension Element Details if the value field for the property in the table is empty. Extension elements appear as shown in Figure 23‑8.
Figure 23‑8 Specifying properties for rotatedItemLabelUI
5 In All Extensions, add the org.eclipse.birt.report.model.reportItemModel extension point. Select reportItem. In Extension Element Details, add the reportItem properties shown in Table 23‑5.
6 In All Extensions, in org.eclipse.birt.report.model.reportItemModel, perform the following tasks:
1 Right-click reportItem again and choose New➛property to create a new extension element property with the settings shown in Table 23‑6. The displayText property contains the text that the rotated label displays.
Table 23‑6 Property values for displayText
Extension element
Property
Value
property
name
displayText
type
string
displayNameID
detailType
subType
canInherit
true
defaultValue
RotatedLabel
isEncryptable
false
defaultDisplayName
Display Text
isList
false
hasOwnModel
true
allowExpression
2 Right-click reportItem and choose New➛property to add an extension element property named rotationAngle. The settings for this property are shown in Table 23‑7. As the property name suggests, this property contains the rotation angle of the displayed text.
Table 23‑7 Property values for rotationAngle
Extension element
Property
Value
property
name
rotationAngle
type
string
displayNameID
detailType
subType
canInherit
true
defaultValue
-45
isEncryptable
false
defaultDisplayName
Rotation Angle
isList
false
hasOwnModel
true
allowExpression
7 In All Extensions, expand org.eclipse.birt.report.engine.reportitemPresentation and choose org.eclipse.birt.sample.reportitem.rotatedlabel.reportItem1(reportItem).
8 In Extension Element Details, modify the reportItem properties to the values shown in Table 23‑8.
9 In All Extensions, right-click org.eclipse.birt.report.designer.ui.elementAdapters and choose org.eclipse.birt.sample.reportitem.rotatedlabel.Adaptable1(adaptable).
10 In Extension Element Details, modify the adaptable property to the following class: