Creating a scheduled task
A scheduled task includes a trigger, task details, and an assigned action. The following procedure summarizes high‑level steps for creating a scheduled task.
1 Create a new scheduled task.
2 Configure conditions that trigger the task.
3 Assign an action to the scheduled task.
4 Save the scheduled task.
How to create a task triggered by time
1 Choose Workflow—Tasks and events—New Scheduled Task.
2 In Scheduled task—Name, type characters that name the task.
3 Optionally, describe and activate the task, using the following options:

In Description, type characters that describe the task.
Select Starting date and Ending date. Then, use the date and time selector to specify a range of dates during which this task trigger is active.
4 In Trigger for task, expand Scheduled task on time.
5 Drag Time to the right and drop it in the box.
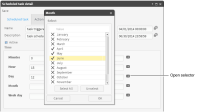
6 In Time, select values for each time parameter using the selector, as shown in
Figure 8‑1.
For example, double‑click the selector icon for Month. In Month, select values for the minute, hour, day, month, and day‑of‑week that specify when the task triggers. Choose OK. Not every field requires a value.
Default values are: minute = 0, hour = 1, and current day. Default settings trigger a task on this day of each month at the hour and minute 0.
Figure 8‑1 Setting time properties for a scheduled task
7 Choose Save.
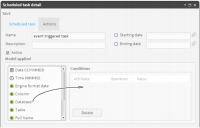
How to create a condition for an event trigger
1 In Scheduled task detail, in Trigger for task, expand Scheduled task on event.
2 Drag an event and drop it as shown in
Figure 8‑2.
Figure 8‑2 Creating a trigger for an event‑driven task
3 Drag a listed attribute and drop it in Conditions, as shown in
Figure 8‑3.
Figure 8‑3 Creating a condition that triggers an event‑driven task
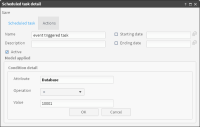
4 In Conditions detail, select an operation and type a value for the selected attribute, as shown in
Figure 8‑4.
Figure 8‑4 Configuring condition details for an event trigger
5 Choose OK.
How to assign an action to a scheduled task
1 In Actions, expand an action group.
2 Drag an action name and drop it in the Actions visual editor, as shown in
Figure 8‑5.
Figure 8‑5 Dropping an action in Actions visual editor
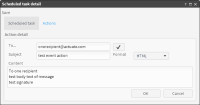
3 In Action detail, define action properties using tools provided for a selected action type.
For example, to create a Send email action, provide values for the following properties, using the toolset provided in Action detail editor, as shown in
Figure 8‑6.
In To..., type a valid email address.
Choose the check mark to validate an email address.
In Subject, type a subject for an email message.
In Format, select HTML or Plain Text.
In Content, type characters that comprise an email message.
Figure 8‑6 Defining properties for a Send email action
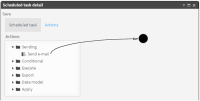
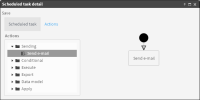
4 Choose OK. An action appears in the Actions visual editor, as shown in
Figure 8‑7.
Figure 8‑7 Examining the visual actions editor
How to edit action details
1 In Actions visual editor, double‑click an action.
2 Action detail opens editing tools appropriate for the selected action.
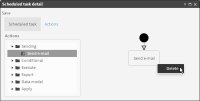
How to remove an action from a scheduled task
1 In Actions, right‑click an action in the visual editor.
Figure 8‑8 Removing an action from a scheduled task