The tasks for creating a Metrics Management database include:
Naming the database
Creating an administrator password
If necessary, providing a database license file
Defining the database start and end years, and fiscal year start month
Choosing which period types to make available
Specifying the database type
You can rename the database or change the administrator password after creating the database. You cannot change the database start and end years, fiscal year start month, and available period types after database creation.
Metrics Management creates a database administrator user named Administrator. Security settings allow the Administrator to perform any action on any Metrics Management object. These security settings are non-editable. The volume administrator name in iHub is Administrator. Logging in to Visualization Platform or Metrics Management using Metrics Management authentication requires having the same user name for the iHub administrator and Metrics Management administrator. For this reason, do not change the Administrator name in Metrics Management.
How to create the new database
1 In Metrics Management, choose File➛Open Servers and Databases. If prompted, choose Yes to close the database that is open. Servers and Databases opens.
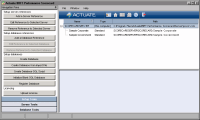
2 From the list of servers in the main window, select the server on which to create the database, as shown in Figure 1‑1.
Figure 1‑1 Servers and Databases
3 In the Navigation Pane, choose Setup Tools.
4 In Setup databases, choose Create Database. Create a New Database appears, as shown in Figure 1‑2.
Figure 1‑2 Creating a new Metrics Management database
How to create an administrator password
Using a Standard database, a new administrator password must be at least eight characters, is case‑sensitive, and can contain special characters. In Metrics Management database settings, name the Metrics Management database, and change the administrator password.
1 In Metrics Management database name, type a name for the database.
2 In Administrator login name, leave Administrator unchanged. The name for the Metrics Management database administrator is Administrator.
3 In Password and Reenter password, type a password for the Administrator user.
How to provide a database license file
If your organization purchased the database license model, provide the database license file. Otherwise, Database license appears unavailable.
1 To provide the license, in Database license, choose Browse.
2 In Upload new license to Metrics Management, locate and select the database license file. Then, choose Open.
How to specify calendar settings
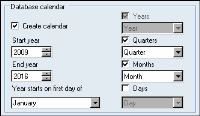
In Database Calendar, shown in Figure 1‑3, you can specify calendar settings.
Figure 1‑3 Defining database calendar settings
Ensure that Create calendar is selected and perform any of the following tasks:
To define start and end dates for the database, select a year in Start year and a year in End year.
To create a fiscal year that begins in a month other than January, in Year starts on the first day of, select a start month.
To make a period type available in the database, select Quarters, Months, or Days. You cannot deselect the Years period type.
How to specify the Standard database type
To specify a Standard database, in Database server settings, in Type, select Standard, as shown in Figure 1‑4.
Figure 1‑4 Selecting the Standard database type
How to specify SQL Server database settings
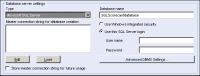
1 In Database server settings, in Type, select Microsoft SQL Server as the database type.
2 In Database name, enter the name of the database to create in SQL Server, as shown in Figure 1‑5.
Figure 1‑5 Specifying the type and name of a SQL Server database
Provide credentials by performing one of the following tasks:
To log on using Windows credentials, select Use Windows integrated security. The account running the Metrics Management Server as a Windows service must have the appropriate rights to SQL Server.
To log on using SQL Server user credentials, select Use this SQL Server login. Then, provide the appropriate user name and password.
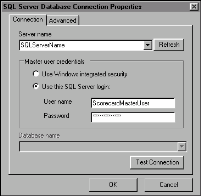
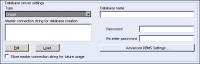
3 To create a connection to the SQL Server database, in Master connection string for database creation, choose Edit. SQL Server Database Connection Properties appears, as shown in Figure 1‑6.
Figure 1‑6 Specifying SQL Server connection settings
Perform the following tasks. Then, choose OK.
1 In Connection, from Server name, select the SQL Server name.
2 In Master user credentials, provide credentials to log on to SQL Server by performing one of the following tasks:
To log on using Windows credentials, select Use Windows integrated security. The account running the Metrics Management Server as a Windows service must have the appropriate rights to SQL Server.
To log on using SQL Server user credentials, select Use this SQL Server login. Then, provide the appropriate user name and password.
3 Choose Test Connection. In the confirmation message, choose OK.
4 To save the connection string, choose Store master connection string for future usage. The string saves in the psvsrvrprivate.ini configuration file, which is located by default in C:\Program Files\Actuate\iHub3\modules \\Server\Resources on a 32-bit machine and C:\Program Files(x86)\Actuate\ Metrics Management\Server\Resources on a 64-bit machine.
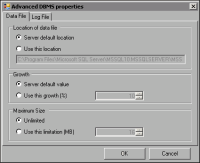
5 To change default database settings, choose Advanced DBMS Settings. Advanced DBMS properties appears, as shown in Figure 1‑7.
Figure 1‑7 Specifying advanced SQL Server database settings
Perform any of the following optional steps:
To specify a location for the database .mdf file, in Location of data file, choose Use this location. Then, provide a path.
To specify the maximum percentage size to permit the database to increase, in Growth, choose Use this growth (%). Then, provide a percentage value.
To specify the maximum size for the database, in Maximum Size, choose Use this limitation (MB). Then, provide a value.
To specify a location for the database log file, choose Log File. In Location of log file, choose Use this location. Then, provide a path.
How to specify Oracle database settings
1 In Database server settings, in Type, select Oracle as the database type, as shown in Figure 1‑8.
Figure 1‑8 Selecting the Oracle database type
2 In Database server settings, perform the following tasks:
1 In Database name, enter the name of the database to create in Oracle. The database name cannot contain spaces.
During database creation, the Metrics Management master user creates an Oracle user to perform data transactions between Metrics Management and the Oracle database. The new user is named based on the value provided in Database name.
2 In Password, enter the password for this user. Then, reenter the password.
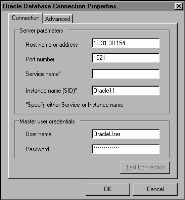
3 In Master connection string for database creation, choose Edit.
4 In Oracle Database Connection Properties, shown in Figure 1‑9, create a connection to the Oracle database. Then, choose OK.
5 In Server parameters, perform the following tasks:
1 In Host name or address, provide the name or IP address of the Oracle database server machine.
2 In Port number, provide the port number for Metrics Management to communicate with the Oracle database server.
3 Perform one of the following tasks:
In Service name, provide the Oracle service name. The service name is the name of the Oracle service on the Oracle database server.
In Instance name (SID), provide the instance name or system ID of the Oracle database.
If both service name and instance name are provided, Metrics Management connects using the Oracle service name.
4 In Master user credentials, provide the Metrics Management master user name and password.
5 Choose Test Connection. Then, choose OK.
6 To save the connection string, choose Store master connection string for future usage. The string saves in the psvsrvrprivate.ini configuration file, which is located by default in C:\Program Files\Actuate\iHub3\modules \\Server\Resources.
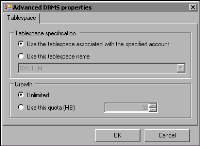
7 In Advanced DBMS properties, shown in Figure 1‑10, provide tablespace specifications or specify the growth limits for the database as necessary.
Perform either of the following steps, if necessary:
To define a tablespace, in Tablespace specification, choose Use this tablespace name. Then, provide a name.
To specify the maximum size for the database, in Growth, choose Use this quota (MB). Then, provide a value.
8 To create the database, choose Create in Create a New Database. Metrics Management creates the database. Choose OK to accept the confirmation message. In the main window, the new database appears under the server on which the database was created.