Metrics Management supports three types of database preferences. User-interface preferences define the corporate appearance of Metrics Management. Personalizable preferences define default view and measure display settings that users can change. System-level preferences define settings that enable functionality available to users. The system specialist can define all database preferences. Non‑administrative users can only modify personalizable preferences settings, and, if permitted by the system specialist, book images.
User-interface preferences include:
Specifying an image for the home page
The home page image, typically a corporate logo, displays at the top of the home page.
Specifying an image for books
The book image, typically a corporate logo, displays on all book cover pages. The system specialist can choose whether to allow users to change this image.
Providing contact information for the book cover page
Contact information is typically the organization’s mission statement and the system specialist’s e-mail address. Metrics Management copyright information always appears on the book cover page.
Defining the book for My Book
My Book is a briefing book that is available to all users by choosing My Book from the toolbar. The book typically contains one section that tracks the organization’s strategic objectives. Additional sections use filters to provide performance information specific to the current user, such as measures that are performing well. When creating the filters for My Book, specify the owner as <Current User>, and ensure that the Everyone group can view the filters.
Personalizable preferences include:
Defining the default location for new views
Typically, the default location is the top location in the location structure. If the database contains more than one location structure, choose the most commonly used location in the database. This setting defines the initial location that a view displays. Users can personalize this setting when creating a new view.
Defining the default period type for new measures, and for data entry
Typically, the system specialist defines the default period type based on when users report measure data. For example, if users provide measure data on a monthly basis, then define Month as the default period type. Users can personalize this setting when creating a new measure.
System-level preferences include:
Specifying the user for active web publishing
The active web publishing user has restricted privileges that enable secure publishing of books, dashboards, maps, or views on an internal web site or personalized web page. For more information about configuring active web publishing, see Publishing data.
Setting up the Performance Management page in Share
Share is a repository for links and performance management content. The system specialist can rename the button and web page for the Performance Management page. In the Windows Client, defining an active web publishing link as the web page requires adding the Metrics Management Classic Web Client as a trusted site in IE with custom level security set to low. By default, the Performance Management page links to performance management content on the Actuate web site.
How to define database preferences
1 Choose Setup➛Configure➛Options.
2 In Database Preferences, to define user-interface preferences, perform any of the following tasks:
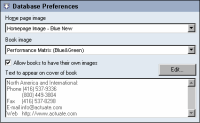
Choose the home page image and default book image, as shown in Figure 1‑24. To allow users to change the default book image, select Allow books to have their own images.
Figure 1‑24 Defining home page and book database preferences
Choose the book for My Book, as shown in Figure 1‑25.
Figure 1‑25 Specifying the database book
3 To define user-level preferences, choose a default location and period type, as shown in Figure 1‑26.
Figure 1‑26 Defining the default location and period type
4 To define system-level preferences, perform any of the following tasks:
Choose an active web publishing user, as shown in Figure 1‑27.
Figure 1‑27 Defining the active web publishing user
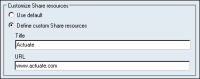
To change the Performance Management web page for Share, as shown in Figure 1‑28, perform the following tasks:
1 In Customize Share resources, select Define custom Share resources.
2 In Title, provide a new name for the Performance Management button.