The following procedure explains how to create a data import. To create a data import:
Specify the import source.
Specify import column definitions.
Specify error log settings.
Specify security settings.
A data import includes either user data or user commentary. To import both data and commentary, create and run two separate imports.
How to create a data import
1 In the Navigation Pane, choose Data➛Data Imports➛Create.
2 In Setup Data Import: <New>—Properties:
In Name, provide a name for the data import.
In Description, choose Edit. Provide a description. Then, choose OK.
In Categories, choose Edit. Select or create categories. Then, choose OK.
3 In Type, perform one of the following tasks:
To create a data import, choose Import user data.
To create a commentary import, choose Import user commentary.
How to specify the import source
In Source, define the import source type as a text file, XML file, or a database:
1 To specify a text file as the source file, perform the following tasks:
1 In Import source, choose Import from a text file.
2 To specify the text file, in Import from a file, choose Browse. Then, navigate to the file location. Select the file. Then, choose Open.
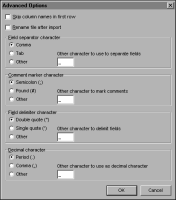
3 To customize the text file for import, choose Advanced. In Advanced Options, shown in Figure 7‑30, perform any of the following optional tasks:
Figure 7‑30 Setting advanced options for a data import from a text file
To exclude the header row from the import file, choose Skip column names in first row.
To append today’s date to the import file name after import, choose Rename file after import.
To replace the current character for the field separator, comment marker, field delimiter, or decimal character with an alternative character, select or provide an alternative character for each.
2 To specify an XML file as the source file, perform the following tasks:
1 In Import source, choose Import from an XML file.
2 To specify the XML file, in Import from a file, choose Browse. Then, navigate to the file location, select the file, and choose Open.
3 To specify a database as the source file, perform the following tasks:
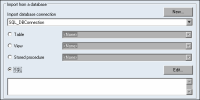
1 In Import source, choose Import from a database, as shown in Figure 7‑31.
Figure 7‑31 Creating a data import from a database
2 In Import database connection, select a connection name from the list, as shown in Figure 7‑32.
Figure 7‑32 Selecting a connection name
Select one of the following data access methods:
Table. Then, select a table name from the list. To import from an Excel file, select the named range created in the Excel import file. In the example in Figure 7‑33, Import_Monthly_Actuals is selected.
Figure 7‑33 Specify database connection values
View. Then, select a view name from the list.
Stored Procedure. Then, select a procedure name from the list.
SQL. Choose Edit. Then, type or provide a SQL or MDX query, in SQL.
How to specify import column definitions
1 In Table, to specify a value for a column, instead of importing a value, in Options perform any of the following tasks:
To specify a measure, select Do not import measures. Then, choose a measure.
To specify a location, select Do not import locations. Then, choose a location.
To specify a comparative, select Do not import comparatives. Then, choose a comparative.
To specify a period, select Do not import periods. Then, choose a period.
To specify a commentary type, select Do not import commentary types. Then, choose a commentary type. Selecting a commentary type is available with commentary imports only.
Specifying a value removes the column from Columns in Setup Data Import.
2 In Columns, either accept the order that the columns are in or rearrange and add to them to match the import file. To add or remove import column definitions, choose Change. In Columns, shown in Figure 7‑34, perform any of the following steps:
Figure 7‑34 Selecting data import column definitions
To add a column definition to Selected, select the definition in Available and choose Add.
To change to order of definitions in Selected, select a definition and choose Move Up or Move Down. Choose Sort to sort definitions alphabetically.
To add a column definition that uses a translator:
1 In Available, select a translated column name.
2 In Translator, select a translator name.
3 Choose Add to move a translated column name from Available to Selected.
4 Choose OK.
To add a skip column, add Skip to Selected.
3 To view the import file, in Columns, perform one of the following steps:
If the import source is a text or XML file, choose Show File.
If the import source is a database, choose Show SQL.
How to specify error log settings
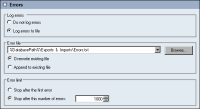
To enable the import error log file, in Errors, make selections similar to those shown in Figure 7‑35.
Figure 7‑35 Defining error log settings
1 To enable logging of data import errors, in Log errors, choose Log errors to file.
2 To define the log file location, in Error file, choose Browse and navigate to a location to save the file. Provide a file name with the .txt file extension.
3 In Error file, select one of the following file handling options:
To overwrite the log file each time the import runs, select overwrite existing file.
To append the error log each time the import runs, select Append the error log to an existing error file.
4 To limit the number of errors logged, in Error limit, select Stop after this many errors. Then, provide a value.
How to specify security settings
1 If necessary, choose Security. Then, assign access rights for the data import to groups and users.