Before creating an internet library, decide which books to include in the library. Choose from existing books, or create books specifically defined for publishing.
Metrics Management supports creating any number of libraries. Each library can contain multiple briefing books.
The system specialist restricts access to published data by specifying the Publish content for user setting in an internet library.
How to create an internet library
1 In the Navigation Pane, choose Setup➛Internet Libraries➛Create.
2 In Name, perform the following tasks:
In Name, provide a name for the internet library. This name appears on the library home page.
For Description, choose Edit. In Edit, enter a description and choose OK. The description appears below the library name on the library home page.
For Categories, choose Edit and select or create categories.
3 In Library Options, perform any of the following tasks to specify internet library settings:
To select which briefing books to publish:
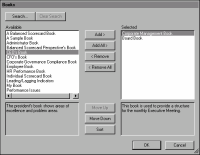
1 In Books, choose Edit.
2 Add the briefing books to the Selected list, as shown in Figure 8‑2.
Figure 8‑2 Choosing books for an internet library
3 To show briefing books in a particular order, rearrange the books in the Selected list by choosing Move Up or Move Down, or choose Sort to arrange the briefing books in alphabetical order.
4 Choose OK.
To enable users to drill down into the measures or locations in a briefing book, select Enable submeasure drill down and Enable sublocation drill down. Clear the appropriate check box to restrict access to submeasures or sublocations in a book or to limit the size of a published briefing book.
To show Info in the briefing book’s dashboard, select Show measure info.
To show Notes in Info in the briefing book’s dashboard, select Show notes.
To display a background image on the library home page, select a graphic in Image for library page.
To overwrite the default contact information for an internet library briefing book, choose Edit. Then, type new contact details, as shown in Figure 8‑3, and choose OK. Contact information appears at the top of each book’s home page.
Figure 8‑3 Entering contact information for an internet library
To specify which user’s security settings apply to published books, select a user from Publish content for user.
To change the text direction for a right-to-left language, for example Arabic or Hebrew, select Right to left, and select the appropriate character set. Otherwise, select Undefined.
4 In Path, specify the location in which to create published briefing books. Choose Browse to navigate to a location. Alternatively, select a predefined named path in Content path. Actuate recommends generating internet library files in a folder dedicated to internet libraries.
5 Choose Options. In Internet library header and in Internet library footer, perform any of the following tasks:
To add an existing header or footer, select a header or footer from the list.
To show no header or footer, select <None>.
To show the header or footer specified for the database, select <Default>.
To edit an existing header or footer, select a header or footer from the list, and choose Edit.
To create a new header or footer, choose New to open Setup➛Header and Footer.
6 Choose Security, and assign access rights to groups and users.