About entering measure data in the data entry table
In the data entry table, you personalize the table to display the measures and locations for which you want to enter data. You choose a specific view or all the measure in the database and the location. You restrict the number of measures in the table by choosing a comparative and period type. You can also change the table’s x-axis to show measures against locations, comparatives, or periods, and locations against comparatives or periods.
The measures for which you are allowed to enter data appear by default. The polarity indicator arrow in the top row of the data table indicates whether to consider high values good or bad. You can choose to display all the measures that you are allowed to view.
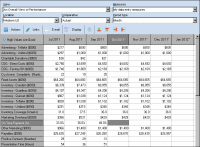
For example, Figure 3‑3 shows the My data entry measures for the Western US location of the Overall Performance View.
Figure 3‑3 Results from selected measure over period
About pending user data entry
Metrics Management performs calculations on data when books and views open. Your system specialist can choose to perform these calculations during non-peak hours by enabling pending user data. If so, any data you enter will not be calculated until the system specialist synchronizes the database.
To be able to enter user data when pending user data is enabled, in Data➛Data Entry, you must select User data with pending changes from the Type of data list. Cells containing pending user data appear with a yellow background and a black border. After the system specialist synchronizes the database, pending user data becomes user data.
Entering measure data in the data entry table
Measure cells available for data entry appear white. If a formula measure allows for direct data entry, the formula name appears in italics in the measure list indicating that you can enter comparative data to override the formula’s calculated value.
If data is locked, you can only input data for periods after the locked date. If you need to input or modify data prior to that date, the system specialist must modify the Calendar Settings to enable this task.
The Type of user data list is available only if your system specialist has enabled pending user data for the database. To enter pending user data, you must select User data with pending changes. For more information, see About pending user data entry.
How to enter data in the data entry table
1 In Navigation Pane, choose Data➛Data Entry. Data Entry opens in the main window, as shown in Figure 3‑3.
2 To choose measures and locations:
From the View list, select a view for which to enter data. Select a specific view to show the measures in that particular view. Select <All measures> to display all the measures you are authorized to see.
From the Type of user data list, to view user data, select User data. To enable entering pending user data, select User data with pending changes.
From the Measures list, choose My data entry measures or All measures. My data entry measures shows only the measures for which you can enter data. All Measures shows all the measures you are authorized to see.
From the Location list, select a location for which to enter data. The default location is your preferred location.
From the Comparative list, select a comparative type for which to enter data. For example, choose actual or target.
From the Period type list, select a period type. For example, select Month to display all your monthly measures.
3 From the Display menu, you can change the data table’s x-axis and y-axis from the default of Measures by Period. Choose one of the following options:
Measures by Locations to display measures on the y-axis and locations on the x-axis.
Measures by Comparative to display measures on the y-axis and comparatives on the x-axis.
Measures by Periods to display measures on the y-axis and periods on the x-axis.
Locations by Comparatives to display locations on the y-axis and comparatives on the x-axis.
Locations by Periods to display location on the y-axis and periods on the x‑axis.
4 Choose the appropriate cell and enter a value for the measure or location. Data saves when you choose another cell. To choose an adjacent cell, press the left, right, up, or down arrow key.
5 To copy a value from one cell to an adjacent cell, choose one of the Copy Cell buttons. You can copy to the left, right, up, or down.