The system administrator creates a cluster in System Console—Clusters. Then, the system administrator configures the cluster. The cluster must exist before the system administrator can perform any configuration tasks.
2 In Create Cluster, set the following properties, as shown in Figure 2‑2. A property name appearing with an asterisk (*) next to the name is a required property.
Name
Type a unique identifier for an cluster name, such as the company name.
Description
Type a description for the cluster.
Cluster URL
Optionally, type a URL for the cluster. The cluster URL specifies the location of a BIRT iHub proxy that performs load balancing by distributing requests among nodes. The proxy can be a server or a third-party load‑balancing mechanism. Apache and Nginx are examples of third-party load-balancing solution providers. For information about using an Apache web server for load balancing and as a proxy for a BIRT iHub cluster, see “Configuring an Apache web server for load balancing and proxying,” later in this chapter.
New Password
Type a new password. Actuate recommends creating a password at least eight characters long, containing at least one lowercase letter, one uppercase letter, and one digit.
Confirm New Password
Type the new password again.
Choose OK.
System Console creates the cluster, and displays a message telling the system administrator that the cluster has been created and that the system administrator must add a cluster node for the cluster to be operational.
About the cluster configuration categories
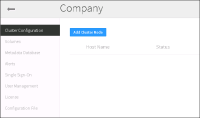
After System Console creates the cluster, System Console displays Cluster Configuration, which includes a side menu containing the following cluster configuration categories, as shown in Figure 2‑3. The system administrator specifies property settings for each category to configure the cluster.
Cluster Configuration
Add a cluster node to BIRT iHub System. Completion of this task makes the cluster operational. The system administrator must complete this task to specify any other property settings for the cluster.
Volumes
Add a volume to the cluster.
Metadata Database
Specify the type of relational database management system (RDBMS) the cluster uses, such as PostgreSQL, or Oracle.
Alerts
Configure one or more alerts for the cluster. System Console monitors conditions and activity levels in the cluster. An alert is a notification triggered by a condition or an activity level crossing a particular threshold.
Single Sign-On
View or change SAML Identity Provider information for the cluster. View or change Service Provider information for the cluster. Add a Service Provider.
User Management
Specify settings for managing user authentication and authorization.
License
Update the license file for the cluster.
Configuration File
Update the shared configuration file for the cluster.
Figure 2‑3 Viewing menu of cluster configuration categories
Adding cluster nodes to a cluster
This section demonstrates adding three nodes to a cluster named Company. The machine name of the first node the system administrator adds to the cluster is urup, the machine name of the second node is kozu, and the machine name of the third node the system administrator adds to the cluster is tupo. System Console and BIRT iHub are running on urup. urup also contains the shared configuration directory, which all nodes in the cluster access. The second and third nodes, kozu and tupo, each run a BIRT iHub instance. Neither kozu nor tupo run a System Console instance.
After performing this task at the operating system level, the system administrator performs the following tasks in System Console:
1 On Cluster Configuration, choose Add Cluster node, as shown in Figure 2‑4.
Figure 2‑4 Choosing Add Cluster Node
2 On Add Cluster Node, set the following properties, as shown in Figure 2‑5. A property name appearing with an asterisk (*) next to the name is a required property.
Host Name
Type the cluster node computer name.
Description
Type a description for the node.
Figure 2‑5 Adding a cluster node
Choose OK.
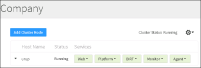
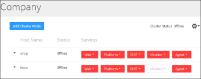
System Console displays the following information about the cluster node, as shown in Figure 2‑6:
Host Name
The machine name of the cluster node
Status
Status is either Running or Not Running
Services
The services running on the cluster node
Figure 2‑6 Viewing cluster node host name, status, and services
How to add the second cluster node to a cluster and enable the default volume
Before adding the second node, kozu, to the cluster, the system administrator performs the following tasks:
On urup, the system administrator:
Creates a folder for the shared configuration directory and shares it.
Shares the folder containing the files for the out-of-the-box (OOTB) sample volume, Default Volume.
After performing these tasks at the operating system level, the system administrator performs the following tasks in System Console:
1 On Cluster Configuration, choose Add Cluster Node, as shown in Figure 2‑6.
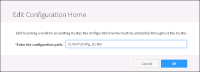
2 On Edit Configuration Home, in Enter the configuration path, type the path to the shared configuration directory, using UNC format, as shown in Figure 2‑7. UNC format supports all nodes in the cluster finding the shared configuration directory. The path you type is the path that appears as the Network Path in Properties—Sharing for the shared configuration directory. In this example, the shared configuration directory, config_cluster, is on a machine named URUP. Choose OK.
Figure 2‑7 Specifying the path of the shared configuration directory
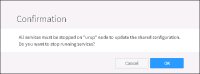
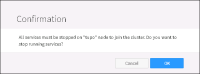
3 On Confirmation, choose OK to stop the services on the previously added cluster node, urup in this example, as shown in Figure 2‑8.
Figure 2‑8 Stopping the services on previously added cluster node
4 On Add Cluster Node, specify the machine name of the cluster node you are adding and optionally, a description, as shown in Figure 2‑9.
Figure 2‑9 Specifying name and description of node you are adding
5 On Confirmation, choose OK to stop the services on the node you are adding to the cluster, as shown in Figure 2‑10.
Figure 2‑10 Stopping the services on the node you are adding to the cluster
System Console adds the second node to the cluster, as shown in Figure 2‑11. By default, the Monitor service runs only on the node having the shared configuration directory.
Figure 2‑11 Viewing the second node added to the cluster
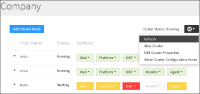
6 Choose Start Cluster from the Manage Cluster menu, as shown in Figure 2‑12. Then, choose Refresh from this menu to update the status of the services during the Start Cluster operation. Wait until all services that are red turn green before proceeding to the next step, as shown in Figure 2‑13.
Figure 2‑12 Choosing to start the cluster
Figure 2‑13 Viewing the started services on both nodes
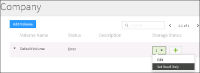
7 Choose Volumes from the side menu. Default Volume shows a status of ‘Error’. Left-click the arrowhead icon in the first Storage Status box for Default Volume and choose Set Read Only, as shown in Figure 2‑14.
Figure 2‑14 Choosing Set Read Only for Default Volume
On Confirmation, choose OK to confirm that you want to change the Default Volume state to Read only.
8 On Volumes, left-click the arrowhead icon in the first Storage Status box for Default Volume and choose Edit, as shown in Figure 2‑15.
Figure 2‑15 Choosing to edit Default Volume storage
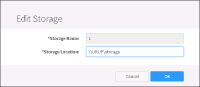
9 On Edit Storage, in Storage Location, type the path to the Default Volume storage folder, storage, using UNC format, as shown in Figure 2‑16. UNC format supports all nodes in the cluster finding this folder. The path you type is the path that appears as the Network Path in Properties—Sharing for the storage folder after sharing it. In this example, the Default Volume storage folder is on a machine named URUP. Choose OK.
Figure 2‑16 Specifying the Default Volume storage folder
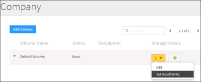
10 On Volumes, left-click the arrowhead icon in the first Storage Status box for Default Volume and choose Set Read/Write, as shown in Figure 2‑17.
Figure 2‑17 Setting Default Volume to Read/Write status
On Confirmation, choose OK to confirm that you want to change the Default Volume state to Read/Write.
11 On Volumes, left-click the arrowhead icon next to Default Volume and choose Disable, as shown in Figure 2‑18.
Figure 2‑18 Disabling Default Volume
On Confirmation, choose OK to confirm that you want to disable Default Volume.
12 On Volumes, left-click the arrowhead icon next to Default Volume and choose Enable, as shown in Figure 2‑19.
Figure 2‑19 Enabling Default Volume
On Confirmation, choose OK to confirm that you want to enable Default Volume.
Default Volume is enabled and ready for use, as shown in Figure 2‑20.
Figure 2‑20 Viewing Enabled status of Default Volume
How to add a third or subsequent node
Before adding the third node, tupo, or any subsequent node, to the cluster, the system administrator performs the following tasks:
On tupo, the system administrator:
Turns off the firewall.
Obtains the machine name and IP address.
Ensures that the logon account for the Actuate iHub service on the node has administrator privileges.
On both urup and tupo, the system administrator pings each machine from the other machine to ensure the machines can communicate.
After performing these tasks at the operating system level, the system administrator performs the following tasks in System Console:
1 On Cluster Configuration, choose Add Cluster Node.
2 On Add Cluster Node, specify the machine name of the cluster node you are adding and optionally, a description, as shown in Figure 2‑21.
Figure 2‑21 Specifying name and description of node you are adding
3 On Confirmation, choose OK to confirm that you want to stop the services on tupo, as shown in Figure 2‑22.
Figure 2‑22 Stopping services on the third node
System Console adds the third node to the cluster, as shown in Figure 2‑23. By default, the Monitor service runs only on the node having the shared configuration directory.
Figure 2‑23 Viewing the second node added to the cluster
4 Left-click the arrowhead icon next to tupo and choose Start Node, as shown in Figure 2‑24. Then, choose Refresh from this Manage Cluster menu to update the status of the services during the Start Node operation. When all the services that are red turn green, the node is ready for use.
Figure 2‑24 Choosing to start the cluster
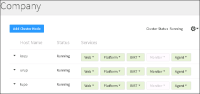
5 Choose Refresh from the Manage Clusters menu to update the status of the services during the Start Node operation, as shown in Figure 2‑25. When the services display green, the node is ready for use, as shown in Figure 2‑26. By default, the Monitor service runs only on the node containing the shared configuration directory, urup, in this example.
Figure 2‑25 Refreshing the status of services on the third node
Figure 2‑26 Viewing the running services in the cluster
Understanding Cluster Configuration
In Cluster Configuration, the system administrator adds a cluster node to the cluster. Additionally, Cluster Configuration supports management tasks such as starting, stopping, and editing the properties of the following:
The entire cluster
An individual cluster node
A service running on a cluster node
Performing management tasks for the entire cluster
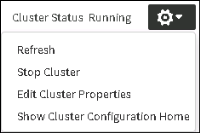
The system administrator chooses the cog-shaped icon to access the Manage Cluster menu, as shown in Figure 2‑27.
Figure 2‑27 Accessing the Manage Cluster menu
The Manage Cluster menu consists of the following options:
Refresh
Refreshes the status of the services running on all cluster nodes.
Stop or Start Cluster
Stops or Starts all nodes in the cluster. If the cluster is running, or online, Stop Cluster displays in the Manage Cluster menu. If the Cluster is stopped, or offline, Start Cluster displays in the Manage Cluster menu.
Edit Cluster Properties
Displays Edit Cluster Properties. The system administrator can change any of the following cluster properties. Choose Stop Cluster to stop the cluster before changing Cluster URL.
Name
Description
Cluster URL
Password
After making any cluster property changes choose OK. If you changed the Cluster URL, choose Start Cluster to start the cluster after choosing OK.
Show Cluster Configuration Home
Displays the location of the shared configuration folder that the AC_CONFIG_HOME element specifies in the acpmdconfig.xml file on the cluster node, in UNC format. For example, the following syntax specifies the path to the shared configuration directory used in “How to add the second cluster node to a cluster and enable the default volume,” earlier in this chapter:
\\urup\config_cluster
where urup is the name of the machine containing the shared configuration directory.
In a default BIRT iHub installation on Windows, performed using the installer, in which the install folder is C:\Actuate, the path AC_CONFIG_HOME specifies is:
Performing management tasks for an individual cluster node
The system administrator chooses the arrowhead icon next to a cluster node name to access the cluster node menu, as shown in Figure 2‑28.
Figure 2‑28 Accessing the cluster node menu
The following list describes the options on the cluster node menu:
Stop or start node
Stops or Starts the cluster node. If the cluster node is running, or online, Stop Node displays in the cluster node menu. If the cluster node is stopped, or offline, Start Node displays in the cluster node menu.
Edit
Displays Edit Cluster Node. The system administrator can change either of the following properties.
Host Name
Description
Delete
Deletes the node from the cluster.
Performing management tasks for a service running on a cluster node
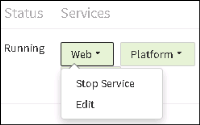
The system administrator chooses the arrowhead icon next to a service name to access the service menu. For example, Figure 2‑29 shows the menu for the Web service.
Figure 2‑29 Accessing a service menu
The following list describes the options on any service menu except the BIRT menu. For more information about the BIRT service, see “About the BIRT service,” later in this chapter.
Stop or Start Service
Stops or Starts the service. If the service is running, the color of the icon for the service is green, and Stop Service displays in the service menu. If the service is stopped, the color of the icon for the service is red, and Start Service displays in the service menu.
Edit
Displays Edit <service name>. For example, when the system administrator chooses to edit the Web service, System Console displays Edit Web.
For each service, Edit <service name> displays the Startup Mode, Process Name, and Java Arguments properties, as shown in Table 2‑1. The system administrator can change the Startup Mode and the Java Arguments properties. A property name appearing with an asterisk (*) next to the name is a required property.
If you modify the Java heap size argument for a service, make sure not to specify a size that exceeds the amount of RAM on the node. On some Linux platforms, the LMServer process may encounter an error if the Java heap size you specify exceeds the amount of RAM available on the node.
Choosing the arrowhead icon next to BIRT displays a menu containing one option, Edit.
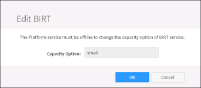
When the system administrator chooses Edit on the menu for BIRT, System Console displays Edit BIRT, as shown in Figure 2‑30.
Figure 2‑30 Editing the BIRT service
Changing the Capacity Option changes the server configuration template that this cluster node uses to configure itself. AC_CONFIG_HOME\acserverconfig.xml contains the server configuration templates. The names of the default server configuration templates that acserverconfig.xml contains are small, medium, large, and disable. Stop the Platform service before changing the name for Capacity Option in Edit BIRT.
A cluster can contain one or more volumes. For each volume, there is one database schema and one or more storage areas. The metadata database contains volume metadata, such as user and user group information. The storage area or areas contain volume consumable data, such as BIRT document content. When adding a volume, properties the system administrator specifies include schema name, storage area or areas, and the database user and password with which to connect to the metadata database.
A single BIRT iHub cluster can use only one security mechanism. For example, if the system administrator wants to use iHub User Management (default) as the user management setting for one volume and LDAP Adapter as the user management setting for a second volume, the system administrator must create a cluster for each volume. For more information on the user management setting, see “Configuring User Management,” later in this chapter.
Actuate recommends enabling e-mail notification before creating a new volume if you have not already enabled e-mail notification. You need e-mail notification enabled to successfully perform the following tasks:
Create a volume, if also specifying an e-mail address for the volume administrator
Edit an existing volume and selecting to reset the password
If you have not enabled e-mail notification, System Console displays an error message and does not allow you to complete these tasks. For information on enabling e-mail notification, see “Enabling e-mail notification,” later in this chapter.
This section demonstrates adding an example volume named sales_volume in the process of creating a two-node cluster.
How to add a volume
1 Actuate recommends enabling e-mail notification. For information on enabling e-mail notification, see “Enabling e-mail notification,” later in this chapter.
2 Create a new folder at the location where you want to store the volume data. For example, create a new folder in AC_SHARED_HOME named sales_storage. In a default BIRT iHub installation on Windows, performed using the installer, in which the install folder is C:\Actuate, the path for AC_SHARED_HOME\sales_storage is:
Do not reuse a storage location for a new volume. For example, if AC_SHARED_HOME\sales_storage was the storage folder for a previously existing volume, create a storage location for the new volume that has a path other than AC_SHARED_HOME\sales_storage. System Console allows using a subfolder of AC_SHARED_HOME\sales_storage, such as AC_SHARED_HOME\sales_storage\sales_storage_2.
3 On Volumes, choose Add Volume, as shown in Figure 2‑31.
Figure 2‑31 Choosing Add Volume
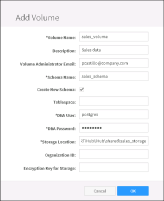
4 Configure the following properties on Add Volume. Figure 2‑32 shows the property values for an example volume, sales_volume. An asterisk (*) next to the property name means the property is required.
Volume Name
Type a name for the volume.
Description
Type a description for the volume.
Volume Administrator Email
Type the e-mail address of the volume administrator. When you create a volume, System Console sends a notification e-mail containing the volume password to this address if you have enabled e-mail notification. For more information, see “Enabling e-mail notification,” later in this chapter. If you leave Volume Administrator Email blank, BIRT iHub does not create a password for accessing the new volume in Visualization Platform. The BIRT iHub default user, Administrator, can log in to Visualization Platform to access the new volume without using a password. Then, in Visualization Platform, the administrator can choose My Profile and create a new password for accessing the volume.
Schema Name
Type a name for the volume schema that is 30 characters or less. BIRT iHub creates the volume and the volume schema at the same time.
Create New Schema
Select this property except under either of the following conditions:
You have already populated the schema using the Volume Data Store Administrator utility.
You are adding a volume for which the schema is already populated and the storage location already contains files.
Tablespace
Type the name of a tablespace for the volume schema. Alternatively, leave Tablespace blank to use the default tablespace.
DBA User
Type the name of the postgreSQL superuser, postgres.
DBA password
Type the postgreSQL superuser password. By default, the password is postgres.
Storage Location
Type the path of the volume storage folder you created in step 1.
Organization ID
Type an alphanumeric character string for the Organization ID. The LDAP adapter and RSSE implementation use the Organization ID to filter users and user groups. Alternatively, leave Organization ID blank. For more information on Organization ID, see “About managing volume access by users and user groups when using LDAP,” later in this chapter.
Encryption Key for Storage
Type the name of the Encryption key. Alternatively, leave Encryption Key blank.
On Add Volume, choose OK.
Figure 2‑32 Adding a volume
If e-mail notification is enabled, BIRT iHub sends an e-mail notifying the volume administrator that BIRT iHub has created the volume. The e-mail contains the password with which to log into Visualization Platform to access sales_volume, as shown in Figure 2‑33.
Figure 2‑33 Viewing the notification e-mail that the volume is created
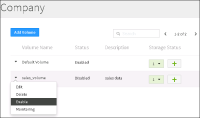
5 On Volumes, left-click the arrowhead icon next to the new volume name and choose Enable, as shown in Figure 2‑34.
Figure 2‑34 Viewing the new volume in the list on Volumes
Adding or updating a storage location
The system administrator can add a storage location for a volume. A single volume can use a maximum of 10 storage locations. The system administrator can also change the storage location for an existing volume.
How to add a storage location for an existing volume
1 Create a new folder at the location where you want to add storage. Do not use a storage location that a volume has used previously. The path of the storage location must be new.
2 On Volumes, in the Storage Status column, left-click the plus sign (+) in the row containing the name of the volume for which you want to add storage.
3 In Add Storage, specify the new storage location in Storage Location, as shown in Figure 2‑35. Choose OK.
Figure 2‑35 Adding a storage location for a volume
How to change the storage location for an existing volume
1 Create a new folder at the location to which you want to change the storage location. Do not use a storage location that a volume has used previously. The path of the storage location must be new.
2 On Volumes, in the Storage Status column, left-click the arrowhead icon in the row containing the name of the volume for which you want to change the storage location, and choose Set Read Only.
3 On Edit Storage, in Storage Location, specify the path to the new storage location you created in step 1, as shown in Figure 2‑36. Choose OK.
Figure 2‑36 Changing the storage location for a volume
4 On Volumes, in the Storage Status column, left-click the arrowhead icon in the row containing the name of the volume for which you changed the storage location, and choose Set Read/Write
Understanding the volume menu
Left-click the arrowhead icon next to a volume name to display a menu containing the following options:
Edit
Supports changing the following volume properties:
Description
Organization ID
Encryption Key for Storage
Delete
Deletes the volume. Delete is a menu option only when the volume is offline.
Enable or Disable
Brings the volume online and takes it offline. If the status of the volume is Enabled, the menu option is Disable. If the status of the volume is Disabled, the menu option is Enable.
Monitoring
Displays a link named Server Resource. Choose Server Resource to open a new browser window, in which System Console uses Actuate Viewer to display a graph showing the last 48 hours of activity on this volume for each of the following statistics.
Response Time (milliseconds)
Number of Alerts
Selecting the metadata database type
When the system administrator runs the BIRT iHub installation program, BIRT iHub installs the out-of-the-box (OOTB) PostgreSQL database to contain volume metadata. By default, Metadata Database displays the properties for the OOTB PostgreSQL database. The database type for this database is ActuatePostgreSQL. Figure 2‑37 shows the following properties for the OOTB PostgreSQL database, installed on a machine named urup. An asterisk (*) next to the property name means the property is required.
Database server
The host name of the machine containing the database.
Database port
The default port number for the OOTB PostgreSQL database is 8432.
Database name
The name of the database.
Encryption Method
requestSSL
BIRT iHub encrypts the login request and data using SSL. If the database server does not support SSL, the driver establishes an unencrypted channel.
SSL
BIRT iHub performs SSL certificate verification.
noEncryption
The channel between BIRT iHub and the metadata database passes unencrypted data.
Username
The database user name.
Password
The database user name password.
Test Connection
Choose to verify that the BIRT iHub system can successfully connect to the metadata database.
Accept the default values for the ActuatePostgreSQL database type. Alternatively, choose a different database type to configure the properties for a pre-existing third-party database for storing volume metadata. In database type, select one of the following relational database management systems (RDBMS):
PostgreSQL
Oracle
Depending on the database type selected, provide the following database information:
PostgreSQL
Database server
Type the host name of the machine containing the database, such as localhost.
Database port
Type a port number, or accept the default value, 8432 for out-of-the-box (OOTB) ActuatePostgreSQL, or 5432 for a pre-existing PostgreSQL database.
Database name
Type a name for the database.
Encryption Method
requestSSL
BIRT iHub encrypts the login request and data using SSL. If the database server does not support SSL, the driver establishes an unencrypted channel.
SSL
BIRT iHub performs SSL certificate verification.
noEncryption
The channel between BIRT iHub and the metadata database passes unencrypted data.
Schema name
Type the name of the volume schema.
Username
Type the database user name.
Password
Type the database user name password.
After setting these options, choose Test Connection to verify that System Console can successfully connect to the database.
Choose Save and continue to Alerts.
Oracle
Database Server
Type the host name of the machine containing the database, such as localhost.
Database Port
Type a port number, or accept the default value, 1521.
Service Name
Type a valid service name, such as orcl.actuate.com, that identifies the Oracle database server on which you want to install the volume metadata. Do not use just the system identifier (SID). Provide the complete reference to the server, including the domain. When using a service name, leave Tns Server Name and Tns Names File blank. When using a Transparent Network Substrate (TNS) service, leave service name blank.
TNS Name
Type the host name of the machine containing the TNSNAMES.ORA file if leaving Service name blank.
TNS Names File
Type the path to the TNSNAMES.ORA file if leaving Service name blank.
Encryption Method
SSL
BIRT iHub performs SSL certificate verification.
noEncryption
The channel between BIRT iHub and the metadata database passes unencrypted data.
Schema name
Type the name of the volume schema.
Username
Type the database user name.
Password
Type the database user name password.
After setting these options, choose Test Connection to verify that System Console can successfully connect to the database.
Choose Save and continue to Alerts.
Configuring alerts
System Console monitors a range of activity, conditions, and resources in a BIRT iHub System. An attribute identifies a monitored item. The system administrator can create an alert for any system attribute. Alerts supports the system administrator performing the following operations:
Viewing the list of alerts
Adding an alert
Editing an alert
Disabling and enabling an alert
Deleting an alert
The following sections describe these operations.
Viewing the list of alerts
View the list of alerts by choosing Alerts from the side menu, as shown in Figure 2‑38. An alert contains the following information:
Alert name
Name of the alert.
Attribute
Name of the attribute identifying the item BIRT iHub monitors.
Condition
Condition that determines whether a monitored item reaches the alert threshold.
Threshold
Limit that when met, triggers an alert.
Enable
True if the alert is enabled, false if the alert is disabled.
Email
E-mail address to send notification of an alert.
Message
Message System Console sends when an alert occurs.
Figure 2‑38 Viewing the list of alerts
Adding an alert
When adding an alert, the system administrator selects an attribute name from a list, and sets a value, or threshold, that when reached, causes System Console to trigger an alert. The alert displays on Monitoring, and System Console sends an e‑mail to the e-mail address the system administrator specifies. The e-mail notifies the recipient that the attribute for the item System Console is monitoring has met the specified threshold.
The value for Threshold that the system administrator specifies for most Alert attributes is a number from 0 (zero) to 100. For these Alert attributes, the administrator can specify one of the following values for determining whether the condition which triggers an alert has been met:
equal to (=)
greater than (>)
greater than or equal to (>=)
less than (<)
less than or equal to (<=)
For the remainder of the Alert attributes, the administrator specifies a string value for Threshold and a condition value of equal to (=).
Table 2‑2 displays the Condition and Threshold values that the administrator can specify for Alert attributes.
Table 2‑2 Alert attribute Condition and Threshold values
Alert attribute name
Threshold value data type
Permissible values for Condition
Permissible values for Threshold
Volume status
String
=
ONLINE, OFFLINE, ERROR
Server status
String
=
ONLINE, OFFLINE
Server needs restart
String
=
YES, NO
Integration service status on server
String
=
ONLINE, OFFLINE
Factory service status on server
String
=
ONLINE, OFFLINE
View service status on server
String
=
ONLINE, OFFLINE
Encyclopedia service status on server
String
=
ONLINE, OFFLINE
All other Alert attributes
Numeric
=, >, >=, <, <=
Any number from 0 through 100
This following section demonstrates adding an alert on the system attribute named Percent of server RAM used (MB).
How to add an alert
1 Choose Alerts from the Clusters side menu.
2 Choose Add Alert.
3 On Add Alert, perform the following tasks, as shown in Figure 2‑39. An asterisk (*) next to the property name means the property is required.
1 In Attribute Name, select an attribute.
2 In Condition, select a condition by which System Console determines whether the monitored item has reached the threshold.
3 In Threshold, specify a value that triggers an alert when reached.
4 In Email, specify an email address where System Console sends notification of an alert. You must enable e-mail notification. For more information, see “Enabling e-mail notification,” later in this chapter.
5 In Message, type a message to display on Monitoring and to include in the notification e-mail when an alert is triggered, such as ‘Number of jobs running on the volume has reached the specified limit’.
6 In Alert Name, type a name for the alert. Choose OK.
Figure 2‑39 Adding an alert
Enabling e-mail notification
The system administrator modifies acserverconfig.xml, the configuration file that all cluster nodes share, adding properties supporting e-mail notification when the following events occur:
A scheduled job in Visualization Platform completes.
The system administrator creates another system administrator.
The system administrator creates a volume.
System Console triggers an alert.
How to enable e-mail notification
1 On Clusters, choose to edit the cluster for which you want to enable e-mail notification.
2 Stop the cluster by performing the following steps:
1 Choose Cluster Configuration from the side menu.
2 On Cluster Configuration, left-click the cog icon and choose Stop Cluster from the Manage Cluster menu.
3 Choose Refresh from the Manage Cluster menu. When all the services icons have turned red, continue to the next step.
3 Using Windows Explorer, navigate to AC_CONFIG_HOME. For example, if the system administrator created a folder for the shared configuration directory named config_cluster, then in a default BIRT iHub installation on Windows, performed using the installer, in which the install folder is C:\Actuate, AC_CONFIG_HOME represents the following path:
Create a backup copy of acserverconfig.xml. Then, open acserverconfig.xml in a text editor such as Notepad. In acserverconfig.xml, locate the following string:
<SMTPServers/>
Create a child element of <SMTPServers> named <SMTPServer>. Using the following example, provide values for the attributes of the <SMTPServer> element:
<SMTPServers>
<SMTPServer
Name="mailhost.actuate.com"
SenderName="Notifications"
SMTPHostName="mailhost.actuate.com"
SenderAddress="support@actuate.com"/>
</SMTPServers>
The <SMTPServers> element appears in acserverconfig.xml as shown in Listing 2‑1.
Listing 2‑1 acserverconfig.xml with configured <SMTPServer> element
4 Start the cluster by performing the following steps:
1 Choose Cluster Configuration from the side menu.
2 In System Console, on Clusters—Cluster Configuration, left-click the cog icon and choose Start Cluster from the Manage Cluster menu.
3 Choose Refresh from the Manage Cluster menu. When all the services icons have turned green, the cluster is back online.
5 If your anti-virus software prevents processes from sending e-mail, the anti‑virus software may block an alert notification e-mail. Configure your anti‑virus software to allow processes such as java.exe, LMServer.exe, ihub.exe, and ihubc.exe to send e-mail.
6 Verify that you are receiving e-mail notification by performing any one of the following tasks. Completion of any of these tasks prompts System Console to send an e-mail notification.
Schedule a job in Visualization Platform to run immediately. For more information, see Chapter 3, “Scheduling and Managing Jobs,” in Using Visualization Platform.
Configure an alert. For example, add an alert having the following properties:
Attribute Name: Percent of server RAM used (MB)
Condition: Greater than or equal to
Threshold: 0 (zero)
For more information on configuring an alert, see “Adding an alert,” earlier in this chapter.
Add a volume. For more information, see “Adding a volume,” earlier in this chapter.
Editing, deleting, disabling, and enabling an alert
Choose the icon next to an alert on Clusters—Alerts to access the alert menu. This menu contains the following options, as shown in Figure 2‑40:
Edit
Edit the alert.
Delete
Delete the alert.
Disable
If the alert is enabled, the menu contains Disable. If the alert is disabled, the menu contains Enable.
Figure 2‑40 Viewing the alert
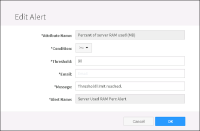
When editing an existing alert, the system administrator can change any value except the attribute name and the alert name.
How to edit an alert
1 Point to the icon next to the name of an alert and choose Edit.
2 On Edit Alert, modify any properties as necessary, as shown in Figure 2‑41. Choose OK.
Figure 2‑41 Editing an alert
How to delete an alert
Point to the icon next to the name of an alert and choose Delete.
How to disable or enable an alert
Disable an enabled alert by left-clicking the icon next to the name of an enabled alert and choosing Disable.
Enable a disabled alert by left-clicking the icon next to the name of an disabled alert and choosing Enable.
Configuring Single Sign-On
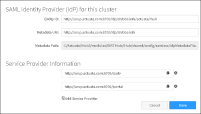
Choose Single Sign-On to view the SAML identity and service provider information for the nodes in the cluster and optionally, to add a service provider, as shown in Figure 2‑42. Service provider information for a cluster node becomes visible to the cluster when the node joins the cluster.
Figure 2‑42 Choosing iHub User Management
Viewing the information in SAML Identity Provider (IdP) for this cluster
SAML Identity Provider (IdP) for this cluster specifies the following Security Assertion Markup Language (SAML) information:
Entity ID
The identity provider identifier. This is the value of the entityID attribute in the <EntityDescriptor> element in the identity provider metadata.
Metadata URI
The identifier for the identity provider metadata.
Metadata path
The path to the identity provider metadata on disk.
Viewing and adding service provider information
Service Provider Information displays the information for each service provider on each node in the cluster. The system administrator can also add additional service providers using Add Service Provider.
By default, each node uses the following service providers:
icadv
Provides access to Visualization Platform.
iportal
Provides access to Visualization Platform.
Choose the icon next to the service provider URL to view the following information for the service provider:
Entity ID
The service provider identifier. This is the value of the entityID attribute in the <md:EntityDescriptor> element in the service provider metadata.
Server URL
The URL of the login for a service provider. To enable https, set up a proxy that has https enabled.
Metadata path
The path of the metadata file for this service provider.
Metadata URI
The URI for the metadata for this service provider.
ACS Post URL
The URL for ACS Post.
Choose Add Service Provider to specify these properties, as shown in Figure 2‑43.
Server URL
The URL for the service provider.
Entity ID
The service provider identifier.
Figure 2‑43 Specifying Service Provider information
Configuring User Management
The system administrator specifies settings for managing user authentication and authorization on User Management. Select among the following ways that BIRT iHub manages users for this cluster:
iHub User Management (default)
LDAP Adapter
RSSE SOAP Service
iHub User Management is the default setting and requires no action.
Configuring LDAP Adapter
Choose LDAP Adapter to configure settings for user management using a LDAP server. Settings for LDAP Adapter are grouped into the following sections:
Search setting
LDAP connection settings
LDAP Performance Settings
LDAP Mapping
The following sections describe these property groups.
About Search setting
Search setting contains one property, Search Cache Only. Cache Only restricts any search for users and user groups that BIRT iHub performs to the open security cache, with the exception of user authentication. When performing user authentication, BIRT iHub always searches the external security source, such as the LDAP server. Searching the cache only improves performance because data retrieval from the cache is faster than from the external data source.
A user sync thread runs in the background, and refreshes the cache automatically, at an interval that the Performance Settings—Cache Timeout property specifies. To prevent BIRT iHub from refreshing the cache, set Performance Settings—Cache Timeout to -1 to prevent a user from ever expiring. If you want BIRT iHub to refresh the cache, Actuate recommends setting Performance Settings—Cache Timeout to 1440 minutes, which is 24 hours, or more, instead of the default 60 minutes.
To use the Search Cache Only feature, create a script that sends the SOAP request that executes the caching operation, an example of which is shown in Listing 2‑2. For more information, see “Chapter 24, Actuate Information Delivery API operations,” in Application Integrator Guide.
Listing 2‑2 The SOAP request for the operation that loads the cache
Perform this operation immediately after installing BIRT iHub, to load the open security cache. Subsequently, perform the operation to refresh the cache when information in the external data source has changed.
Actuate recommends selecting Search Cache Only only if you have a large number of users or user groups, when using the feature makes enough of a difference in performance to warrant the management task of refreshing the cache.
Configuring LDAP connection settings
Configure LDAP Connection settings to connect to the LDAP or Active Directory server by providing values for each of the following settings in LDAP Connection settings, as shown in Figure 2‑44. An asterisk next to the property name indicates that this property is required. Choose Test Connection to test the connection to the LDAP server after setting all the values in LDAP connection settings. A message displays, indicating whether the connection is successful.
LDAP Server
Name of the machine hosting the LDAP or Active Directory server. BIRT iHub must be able to resolve this name. For example, when using a LDAP server, specify:
ldap.company.com
For an Active Directory server, an example value is:
ad.company.com
LDAP Port
Port on which the LDAP or Active Directory server listens. Whether using a LDAP server or an Active Directory server, the default port is:
389
For an LDAP server with SSL (LDAPS), the default port is:
636
User DN
Distinguished name of the user that can log in to the LDAP or Active Directory server. The distinguished name with which BIRT iHub binds to the LDAP server. For example, when using a LDAP server, specify:
ou=Engineering,dc=company,dc=com
For an Active Directory server, an example value is:
user@company.com
Password
Password for the LDAP or Active Directory server.
SSL
Enables connecting to a LDAP server or an Active Directory server with SSL. An out-of-the-box (OOTB) BIRT iHub installation only connects to an LDAP or Active Directory server that has a signed certificate. To connect to a server that does not have a signed certificate, use the Java keytool utility to add that certificate as a trusted certificate. For information on using the Java keytool utility, see: http://docs.oracle.com/javase/6/docs/technotes/tools/windows/keytool.html.
Active Directory
Supports a LDAP implementation using Active Directory. Select if implementing LDAP using Active Directory.
Recursive Groups
Supports nested group membership. Leave this property deselected if not using an Active Directory LDAP implementation.
Figure 2‑44 Configuring LDAP connection settings
Configuring LDAP Performance Settings
Choose LDAP Performance Settings to set the following properties, as shown in Figure 2‑45. An asterisk next to the property name indicates that this property is required.
Timeout
The number of milliseconds before the time to perform an LDAP operation expires.
Maximum Pool Size
The maximum number of connections per connection identity that can be maintained concurrently.
Fetch Limit
The maximum number of entries to be returned from the directory.
Preferred Pool Size
The preferred number of connections per connection identity to maintain concurrently.
Cache Timeout
The number of minutes before BIRT iHub deletes cached data.
Configure LDAP Mapping to map BIRT iHub user data to the LDAP or Active Directory server by providing values for each of the following settings in LDAP Mapping, as shown in Figure 2‑46. An asterisk next to the property name indicates that this property is required.
Prefix
For simple authentication, a string value that LDAP prepends to the name with which the user logs on to the server. For LDAP servers requiring distinguished name (DN) login, set this property to the appropriate value, followed by an equal sign (=). For example, specify:
uid=
When using an Active Directory server, leave Prefix blank.
Suffix
For simple authentication, a string value that LDAP appends to the name with which the user logs on to the server. For LDAP servers requiring distinguished name (DN) login, set this property to the appropriate chain of values, preceded by a comma (,). For example, specify:
,ou=company users,dc=company,dc=com
When using an Active Directory server, which requires logging in with an e‑mail address, set Suffix to @ followed by the domain name of the Active Directory. For example, specify:
@company.com
User Base DN
The root of the tree that BIRT iHub searches for user information. A user name must be unique for each distinguished name BIRT iHub searches. Separate multiple distinguished names with a semicolon. For example, when using a LDAP server, specify:
Attribute that specifies the user login name. Cannot contain a space. For example, when using a LDAP server, specify:
uid
When using an Active Directory server, specify:
sAMAccountName
Note that if the LDAP or Active Directory server contains a user login name longer than 255 characters, BIRT iHub reads only the first 255 characters. User login names longer than 255 characters are not supported.
User Full Name Attribute
Attribute that specifies the user’s full name. For example, when using a LDAP server, specify:
cn
or
displayName
When using an Active Directory server, specify:
cn
User Description Attribute
Attribute specifying a description of the user. For example, whether using a LDAP server or an Active Directory server, specify:
description
User Object
LDAP object class for users. For example, when using a LDAP server, specify:
person
When using an Active Directory server, specify:
user
User Search Filter
Use this property to identify which users can access BIRT iHub. Use the format appropriate to the indicated provider. For example, create a group for BIRT iHub users on your LDAP server. Then, specify this group as a filter to ensure that BIRT iHub imports only users belonging to the group of BIRT iHub users. For example, when using a LDAP server, specify:
cn=birtUsers
When using an Active Directory server, an example value is:
Be aware that for a distinguished name containing one or more special characters, LDAP stores the distinguished name with any special characters escaped with a backslash, so you must also escape any special character in the value you specify for User Search Filter with a backslash. For more information, see “About searching when Active Directory implements LDAP,” later in this chapter.
Email Attribute
Attribute that stores a user’s e-mail address. For example, whether using a LDAP server or an Active Directory server, specify:
mail
Group Base DN
The root of the tree that BIRT iHub searches for user group information. Separate multiple distinguished names with a semicolon. For example, when using a LDAP server, specify:
The LDAP Role Member attribute. BIRT iHub uses this attribute to find a user in a group. Groups use this attribute to name a user to a group. For example, when using a Sun Directory LDAP server, specify:
uniqueMember
When using an Active Directory server, specify:
member
Member ID Type
The LDAP Role Member. Specifies the type of a member in a group. Whether using a LDAP server or an Active Directory server, specify the type as:
DN
or
LoginID
Home Folder Attribute
Attribute key that maps to a user’s home folder. For example, when using a LDAP server or an Active Directory server, specify:
companyHomeFolder
When using an Active Directory server, leave this property blank.
Default Home Folder
Value that specifies the default parent folder of a user’s home folder.
If no Home Folder Attribute exists, BIRT iHub uses this property to construct the user's home folder. For example, whether using a LDAP server or an Active Directory server, specifying /home results in a home folder of /home/bHill for a user named bHill.
Specifies an attribute, for example, businessType, that BIRT iHub uses to determine which user groups have access to a volume. Requires the Multi-Tenant license option. For more information, see “About managing volume access by users and user groups when using LDAP,” later in this chapter.
“Admin” Group
Specifies the name of a group of users to whom BIRT iHub gives Administrator-level privileges in Visualization Platform. When using a LDAP or Active Directory server for user management, BIRT iHub does not use the default Administrators user group in Visualization Platform—iHub Administration. For example, whether using a LDAP server or an Active Directory server, specify:
volumeAdministrators
Figure 2‑46 Configuring LDAP Mapping
About managing volume access by users and user groups when using LDAP
The LDAP mapping attribute User Volume Filter Attribute identifies the users that can access a particular volume. The LDAP mapping attribute Group Volume Filter Attribute identifies user groups that can access a particular volume.
Whether using a LDAP server or an Active Directory server, the value the system administrator specifies for User Volume Filter Attribute is the name of an attribute having a value that is shared by a group of users to which the system administrator wants to give access to a particular volume. The system administrator specifies this attribute value for the Organization ID when creating a volume.
As an example, employeeType is an attribute for a user on a LDAP or Active Directory server. All users for which the value of employeeType is Sales can access a volume having an Organization ID of Sales.
Likewise, the value the system administrator specifies for Group Volume Filter Attribute is the name of an attribute having a value that is shared by a group of user groups to which the system administrator wants to give access to a particular volume. The system administrator specifies this attribute value for the Organization ID when creating a volume.
As an example, businessType is an attribute for a user group on a LDAP or Active Directory server. All user groups for which the value of businessType is Insurance can access a volume having an Organization ID of Insurance.
Multiple volumes can have the same Organization ID. When creating a volume, Organization ID can be only one value. If the system administrator specifies both User Volume Filter Attribute and Group Volume Filter Attribute, and on the LDAP or Active Directory the value for these two attributes is the same for a given user and user group, and the system administrator specifies this value as the Organization ID when creating a volume, both the user and the user group can access the volume.
As an example, the system administrator specifies employeeType for User Volume Filter Attribute and businessType for Group Volume Filter Attribute. If the value for each of these attributes is Sales, and the system administrator specifies Sales for the Organization ID when creating a volume, then the users for which the value of EmployeeType is Sales and the user groups for which the value of businessType is Sales can access the volume.
About searching when Active Directory implements LDAP
Active Directory requires that the following characters be escaped with a backslash (\) if used in a Distinguished Name (DN):
Comma (,)
Backslash character (\)
Pound sign (#)
Plus sign (+)
Less than symbol (<)
Greater than symbol (>)
Semicolon (;)
Double quote (")
Equal sign (=)
Leading or trailing spaces
If any of these characters appear in a component of a DN, Active Directory stores the character escaped. For example, Active Directory stores the following DN:
memberOf=CN=\#QA,CN=Users,DC=actuate,DC=com
For Active Directory to recognize this DN in a search, you must escape the backslash escape character with another backslash. The following example query returns the users belonging to the #QA group:
memberOf=CN=\\#QA,CN=Users,DC=actuate,DC=com
Configuring RSSE SOAP Service
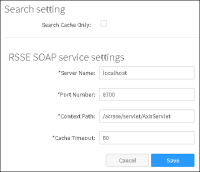
Choose RSSE SOAP Service to configure and view properties for user management using a RSSE web service application for a volume. RSSE SOAP Service is an appropriate choice if you manage user information using an external data source that does not implement LDAP. Configure the following properties for RSSE SOAP Service, as shown in Figure 2‑47:
Search setting
Contains Search Cache Only. Restricts searching to only the BIRT iHub metadata database
RSSE SOAP service settings
Contains the following properties:
Server Name
Machine name of the server that runs the RSSE web service.
Port Number
Port number for the RSSE web service.
Context Path
Specifies the location of the RSSE web service for BIRT iHub to use when sending messages to the web service. The path for the default volume is /acrsse/servlet/AxisServlet.
Cache Timeout
Number of minutes before BIRT iHub deletes cached data.
Figure 2‑47 Configuring security settings
Updating the license
Each BIRT iHub cluster uses a separate BIRT iHub license. Choose License to view the license options or update the license, as shown in Figure 2‑48.
Figure 2‑48 Choosing License
Choose Update License to browse for and select the license file, as shown in Figure 2‑49.