In this task, you create a new report in BIRT Report Designer and name it ScriptedDataSrc.rptdesign.
1 Choose File➛New➛Report.
2 In File Name in New Report, type:
ScriptedDataSrc.rptdesign
3 In Enter or Select the Parent Folder, accept the default folder. Choose Finish.
Task 2: Create a scripted data source
In this task you create the new data source.
1 In Data Explorer, right-click Data Sources and choose New Data Source.
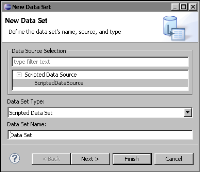
2 In New Data Source, select Scripted Data Source.
3 In Data Source Name, type:
ScriptedDataSource
4 Choose Finish.
Data Explorer and the code window for ScriptedDataSource appear, as shown in Figure 40‑1.
Figure 40‑1 Data Explorer and ScriptedDataSource code window
Task 3: Create a scripted data set
In this task, you create the new data set.
1 In Data Explorer, right-click Data Sets. Choose New Data Set. New Data Set appears, as shown in Figure 40‑2.
Figure 40‑2 New data set for a scripted data source
2 In Data Set Name, replace the default name by typing:
ScriptedDataSet
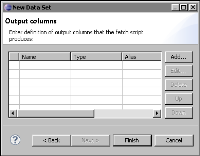
3 Choose Next. Output columns appears, as shown in Figure 40‑3.
Figure 40‑3 Preparing to define the output columns
4 In Output columns, choose Add to define the first column for the data set. New Script Data Set Column appears.
5 In the Column Name, type:
col1
6 In Data Type select Integer from the drop-down list. New Script Data Set Column now contains the definition of one output column.
7 Choose OK. The col1 column definition appears in the Output columns list.
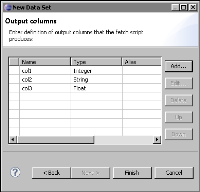
8 Using the same procedure create the definitions for col2 and col3. These data types are respectively String and Float. When you finish, the column definitions should look the ones shown in Figure 40‑4. Choose Finish.
Figure 40‑4 Completed column definitions
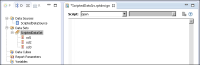
9 In Data Explorer, select ScriptedDataSet. The script window for the data set appears, including the column definitions, as shown in Figure 40‑5.
Figure 40‑5 Code window for Data Set
Task 4: Write the open( ) and close( ) methods of the data source
Use the open( ) method to open the data source. Use the close( ) method to do clean‑up tasks. Typically, you need to place some code in these methods. The open( ) method is the default selected method upon creating a data set.
1 Select open from the pull-down list of methods.
2 Type the following code into the code window for the open( ) method:
dummyObject = new Object( );
The previous example code is placeholder code for this simplified example. In a typical application, you use this method to initialize a Java object that provides access to the data for the report.
3 Select close from the pull-down list of methods.
4 Type the following code into the code window for the close method:
dummyObject = null;
Task 5: Write the open( ) method of the data set
When you create the data set, the open( ) method is selected by default. Use the open( ) method of the data set to do initialization, such as defining a counter and setting it to zero.
1 Select open from the pull-down list of methods.
2 Type the following code into the code window:
recordCount = 0;
Task 6: Write the fetch( ) method of the data set
Use the fetch( ) method to process row data. The fetch( ) method must return either true or false. Fetch( ) returns true to indicate that there is a row to process. Fetch( ) returns false to indicate that there are no more rows to process. The fetch( ) method also calculates the values of computed fields. The report only has column headings at this point. To include data, you must add code to the fetch( ) method.
1 Choose the Script tab.
2 Select ScriptedDataSet in Data Explorer. Select fetch in the drop-down list of methods.
3 Type the following code into the code window. This code limits the number of rows that appear in the report to 20.
if(recordCount < 20) {
recordCount++;
row.col1 = recordCount;
row["col2"] = "Count = " + recordCount;
row[3] = recordCount * 0.5;
return true;
}
else return false;
Task 7: Place the columns on the report layout
You place columns for a scripted data set in the same way as for a non‑scripted data set.
1 On ScriptedDataSrc.rptdesign, select Layout.
2 In Data Explorer, select ScriptedDataSet and drag the data set into the report layout.
Figure 40‑6 shows the three columns of the data set in the layout editor.
Figure 40‑6 New table in the report design
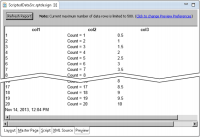
3 Choose Preview. The report contains 20 rows and 3 columns of data, as shown in Figure 40‑7.
Figure 40‑7 Report preview
Writing the scripted data set in Java
You can also implement this example in Java. Setup the Java project in the same workspace as the BIRT report project. Ensure your Java build path includes the external libraries for org.eclipse.birt.core_<version>.jar and org.eclipse.birt.report.engine_<version>.jar. In the report project, repeat the previous tutorial, omitting the code-writing tasks.
In the Java project, add the Java class file in Listing 40‑1. Finally, in the report project, select the scripted data set and set the event handler class property to the class in Listing 40‑1.
With Data Set selected, choosing Browse for the event handler property displays the scripted data set class. This example shows how to implement the scripted data set in Java. You can implement a scripted data source in a similar way.
In this example, the recordCount is stored as a global variable of the MyScriptedDataSet object. Using the global variable in this way is only valid for the data source or data set event handlers and should not be used when extending other event adapters. All other event adapters create a new instance of the event handler class for each instance of a report item. For example, when extending the RowEventAdapter, a new instance of the extending class is created for each row that uses the extended adapter.