1 In Navigator, expand your project and open index.html. Index.html appears in the editor with the Project Name as an H1 title, as shown in as shown in Figure 4‑34.
Figure 4‑34 Viewing the default H1 title in index.html
2 Type the following text under the first line.
This application contains the following content:
<ul>
<li>
<ahref="Dashboards/CustomerOrders.dashboard">Customer Order Dashboard</a>
</li>
</ul>
3 Choose File➛Save to save your latest changes to the landing page.
Task 2: Deploy the BIRT application
Now that you have added data and visualizations to your BIRT project, you can deploy the entire project as a BIRT application to an iHub server. After the BIRT application is deployed, users can access the content using URLs to the landing page or to the files included in the BIRT application.
1 In BIRT Report Designer Professional, open Server Explorer. If you do not see the Server Explorer view in the designer, select Windows➛Show view➛Server Explorer.
2 In Server Explorer, right-click Servers, and choose New Server Profile, as shown in Figure 4‑35.
Figure 4‑35 Adding a new server profile
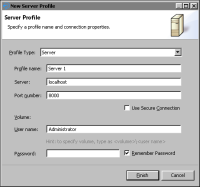
3 In New Server Profile, specify the connection information. Figure 4‑36 displays an example of connection properties provided for a server named localhost that is installed on the same computer as BIRT Designer Professional.
Figure 4‑36 Setting properties in a new Server profile
1 In Profile type, select Server.
2 In Profile name, type a unique name that identifies the new profile.
3 In Server, type the name or IP address of the BIRT iServer server.
4 In Port number, type the port number to access BIRT iServer.
5 In Volume, select the iHub Encyclopedia volume if multiple volumes exist.
6 In User name, type the user name required to access the volume.
7 In Password, type the password required to access the volume.
8 Select Remember Password, if you want to save the password.
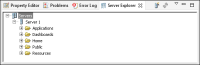
4 Choose Finish to save the Server profile. The Server profile appears in the Server Explorer. You can expand the server profile to see the content of the volume, as shown in Figure 4‑37.
Figure 4‑37 Expanding a server profile
5 Select the My Application project in Navigator, as shown in Figure 4‑38.
Figure 4‑38 Selecting a BIRT project to publish as an application
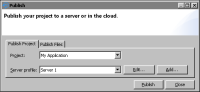
6 Choose File—Publish. In Publish, select Publish Project if it is not already selected.
7 Select a server profile and choose Publish. Figure 4‑39 shows the BIRT application named My Application set to publish to the server profile Server 1.
Figure 4‑39 Selecting a server profile to publish to
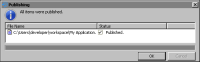
8 After all items have been published choose OK. Figure 4‑40 shows that all files were successfully published.
Figure 4‑40 Verifying all items were published
9 Choose Close to return to BIRT Designer Professional.
Task 3: Test the URL entry points
BIRT applications include a URL for the landing page and additional URLs for each file included in the BIRT application. For more information about URLs that can access your BIRT application content, see Planning a BIRT application.
1 Verify that the application’s landing page is accessible by using a web browser to visit the URL of the application. For example, the server name in this tutorial is localhost so the URL to the application is the following:
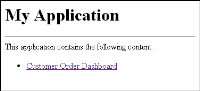
If you are asked to log in to the iHub Visualization Platform, type your user name and password. Your landing page should look similar to Figure 4‑41.
Figure 4‑41 Visiting the landing page
2 Verify that URL links displayed in the landing page function as expected.
3 Verify that the content in the application is accessible. This tutorial includes one dashboard file named CustomerOrders.dashboard in the folder named Dashboards. If the server name was localhost, then the URL to the dashboard is the following: