Adding a descriptive heading that appears at the beginning of each group identifies the data within the group. When you create a group, BIRT Report Designer inserts a data element in the group header row to serve as the group heading. This data element displays the values of the field on which the group is based. For example, when grouping data by state, the data element displays a state name for each group.
Unlike column headings, which are static, group headings change based on the content of the group. If a report groups data by customers, for example, you can display the customer name at the beginning of each group. For a customer list that groups names by the first letter, the titles for the groups are A, B, C, and so on. For a shipping schedule that groups data by weeks, the titles for the groups could be Week of 01/02/06, Week of 01/09/06, and so on.
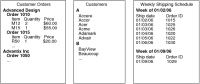
The reports in Figure 12‑28 show examples of headings that change with each group. Bold text highlights the group headings. Group headings are necessary to show where one group ends and another begins. Remove the A and B headings from the Customers report, for example, and the report looks like a list sorted alphabetically. You can add a line or space between groups to indicate a change in group, but a descriptive heading makes it easier for users to find information in the report.
Figure 12‑28 Examples of group headings that change
Inserting group header rows
If you deleted a group header row from a table, you can re-insert the row. You can also insert additional group header rows to display header information on two lines, for example, a group title on the first line, and summary information on the next line.
How to insert a group header row
The procedure for inserting a group header row depends on whether the table already contains a group header row or not.
If the table does not contain a group header row, use the following procedure:
1 Select the table.
2 Right-click the Table tab, then choose Insert Group Header or Footer➛<group>➛Header.
If the table contains a group header row and you want to add another group header row, use the following procedure:
1 Select the table.
2 Right-click the group header row, then choose Insert➛Row➛Above to insert a row above the current row, or choose Insert➛Row➛Below to insert a row below the current row.
Displaying group headings in the detail row
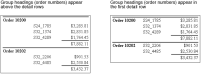
Headings in a group header row appear above the detail rows. Sometimes, a report looks better if the headings appear in the first detail row of each group. Compare the examples in Figure 12‑29. The example on the left shows the group headings, which are order numbers, in a row above the detail rows. The example on the right shows the group headings in the detail row.
Figure 12‑29 Two ways to display group headings
To display group headings on the same line as the first detail row, drop the cell that contains the heading using the Drop property. Do not just move the group heading to the detail row because it would be repeated for every row. To drop a cell, observe the following rules:
There must be an empty cell below the cell that contains the group heading. Otherwise, the cell content overwrites the content in the cell below it.
If a table contains multiple group header rows, you can drop only cells in the group header row directly above the detail row.
You can only drop cells in a group header row. You cannot drop cells in a detail or group footer row.
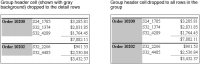
You can drop a group header cell so that it spans the detail rows, or all the rows in the group, including the group footer row. The difference is visible only if the group header cell has a border or background color. Compare the examples in Figure 12‑30.
Figure 12‑30 Reports showing different settings for the Drop property
The example on the left drops the group header cell to the detail rows. The example on the right drops the group header cell to all the rows in the group. Notice that the cell color in the example on the left extends to the last detail row, whereas the cell color in the example on the right extends to the group footer row. If the cell did not have a background color, the output would look the same whether you set the cell’s Drop property to Detail or All. The order numbers always appear in the first detail row of each group.
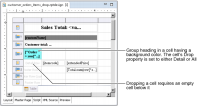
Figure 12‑31 shows the portion of the report design that generates the previous example output.
Figure 12‑31 Report design that generates a dropped cell
How to drop a group heading to the detail row
1 Select the cell that contains the group heading to drop. The cell directly below it must be empty.
2 In Property Editor, under Properties, choose General.
3 In Drop, select one of the following values:
Detail—Select this value to drop the group heading so that it spans only the detail rows.
All—Select this value to drop the group heading so that it spans all the rows in the group, including the group footer row.
These values display a difference in the generated report only if the cell has borders or background color.
4 Preview the report. The group heading appears in the first detail row of each group.
Specifying expressions for group headings
Unlike column headings, which display static text, you specify expressions for group headings because the heading values are dynamic. In other words, the value changes based on the group’s content. Use a data set field, a computed field, or a text element that includes dynamic values, depending on the value to display.
Typically, you use a computed field to combine a field value and static text. Sometimes, you use a JavaScript function to display the values you need. The following list shows some examples of expressions used for group headings:
To display the customer name as the group heading, use the customer name field as the expression. For example:
dataSetRow["customerName"]
To display a group heading that combines static text with a field, insert a data element, and use an expression such as the one in the following example:
"Order " + dataSetRow["orderID"]
To create headings (A, B, and so on) for a customer list that is grouped by the first letter, insert a data element, and use the JavaScript charAt( ) function to get the first letter of the name in each group. For example:
dataSetRow["customerName"].charAt(0)
To create headings that display the names of months (January, February, and so on) for each group of dates, insert an HTML text element, and use the following expression: