After inserting an HTML button in a report, you use the script editor to write JavaScript code that specifies the task to perform when a particular button event occurs. This type of code is called an event handler. HTML button event handlers can consist of any valid JavaScript code, and typically access report data and the Actuate JavaScript API to provide interactive viewing functionality.
The HTML button supports multiple events, and you can write multiple event handlers for a single button to execute different routines based on the event that occurs. For example, you can write an event handler that displays help information when the user moves the mouse pointer over a button, and a second event handler to run a business process when the user clicks the button.
Table 31‑1 lists and describes the events that the HTML button supports and for which you can write code.
Table 31‑1 Supported events
Event
Description
onblur
Occurs when the button loses focus, or stops being active
onclick
Occurs when the button is clicked
ondblclick
Occurs when the button is double-clicked
onfocus
Occurs when the button gets focus, or becomes active
onkeydown
Occurs when a keyboard key is pressed
onkeypress
Occurs when a keyboard key is pressed and released
onkeyup
Occurs when a keyboard key is released
onmousedown
Occurs when a mouse button is pressed
onmousemove
Occurs when a mouse pointer moves when it is over the button
onmouseover
Occurs when a mouse pointer moves onto the button
onmouseup
Occurs when a mouse button is released
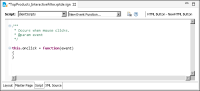
When you select an event for which to write code, the script editor provides a JavaScript code template, as shown in Figure 31‑5.
The following line of code in the template instructs the software to execute the code in the braces that follow when a click, or button press, event occurs:
this.onclick = function(event)
Do not modify this line of code. Write your JavaScript code in the braces following that line.
Figure 31‑5 Script editor displaying a script template
If you write multiple event handlers for an HTML button, the script editor places all the event handlers serially, as shown in the following code example:
/**
* Occurs when mouse clicks.
* @param event */
this.onclick = function(event)
{
/* onclick code here */
}
/**
* Occurs when a mouse button is released.
* @param event */
this.onmouseup = function(event)
{
/* onmouseup code here */
}
Accessing report data
It is common to use HTML buttons to perform calculations on demand or to present additional information. For example, rather than display customer notes that take up space in a report or that users view infrequently, you can create an HTML button that, when clicked, displays the information when users want to view the information.
These types of event handlers typically require access to data in the report, such as row data, aggregate data, or report parameter values. To provide event handlers with access to report data, you must do the following:
1 Insert the HTML button in a container, such as a table, that provides access to data.
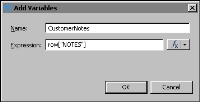
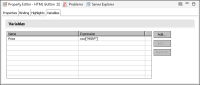
2 For each type of data, create a variable for the HTML button using the Variables page on Property Editor. Figure 31‑6 shows an HTML button variable named CustomerNotes whose value is set to the Notes column.
Figure 31‑6 Variable associated with an HTML button
After you create a variable, use dataObject to access the variable in an event handler. For example, to access the variable CustomerNotes, use dataObject.CustomerNotes, as shown in the following event handler code:
/**
* Occurs when mouse clicks.
* @param event */
this.onclick = function(event)
{
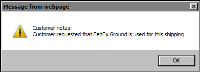
alert("Customer notes: " +
"\n" + dataObject.CustomerNotes );
}
This example uses the JavaScript alert function to display customer notes in a message box, as shown in Figure 31‑7.
Figure 31‑7 Message box displaying a note when the HTML button is clicked
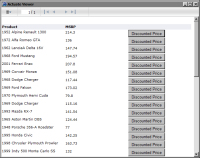
The next example shows how to use an HTML button to calculate the price of a product after applying a discount specified by the user at report view time. Figure 31‑8 shows the report in the web viewer. The report lists the products and their manufacturer’s suggested retail price (MSRP). Each product row contains a Discounted Price button for calculating the discounted price for that product.
Figure 31‑8 Product report using HTML buttons to calculate discounted prices
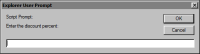
When the user clicks a button, a window prompts the user to type a discount percent, as shown in Figure 31‑9.
Figure 31‑9 Window prompting for a discount percent
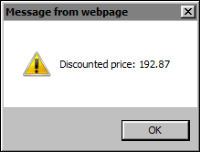
After the user enters a value, such as 10, and chooses OK, another window displays the product’s discounted price, as shown in Figure 31‑10.
Figure 31‑10 Window displaying the discounted price
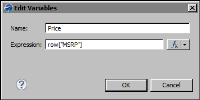
To create this HTML button, a button labeled Discounted Price is inserted in the detail row of a table. The HTML button’s event handler code requires the MSRP values to calculate the discounted price, so a variable is created. Figure 31‑11 shows the definition of a variable named Price.
Figure 31‑11 Price variable defined for the HTML button
The event handler code for the HTML button is as follows:
this.onclick = function(event)
{
Discount = window.prompt('Enter the discount percent: ','');
The first line after the opening brace prompts the user for a discount value and stores the value in the Discount variable. The second line calculates the discounted price using the values in the Price and Discount variables. The third line displays the results in a message box. Note that this event handler code covers only the main tasks. A more complete event handler would also perform data validation to ensure that the input value is a number, and handle the case if the user chooses Cancel at the prompt.
How to add a variable to an HTML button
1 In the layout editor, select the HTML button to which to add a variable.
2 Choose Property Editor, then choose the Variables tab.
3 In Variables, choose Add.
4 In Add Variables, specify the following values:
1 In Name, type a unique name for the variable. JavaScript event handlers use the name to access the variable’s information through dataObject. For example, the event handler accesses a variable named credit as dataObject.credit.
2 In Expression, type the value that the variable contains. You can also use Expression Builder to create a value. Choose OK.
Variables displays the variable you created, as shown in Figure 31‑12.
Figure 31‑12 Variable defined for an HTML button
Using the Actuate JavaScript API
Actuate provides a JavaScript API (JSAPI) to support the integration of Actuate technology with web applications. Application developers can use the API to embed entire reports or individual report elements, such as charts or tables, into existing web pages.
HTML button event handlers can also use JSAPI to access report elements, manipulate data, and refresh a report in the Actuate viewer. For example, you can use the JSAPI to implement interactive functionality in the viewer, such as sorting and filtering data, linking to other report elements, and displaying or hiding report elements.
The three HTML buttons in the report shown in Figure 31‑1, which provide three data filtering options, use methods in the JSAPI to get the current viewer, create the filters, and reload the report with new data each time the user clicks one of the buttons. The following is the event handler code for the Top Ten Products button:
this.onclick = function(event)
{
//Get the current viewer object and the table with the
//bookmark DetailTable on the current page.
var viewer = this.getViewer();
var pagecontents = viewer.getCurrentPageContent();
var table = pagecontents.getTableByBookmark("DetailTable");
The following is the event handler code for the All Products button:
this.onclick = function(event)
{
var viewer = this.getViewer();
var pagecontents = viewer.getCurrentPageContent();
var table = pagecontents.getTableByBookmark("DetailTable");
table.clearFilters("PRICE");
table.submit();
}
The JSAPI provides many classes and methods that are useful for adding functionality to HTML buttons. For more information about using the JSAPI, see Using Actuate JavaScript API.
Testing an HTML button
As mentioned previously, HTML buttons are supported in HTML reports only. To test the functionality of an HTML button, run the report in the web viewer.