The master page determines the dimensions and style of the pages on which report data appears. For example, you can specify that the page size is 7" x 9", the printable area is 6" x 8", the company logo always appears in the top right corner, and the page number appears in the bottom right corner.
The page size and margin settings apply primarily to page-oriented reports like PDF and DOC, where size dimensions matter. For HTML reports that use the default fixed layout setting, the output appears the same as the PDF report. For HTML reports that use the auto layout setting, the layout of data adjusts to the size of the viewer or browser window.
Viewing the master page
When creating or opening a report design, the layout editor always shows the report layout. To view the master page, use one of the following options:
Choose Page➛Master Page➛Simple Master Page.
Choose the Master Page tab at the bottom of the layout editor.
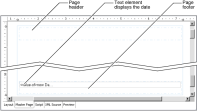
You can view either the report layout or the master page, but not both at the same time. Figure 26‑13 shows the default master page.
Figure 26‑13 Default master page
Designing the page header and footer
The default master page includes a text element that displays the current date in the page footer. When previewing a report, the current date appears on the bottom left of every report page. You can delete or edit this text element. You can add other elements to the master page by dragging them from the palette and dropping them in the page footer or header.
Observe the following rules:
You can place elements in the header and footer only. You cannot place elements in the report content area because the contents of those elements would overlap report data.
You can place only one element directly in the header or footer. To place multiple elements, insert a grid, then insert the elements in the grid.
Displaying page numbers, the current date, and other text
Common header and footer information includes the page number, report‑generation date, company name, author name, copyright information, and confidentiality statements.
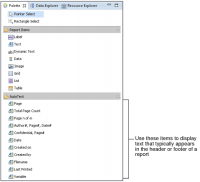
As Figure 26‑14 shows, BIRT Report Designer provides predefined text elements for displaying some of these common items, including the current date, page number, author name, and file name. These items are available on the palette when the master page is displayed.
Figure 26‑14 Text elements for common header and footer items
For example, the date element is a text element that contains the following dynamic value:
<VALUE-OF>new Date()</VALUE-OF>
After inserting a predefined text element in the page header or footer, you can edit the text to display different information. For example, you can edit the date element to display the date in a different format. By default, the report displays the date according to the locale that is set on the machine on which the report is generated. Use the format attribute to display the date in a custom format, as shown in the following expression:
<VALUE-OFformat="MM-dd-yy">new Date()</VALUE-OF>
To display other text in the header or footer, use the other predefined text elements in the palette and edit the text content or insert a regular text or label element and type the text from scratch.
Remember, to display more than one element in the header or footer, you must first insert a grid, then insert the elements in the grid. The predefined Author#, Page#, Date# element creates a grid and three text elements, so it may be convenient to insert this element, then edit the individual text elements.
As with any text element, you can also customize the appearance of the predefined elements. For example, you can display text in a different style or color, or align text in the center or right of the page.
How to display text in the header and footer
1 In the layout editor, choose the Master Page tab. The layout editor displays the master page. The palette displays additional elements under AutoText, specifically for use in the master page.
2 To display a single text element in the header or footer, drag the desired element from the palette, and drop it in the header or footer. For example, to display the page number, insert either the Page element or the Page n of m element.
3 To display multiple text elements in the header or footer:
1 Insert the grid element in the header. If inserting in the footer, delete the date element from the default footer first.
2 In Insert Grid, specify the number of columns and rows for the grid. For example, to display two text elements on the same line, specify 2 columns and 1 row.
3 Insert each text element in a grid cell.
Displaying an image
You can display dynamic and static images in a page header or footer. Insert an image in a master page the same way you insert an image in the report layout. The difference is that you cannot insert an image inside a table in the master page. Therefore, when you insert a dynamic image directly on the master page, the same image—the image in the first data row—appears on every page.
Specifying a header size
The size of the header in the generated report can be different when rendered in PDF and in HTML. For an HTML report, the header dynamically resizes to accommodate its contents, and the header always appears directly above the report content. In an HTML report, the header height property is ignored.
For a PDF report, the header also dynamically resizes to accommodate its contents. Unlike the HTML report, you can specify a fixed size for the header. If you specify a header size of one inch, and insert an image that is half an inch in height, the report displays half an inch of space between the image and the report data. If the header size you specify, however, is not sufficient to display a large image, the report overrides the specified header size and resizes the header to display the image in its entirety.
Increasing the header size is one way to increase the space between the header content and the report content. Because header size applies only to PDF output, however, this technique is not recommended when creating a master page that serves both PDF and HTML output equally well.
The preferred technique to add space between the header content and report content is to increase the padding at the bottom of the text or label element placed in the header. Alternatively, if you use a grid to organize multiple elements, add a row at the bottom of the grid and set the row size. Using either of these techniques, the extra space appears in both PDF and HTML output.
Specifying a footer size
Like the header, the size of the footer in the generated report can be different for PDF and HTML reports. In both types of reports, the footer dynamically resizes to fit its content. If you specify a footer size, the PDF report displays a footer section of the specified size, except when the contents exceed the specified size. The HTML report ignores the specified footer size.
How to specify a header or footer size
1 In the layout editor, choose the Master Page tab. The layout editor displays the master page.
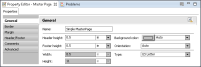
2 In Property Editor, choose General properties. Property Editor displays the master page’s general properties, as shown in Figure 26‑15.
3 Specify a size for the header height, the footer height, or both.
Figure 26‑15 Master page properties in Property Editor
Excluding header content from the first page
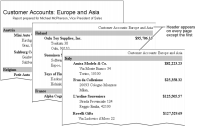
It is common practice to display header content on every page except the first. For example, a report displays a title in bold and large font on the first page, but in a smaller font at the top of the other pages, as shown in Figure 26‑16. To create this design:
Insert a text element in the report page to display the title on the first page.
Insert a text element in the master page header to display the title on subsequent pages. An element in the page header appears, by default, on every page in the report.
Turn off the Show header on first property. This property controls whether headers appear on all pages, or on all pages except the first.
Figure 26‑16 Report output when the Show header on first property is turned off
How to exclude header content from the first page
1 In the layout editor, choose Master Page. The layout editor displays the master page.
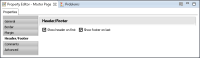
2 In Property Editor, choose Header/Footer. Property Editor displays the header and footer properties, as shown in Figure 26‑17.
Figure 26‑17 Header and footer properties
3 Deselect Show header on first.
4 Choose Preview to verify the report output. If the report contains more than one page, the header content appears on all pages except the first.