In a report that uses page-level security, report users can view only pages to which they have access. You can design a single report that meets the needs of a range of users. The most common case is to create a hierarchy of ACLs where each successive level has access to more information. The ACL hierarchy can match the organizational hierarchy of a company.
For example, in a report that provides worldwide sales data by region and country, you can restrict user access to the content as follows:
Each country sales manager can view only the pages that display sales data for her country.
Each regional sales manager can view all the pages that display sales data for the countries in her region.
The vice president of sales can view the entire report.
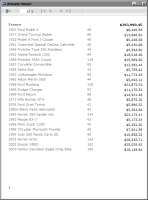
Figure 32‑1 shows the single page that the sales manager in France can view. Note that the page number is 1.
Figure 32‑1 Page that the sales manager in France can view
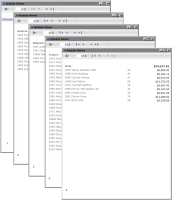
Figure 32‑2 shows the pages that the regional sales manager for Europe can view. The pages are numbered 1 through 5. Here, the sales data for France is on page 4, whereas, it is on page 1 in the report that the sales manager of France sees, as shown in Figure 32‑1. The report displays page numbers sequentially in the order that they appear to a user.
Figure 32‑2 Pages that the regional sales manager for Europe can view
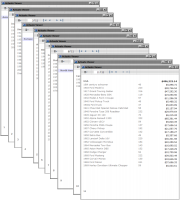
Figure 32‑3 shows the full report, which only the vice president of sales can view.
Figure 32‑3 Pages that the vice president of sales can view
Without page-level security, you would need to create multiple reports—one report for each user—and the iHub administrator would then have to define different security rules for each report, and manage multiple reports. In the sales report example, which presents data for three regions and eight countries, you would have to create twelve reports. For large companies, which typically have more hierarchical levels and more users, the number of reports increases.
Adding page-level security to a report
To implement page-level security in a report, perform the following tasks:
Identify the sections that require security.
The most common elements to which to apply security are tables, lists, grids, and groups defined in a table.
Identify the users that can view each section.
Obtain the security IDs, typically roles, from the iHub volume administrator.
Set security.
For each element that requires security, right click the element, then select Security from the context menu. Set the Access Control List Expression property to the security ID or IDs to which to grant access to the element’s content.
Example 1
Figure 32‑4 shows the design for the sales report shown in the previous section. The report design consists of a single table that groups data by region, country, and product.
Figure 32‑4 Design of report that groups sales data by region and country
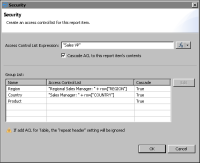
Page-level security is applied to these elements: the table, the Region group, and the Country group. Figure 32‑5 shows the Security dialog for the table element.
Figure 32‑5 Page-level security applied to the table and two of its groups
The Access Control List Expression property is set to the value "Sales VP".
The Cascade ACL option is selected. This setting propagates the specified ACL to all the elements in the table.
These settings specify that only the Sales VP has access to all of the table’s contents:
For the Region group:
The Access Control List expression is:
"Regional Sales Manager: " + row["REGION"]
This expression specifies that data for each region is restricted to a specific regional sales manager role. For example, only a user with the Regional Sales Manager: Europe role can view the sales data for Europe.
Cascade is set to True. This value propagates the ACL to the elements in the Region group, providing the regional sales manager access to all the data within the Region group.
For the Country group:
The Access Control List expression is:
"Sales Manager: " + row["COUNTRY"]
This expression specifies that data for each country is restricted to a specific sales manager role. For example, only a user with the Sales Manager: France role can view the sales data for France.
Cascade is set to True. This value propagates the ACL to the elements in the Country group, providing the sales manager access to all the data within the Country group.
Example 2
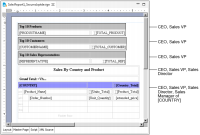
This example shows how to implement page-level security in a report that contains multiple tables. Figure 32‑6 shows a report design that contains four tables and identifies the roles that can view each table. The last table shows detailed sales data grouped by country and product. The CEO, Sales VP, and Sales Director can view all the content in this table. Each sales manager can view only the sales data for her country.
Figure 32‑6 Design of report that contains four tables and the roles that can access each table
There are several ways to implement page-level security in this report. You can:
Select each table and set each table’s Access Control List Expression property to the roles identified in Figure 32‑6.
The ACL for the first, second, and third tables would be:
"CEO" + "," + "Sales VP"
The ACL for the first fourth table would be:
"CEO" + "," + "Sales VP" + "," + "Sales Director"
The ACL for the Country group in the fourth table would be:
Use the Cascade ACL option to cascade security IDs from a container element to its contents. Because the CEO and Sales VP roles can view the entire report, it is more efficient to specify the ACL once at the topmost container, the report element, than it is to specify the same ACL multiple times.
The ACL for the report element would be:
"CEO" + "," + "Sales VP"
The ACL for the fourth table would be:
"Sales Director"
The ACL for the Country group in the fourth table would be:
"Sales Manager of " + row["COUNTRY"]
Add a grid to the report, place all the tables in the grid, and cascade the "CEO" + "," + "Sales VP" ACL expression from the grid instead of from the report element. This design is more versatile than the previous one because it is often practical to leave the ACL at the report level blank to grant all users access to the report. Later, if you add new sections, such as a title page, for a broader range of users, it is easier to start with the rule that all users can view all the content in a report, and then restrict access to particular sections.
The report examples in this section illustrate several key concepts about page‑level security, which are summarized next. Understanding these concepts can help you design a report to use page‑level security.
When an element’s ACL expression property is blank, there are no viewing restrictions for that element, except those restrictions (determined by the ACLs) that the element inherits from its container.
An element inherits the ACLs from its container when the container’s Cascade ACL option is selected. This option, selected by default, means that a user who is permitted to view a container can also view all elements within the container.
The report element is the topmost container. If its ACL expression property is blank, BIRT assigns an internal ACL of "__all" to the report. This setting combined with the selected Cascade ACL option ensures that a report created initially is accessible to all users.
BIRT generates one report document, inserting a page break between elements that have different ACLs. This concept explains why some pages display just a group header, as Figure 32‑3 shows, when groups in a table have different ACLs.
Enabling and disabling page-level security
For ACLs to take effect when the report is run on iHub, you must enable page‑level security in the report design. When enabled, BIRT generates a report that consists of pages, which are restricted to users with specified security IDs. If you decide later to make the entire report available to users, all you do is disable the page-level security option. You do not have to remove the ACLs.
How to turn page-level security on or off
1 In the layout editor, right-click a blank area of the report, then select Security.
2 In Security, shown in Figure 32‑7, either select or deselect Enable Page Level Security on generated report document.
Figure 32‑7 Enabling page-level security
Configuring page numbers
A report that uses page-level security provides two options for displaying page numbers. The report can display page numbers sequentially in the order that they appear to a user. For example, if a user can view pages 1, 5, 6, and 8 of a report, the page numbers that the user sees are 1, 2, 3, and 4. Alternatively, the report can display the actual page numbers 1, 5, 6, and 8.
Similarly, for page number formats that include the total page count, such as 1 of 4, the total page count can be the number of pages visible to the user or the number of pages in the report.
How to configure page numbers
This procedure assumes that the report already contains page number elements.
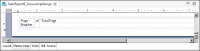
1 Choose Master Page to view the page number elements. Figure 32‑8 shows an example of a master page where the footer contains three elements to display page numbers in the format 1 of 10.
Figure 32‑8 Master page containing page number elements
2 Right-click the Page Number element and choose Security.
3 In Security, shown in Figure 32‑9, select a display option, then choose OK.
Select Visible Page Number to display numbers sequentially in the order that the pages appear to the user.
Select Actual Page Number to display the numbers as they appear in the entire report.
Figure 32‑9 Selecting a page numbering option
4 If the page number format includes a total page count, as shown in the sample master page in Figure 32‑8, use the instructions in the previous step to select a display option for the Total Page element.
Testing page-level security
BIRT Designer Professional supports the simulation of secure report viewing, so that you can test page-level security without having to publish the report to iHub, log in with different user credentials, run the report and verify its output.
How to test page-level security
1 Make sure page-level security is enabled. This procedure is described earlier in this chapter.
2 Choose Run➛View Report with Page Security, and select the output format in which to view the report.
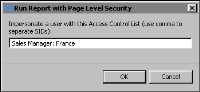
3 In Run Report with Page Level Security, shown in Figure 32‑10, type a security ID specified in an ACL. For example:
Sales Manager: France
Figure 32‑10 Using a specified security ID
Choose OK. The report runs and displays only the page or pages that the specified security ID can view.
4 Repeat the previous step until you finish testing all the security IDs used in the report.