An administrator has access to the entire contents of the volume. You can restrict access to the contents of the volume for other users. BIRT iHub Visualization Platform enables you to create users and assign privileges on files and folders to control access. Each user is assigned a user name and password that they use to log in to the volume.
Very often in an organization, a group of users has the same requirements for access to the reports in a volume. For example, corporate executives may all need access to the same sales reports. Because it is easier to assign privileges to a group of users than it is to assign privileges to individual users, you can create a user group that includes all executives and grant this user group access to sales reports.
You will create two users, User01 and User02. You will then create two user groups, UserGroup01 and UserGroup02. UserGroup01 will consist of one user, User01. Likewise, UserGroup02 will consist of User02.
Task 1: Creating users
Create the users User01 and User02.
1 Click the icon on the right end of the toolbar to display the User menu, as shown in Figure 2‑1.
Figure 2‑1 Displaying the User menu
2 Choose BIRT iHub Administration. Administration appears in a new tab. Only one user appears in the list, Administrator.
3 In Users, choose Add User.
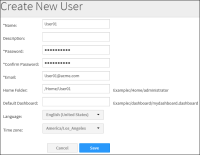
4 In Create New User, in Name, type User01.
5 In Home Folder, type /Home/User01.
6 Provide a password and an email address. The password must be at least eight characters long. It must contain at least one lower case letter, one upper case letter, and one digit. Figure 2‑2 shows the properties for User01.
Figure 2‑2 Creating a user
7 Choose Save. In Confirmation, choose OK to confirm.
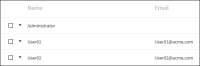
8 Create a second user named User02. User01 and User02 appear in the list of users, along with Administrator, as shown in Figure 2‑3.
Figure 2‑3 List of users
Task 2: Creating user groups
Create the user groups UserGroup01 and UserGroup02.
1 In the upper left corner of Administration, click on User Groups, as shown in Figure 2‑4.
Figure 2‑4 Choosing User Groups
2 In User Groups, choose Add User Group.
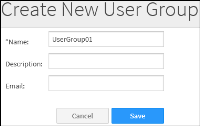
3 In Create New User Group, in Name, type UserGroup01, as shown in Figure 2‑5.
Figure 2‑5 Creating a user group
4 In the left pane, choose Assign Users.
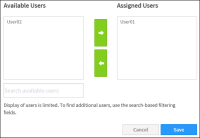
5 In Available Users, select User01. Choose the right arrow. User01 appears in Assigned Users, as shown in Figure 2‑6.
Figure 2‑6 Assigning a user to a group
6 Choose Save. In Confirmation, choose OK to confirm.
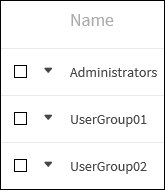
7 Create a second user group named UserGroup02. UserGroup01 and UserGroup02 appear in the list of user groups, along with the Administrators user group, as shown in Figure 2‑7.