Creating a connection profile
You use Data Source Explorer (not to be confused with Data Explorer) to create a connection profile. You can create a connection profile for any data source type, and you can create as many profiles as needed. For example, if your reports frequently access data from a particular database and a particular web service, you can create one connection profile for the database, and one for the web service.
BIRT saves all the connection profiles in a single file named ServerProfiles.dat. This file is saved in the .metadata folder in your current workspace. The path is
...\workspace\.metadata\plugins\org.eclipse.datatools.connectivity\ServerProfiles.dat
To share your connection profiles with other report developers, place ServerProfiles.dat in a central location. You can rename the file in the event that there are other ServerProfiles.dat files in the central location.
How to create a connection profile
1 Choose Window➛Show View➛Other.
2 In Show View, expand Data Management and select Data Source Explorer, then choose OK.
Data Source Explorer appears at the bottom of the application window.
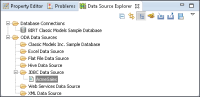
3 In Data Source Explorer, expand ODA Data Sources.
Data Source Explorer lists the data source types and connection profiles, if any were defined previously.
Figure 1‑1 shows the list of data source types in Data Source Explorer.
Figure 1‑1 Data Source Explorer
4 Right click the data source type for which you want to create a connection profile, then choose New.
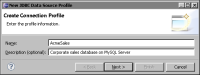
5 In New <data source type> Data Source Profile, type a name and description for the connection profile.
Figure 1‑2 shows an example of information specified for a JDBC connection profile.
Figure 1‑2 Name and description specified for a JDBC connection profile
Choose Next.
6 In New <data source type> Data Source Profile, specify the connection values to connect to the data source.
Figure 1‑3 shows an example of connection properties to connect to a JDBC data source.
Figure 1‑3 Connection properties for a JDBC data source
7 Choose Test Connection to verify the connection.
8 Choose Finish. The new connection profile appears in Data Source Explorer, as shown in
Figure 1‑4. It displays the name you specified when you created the connection profile.
Figure 1‑4 Data Source Explorer displays the new JDBC connection profile