Deploying the extension plug-in
In the PDE, a plug-in developer can use the Export wizard to produce a distributable archive file that contains the plug-in code and other resources. A plug-in developer can create and manage an update site using the Update Site editor in the Eclipse PDE. A user can find software and extract the contents of the archive file to an Eclipse installation using the install new software or update configuration managers.
How to deploy a plug-in extension
1 In the Eclipse PDE Manifest editor, choose Overview.
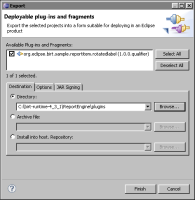
2 In Exporting, choose Export Wizard. Export appears.
3 In Available Plug-ins and Fragments, select the plug-in to export. For example, select org.eclipse.birt.sample.reportitem.rotatedlabel.
4 In Destination, specify Archive file or Directory. For example, in Directory, type:
C:\birt-runtime-4_3_1\ReportEngine\plugins
Figure 17‑25 Exporting a plug-in
5 In Options, select one or more of the following options, if necessary:

Export source
Package plug-ins as individual JAR archives
Save as Ant script
Also select Allow for binary cycles in target platform.
Choose Finish to export the plug-in to the specified destination.
Creating an update site project
A plug-in developer can also use a more structured approach and group plug-ins into features. Features contain information that enables the install new software or update configuration managers to locate published updates and discover new related features. Updates are typically published in a special internet directory called an update site, created and managed by a plug-in developer using the Update Site editor.
A plug-in developer can create an update site by building an update site project in the Eclipse PDE workspace. The update site project contains a manifest file, site.xml, that lists the features and plug-ins packages.
The build operation for an update site puts the JAR files for features in a features folder and the JAR files for plug-ins in a plug-ins folder. The Eclipse PDE also provides support for uploading an update site to a remote server or local file system for distribution.
How to create an update site project
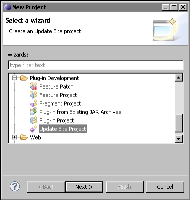
1 From the Eclipse menu, choose File➛New➛Project. New Project appears.
2 In Wizards, open Plug-in Development and select Update Site Project, as shown in
Figure 17‑26. Choose Next.
Figure 17‑26 Selecting Update Site Project wizard
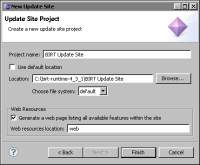
3 In Update Site Project, specify the following items:
Project name
Project contents directory, such as C:\birt-runtime-4_3_1\BIRT Update Site
Web resources
Select the option Generate a web page listing all available features within the site.
Creates index.html, site.css, and site.xls files to display the contents of the update site.
Web resources location.
Change this setting to the web resources location. The default value is web.
Update Site Project appears as shown in
Figure 17‑27. Choose Finish.
Figure 17‑27 Creating a new update site project
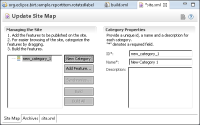
Update Site Map appears.
4 Choose New Category to create a feature category, as shown in
Figure 17‑28.
Figure 17‑28 Update Site Map
5 Choose Add Feature to add a feature to a selected category.