Developing an advanced report item
The rotated label example, discussed earlier in this section in
Developing the sample report item extension, outlines the basic steps in creating a custom report item in BIRT. This section extends that earlier discussion by implementing more advanced functionality to enhance the report item usability and behavior.
The elements of the advanced example demonstrate how to develop additional user interface features for a custom rotated report item. The example shows how to implement a report item builder, a context menu, a custom property page, and data binding.
The example begins by defining a simple report model, design, and behavior. These steps are familiar from the previous example. This example uses more extension points to develop more advanced features. Creating a custom report item involves extending at least these three extension points:

org.eclipse.birt.report.model.reportItemModel, which provides the report model extensibility
org.eclipse.birt.report.designer.ui.reportitemUI, which provides the report designer extensibility
org.eclipse.birt.report.engine.reportitemPresentation, which provides the report engine extensibility
In addition, org.eclipse.birt.report.designer.ui.elementAdapters can be extended to add views like properties pages. The example includes a section about creating a custom property editor.
Defining the report item model
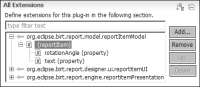
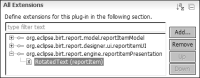
The BIRT report model provides the org.eclipse.birt.report.model.reportItemModel extension point. As shown in
Figure 18‑15, defining the report item model involves creating a reportItem element under the extension and specifying the extensionName property as RotatedText. The extension name is the identifier for the extended item and serves as a connection between the report model and the engine and the designer extensions.
Figure 18‑15 Adding the basic extension points
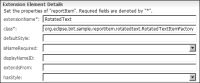
As shown in
Figure 18‑16, the model factory class org.eclipse.birt.sample.reportitem.rotatedtext.RotatedTextItemFactory must be defined.
Figure 18‑16 Defining the report model
This factory class creates and initializes the IReportItem instance, and provides optional localization support.
Listing 18‑9 shows the code for the RotatedTextItemFactory class.
Listing 18‑9 RotatedTextItemFactory class
public class RotatedTextItemFactory extends ReportItemFactory
{
public IReportItem newReportItem( DesignElementHandle modelHandle )
{
if ( modelHandle instanceof ExtendedItemHandle && RotatedTextItem.EXTENSION_NAME.equals( ( (ExtendedItemHandle) modelHandle ).getExtensionName( ) ) )
{
return new RotatedTextItem( (ExtendedItemHandle) modelHandle );
}
return null;
}
public IMessages getMessages( )
{
// TODO implement this to support localization
return null;
}
}
The reportItem Properties page contains more properties like defaultStyle, extendsFrom, hasStyle, and others, which can be used to define additional features. This example does not extend these features; it uses the default values for these properties.
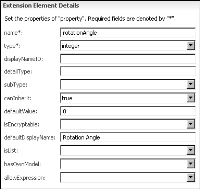
Like the Rotated Label example, the Rotated text element has two properties:
rotationAngle, which defines the text rotation angle, using type integer and a default value 0, as shown in
Figure 18‑17.
Figure 18‑17 Defining the rotationAngle properties
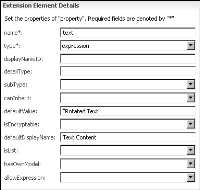
text, which defines the report item text content, using type expression and a default value “Rotated Text”, as shown in
Figure 18‑18.
Figure 18‑18 Defining the text properties
These settings complete the report model definition. The next step is to create a class, RotatedTextItem. This class defines the basic methods for accessing the report item properties. The code is shown in
Listing 18‑10.
Listing 18‑10 RotatedTextItem class
public class RotatedTextItem extends ReportItem
{
public static final String EXTENSION_NAME = "RotatedText"; //$NON-NLS-1$
public static final String TEXT_PROP = "text"; //$NON-NLS-1$
public static final String ROTATION_ANGLE_PROP = "rotationAngle"; //$NON-NLS-1$
private ExtendedItemHandle modelHandle;
RotatedTextItem( ExtendedItemHandle modelHandle )
{
this.modelHandle = modelHandle;
}
public String getText( )
{
return modelHandle.getStringProperty( TEXT_PROP );
}
public int getRotationAngle( )
{
return modelHandle.getIntProperty( ROTATION_ANGLE_PROP );
}
public void setText( String value ) throws SemanticException
{
modelHandle.setProperty( TEXT_PROP, value );
}
public void setRotationAngle( int value ) throws SemanticException
{
modelHandle.setProperty( ROTATION_ANGLE_PROP, value );
}
}
Defining the report item UI design
The designer provides the org.eclipse.birt.report.designer.ui.reportitemUI extension point to define the user interface of extended report items. Add the org.eclipse.birt.report.designer.ui.reportitemUI extension point and create the design properties to define the user interface, as shown in
Figure 18‑19.
Figure 18‑19 Defining the design
The design properties are as follows:
RotatedText (model)
The first property, RotatedText (model), binds the designer extension to the model extension. The RotatedText’s extensionName is RotatedText, the same as the model extension name.
palette
Palette properties specify the icon displayed in Palette view and the palette category. An empty category value causes the report item to use the default category of Report Item.
editor
Editor properties define the report item visibility in different editor pages and whether the resizing control is enabled.
outline
Outline specifies the icon shown in Outline view. Usually the icon is the same as the one in Palette view.
UI provider
The user interface (UI) provider defines how to display and interact with the extended report item within the editor. The BIRT designer supports three types of UI providers:
The Label UI provider implements the IReportItemLabelProvider interface, which manipulates and displays text content.
The Image UI provider implements the IReportItemImageProvider interface, which manipulates and displays image content.
The Figure UI provider implements the IReportItemFigureProvider, which uses the Figure interface from Graphical Editing Framework (GEF), which provides flexibility and interactivity support.
This example introduces all three providers, starting with the simplest Label UI provider. The property reportItemLabelUI, created under the extension, registers the Label UI provider, and specifies the implementer class org.eclipse.birt.sample.reportitem.rotatedtext.RotatedTextLabelUI.
The code for RotatedTextLabelUI class, shown in
Listing 18‑11, reads the text property value from the model and returns it as a string.
Listing 18‑11 RotatedTextLabelUI class
public class RotatedTextLabelUI implements IReportItemLabelProvider
{ public String getLabel( ExtendedItemHandle handle )
{ try {
IReportItem item = handle.getReportItem( );
if ( item instanceof RotatedTextItem )
{
return ( (RotatedTextItem) item ).getText( );
}
} catch ( ExtendedElementException e )
{
e.printStackTrace( );
}
return null;
}
}
The final step is to test the completed report item definition in the BIRT designer. For more information about testing the report item definition, see
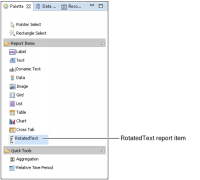
Deploying and testing the rotated label report item plug-in, earlier in this section. Open a new Eclipse instance in Report Design perspective. Open the Palette view, as shown in
Figure 18‑20.
Palette contains the new RotatedText extended report item.
Figure 18‑20 Palette showing the RotatedText report item
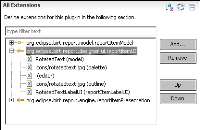
Right-click anywhere in Layout, and the RotatedText item is now also available in the Insert context menu, as shown in
Figure 18‑21.
Figure 18‑21 Insert context menu showing the RotatedText report item
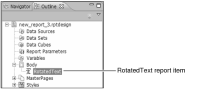
A RotatedText report item inserted in the layout also appears in the Outline view, as shown in
Figure 18‑22.
Figure 18‑22 Outline view showing a RotatedText report item
Defining the report item presentation
BIRT Report Engine provides the org.eclipse.birt.report.engine.reportitemPresentation extension point, as shown in
Figure 18‑23. This extension point defines the presentation of extended report items.
The extension property RotatedText binds the engine extension to the model extension. The property name must be set to RotatedText to match the name of the model’s RotatedText property.
Figure 18‑23 Defining the presentation
The presentation implementer class is set to org.eclipse.birt.sample.reportitem.rotatedtext.RotatedTextPresentationImpl and must implement the IReportItemPresentation interface. The implementation of the class creates the text image dynamically, and uses the Swing graphics API to render the rotated text.
Listing 18‑12 shows the code for this class.
Listing 18‑12 RotatedTextPresentationImpl class
public class RotatedTextPresentationImpl
extends ReportItemPresentationBase
{
private RotatedTextItem textItem;
public void setModelObject( ExtendedItemHandle modelHandle )
{
try {
textItem = (RotatedTextItem) modelHandle.getReportItem();
}
catch ( ExtendedElementException e )
{
e.printStackTrace( );
}
}
public int getOutputType( )
{
return OUTPUT_AS_IMAGE;
}
public Object onRowSets( IRowSet[] rowSets )
throws BirtException
{
if ( textItem == null )
{
return null;
}
int angle = textItem.getRotationAngle( );
String text = textItem.getText( );
BufferedImage rotatedImage =
SwingGraphicsUtil.createRotatedTextImage( text, angle,
new Font( "Default", 0, 12 ) ); //$NON-NLS-1$
ByteArrayInputStream bis = null;
try
{
ImageIO.setUseCache( false );
ByteArrayOutputStream baos = new ByteArrayOutputStream();
ImageOutputStream ios =
ImageIO.createImageOutputStream( baos );
ImageIO.write( rotatedImage, "png", ios ); //$NON-NLS-1$
ios.flush( );
ios.close( );
bis = new ByteArrayInputStream( baos.toByteArray( ) );
}
catch ( IOException e )
{
e.printStackTrace( );
}
return bis;
}
}
This implementation generates an image dynamically in the onRowSets() method. An in-memory stream returns the image content to the caller. The utility class that implements the key rotation rendering algorithm is shown in
Listing 18‑13.
Listing 18‑13 SwingGraphicsUtil class
public class SwingGraphicsUtil
{
public static BufferedImage createRotatedTextImage(
String text, int angle, Font ft )
{
Graphics2D g2d = null;
try {
if ( text == null || text.trim( ).length( ) == 0 )
{
return null;
}
BufferedImage stringImage = new BufferedImage( 1, 1,
BufferedImage.TYPE_INT_ARGB );
g2d = (Graphics2D) stringImage.getGraphics( );
g2d.setFont( ft );
FontMetrics fm = g2d.getFontMetrics( );
Rectangle2D bounds = fm.getStringBounds( text, g2d );
TextLayout tl = new TextLayout( text, ft,
g2d.getFontRenderContext( ) );
g2d.dispose( );
g2d = null;
return createRotatedImage( tl, (int) bounds.getWidth( ),
(int) bounds.getHeight( ), angle );
}
catch ( Exception e )
{
e.printStackTrace( );
if ( g2d != null )
{
g2d.dispose( );
}
}
return null;
}
private static BufferedImage createRotatedImage( Object src,
int width, int height, int angle )
{
angle = angle % 360;
if ( angle < 0 )
{
angle += 360;
}
if ( angle == 0 )
{
return renderRotatedObject( src, 0, width, height, 0, 0);
}
else if ( angle == 90 )
{
return renderRotatedObject( src, -Math.PI / 2, height,
width, -width, 0 );
}
else if ( angle == 180 )
{
return renderRotatedObject( src, Math.PI, width, height,
-width, -height );
}
else if ( angle == 270 )
{
return renderRotatedObject( src, Math.PI / 2, height,
width, 0, -height );
}
else if ( angle > 0 && angle < 90 )
{
double angleInRadians = ( ( -angle * Math.PI ) / 180.0 );
double cosTheta = Math.abs( Math.cos( angleInRadians ) );
double sineTheta = Math.abs( Math.sin( angleInRadians ));
int dW = (int) ( width * cosTheta + height * sineTheta );
int dH = (int) ( width * sineTheta + height * cosTheta );
return renderRotatedObject( src, angleInRadians, dW, dH,
-width * sineTheta * sineTheta,
width * sineTheta * cosTheta );
}
else if ( angle > 90 && angle < 180 )
{
double angleInRadians = ( ( -angle * Math.PI ) / 180.0 );
double cosTheta = Math.abs( Math.cos( angleInRadians ) );
double sineTheta = Math.abs( Math.sin( angleInRadians ));
int dW = (int) ( width * cosTheta + height * sineTheta );
int dH = (int) ( width * sineTheta + height * cosTheta );
return renderRotatedObject( src, angleInRadians, dW, dH,
-( width + height * sineTheta * cosTheta ),
-height / 2 );
}
else if ( angle > 180 && angle < 270 )
{
double angleInRadians = ( ( -angle * Math.PI ) / 180.0 );
double cosTheta = Math.abs( Math.cos( angleInRadians ) );
double sineTheta = Math.abs( Math.sin( angleInRadians ));
int dW = (int) ( width * cosTheta + height * sineTheta );
int dH = (int) ( width * sineTheta + height * cosTheta );
return renderRotatedObject( src, angleInRadians, dW, dH,
-( width * cosTheta * cosTheta ),
-( height + width * cosTheta * sineTheta ) );
}
else if ( angle > 270 && angle < 360 )
{
double angleInRadians = ( ( -angle * Math.PI ) / 180.0 );
double cosTheta = Math.abs( Math.cos( angleInRadians ) );
double sineTheta = Math.abs( Math.sin( angleInRadians ));
int dW = (int) ( width * cosTheta + height * sineTheta );
int dH = (int) ( width * sineTheta + height * cosTheta );
return renderRotatedObject( src, angleInRadians, dW, dH,
( height * cosTheta * sineTheta ),
-( height * sineTheta * sineTheta ) );
}
return renderRotatedObject( src, 0, width, height, 0, 0 );
}
private static BufferedImage renderRotatedObject( Object src,
double angle, int width, int height, double tx, double ty )
{
BufferedImage dest = new BufferedImage( width, height,
BufferedImage.TYPE_INT_ARGB );
Graphics2D g2d = (Graphics2D) dest.getGraphics( );
g2d.setColor( Color.black );
g2d.setRenderingHint( RenderingHints.KEY_TEXT_ANTIALIASING,
RenderingHints.VALUE_TEXT_ANTIALIAS_ON );
g2d.setRenderingHint( RenderingHints.KEY_ANTIALIASING,
RenderingHints.VALUE_ANTIALIAS_ON );
AffineTransform at = AffineTransform.getRotateInstance(
angle );
at.translate( tx, ty );
g2d.setTransform( at );
if ( src instanceof TextLayout )
{
TextLayout tl = (TextLayout) src;
tl.draw( g2d, 0, tl.getAscent( ) );
}
else if ( src instanceof Image )
{
g2d.drawImage( (Image) src, 0, 0, null );
}
g2d.dispose( );
return dest;
}
}
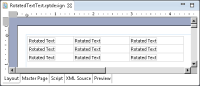
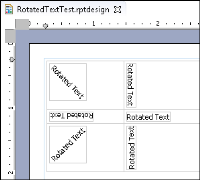
To test the report item, open a new Eclipse instance in the Report Design perspective. Create a report and insert a grid having nine cells. Insert a RotatedText item in each cell, as shown in
Figure 18‑24, and use the Properties view to set a different rotation angle for each report item.
Figure 18‑24 Report layout having nine RotatedText items
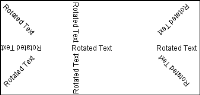
A preview of the report as HTML is shown in
Figure 18‑25.
Figure 18‑25 Preview in HTML
Improving the report item UI design
As you see in the report layout in
Figure 18‑24, all RotatedText report items in the report design look the same, displayed as horizontal text. Look at the Properties view to see the different angles at which the text would be displayed in the preview. This inconsistency prevents the report developer from getting an intuitive picture of the final report at the design phase. One obvious improvement is to make the report item image appear in the design in the same way in which it appears in the preview. This technique is called WYSIWYG, the familiar acronym for what you see is what you get, that is adopted by most contemporary editors.
To comply with the WYSIWYG paradigm, change the report item presentation to display the rotated text in the layout. Use the Image UI provider or the Figure UI provider instead of the Label UI provider to implement this change.
Using the Image UI provider
The Image UI provider requires an image for the UI presentation. The implementation renders the rotated text as an image and returns it to the caller.
To register the Image UI provider, remove the original Label UI provider first, and then add the new Image UI provider extension, as shown in
Figure 18‑26.
Figure 18‑26 Changing the UI provider
The implementer class code is shown in
Listing 18‑14.
Listing 18‑14 RotatedTextImageUI class
public class RotatedTextImageUI
implements IReportItemImageProvider
{
public void disposeImage( ExtendedItemHandle handle,
Image image )
{
if ( image != null && !image.isDisposed( ) )
{
image.dispose( );
}
}
public Image getImage( ExtendedItemHandle handle )
{
try
{
IReportItem item = handle.getReportItem( );
if ( item instanceof RotatedTextItem )
{
int angle =
( (RotatedTextItem) item ).getRotationAngle( );
String text = ( (RotatedTextItem) item ).getText( );
return SwtGraphicsUtil.createRotatedTextImage( text,
angle, null );
}
}
catch ( ExtendedElementException e )
{
e.printStackTrace( );
}
return null;
}
}
The image handler uses Eclipse Standard Widget Toolkit (SWT) to process and rotate the image instead of Swing. An updated version of the SwingGraphicsUtil class is shown in
Listing 18‑15.
Listing 18‑15 SwtGraphicsUtil class
public class SwtGraphicsUtil
{
public static Image createRotatedTextImage( String text,
int angle, Font ft )
{
GC gc = null;
try
{
if ( text == null || text.trim( ).length( ) == 0 )
{
return null;
}
Display display = Display.getCurrent( );
gc = new GC( display );
if ( ft != null )
{
gc.setFont( ft );
}
Point pt = gc.textExtent( text );
gc.dispose( );
TextLayout tl = new TextLayout( display );
if ( ft != null )
{
tl.setFont( ft );
}
tl.setText( text );
return createRotatedImage( tl, pt.x, pt.y, angle );
}
catch ( Exception e )
{
e.printStackTrace( );
if ( gc != null && !gc.isDisposed( ) )
{
gc.dispose( );
}
}
return null;
}
/**
* @return Returns as [rotatedWidth, rotatedHeight, xOffset,
yOffset]
*/
public static double[] computedRotatedInfo( int width,
int height, int angle )
{
angle = angle % 360;
if ( angle < 0 )
{
angle += 360;
}
if ( angle == 0 )
{
return new double[]{ width, height, 0, 0 };
}
else if ( angle == 90 )
{
return new double[]{ height, width, -width, 0 };
}
else if ( angle == 180 )
{
return new double[]{ width, height, -width, -height };
}
else if ( angle == 270 )
{
return new double[]{ height, width, 0, -height };
}
else if ( angle > 0 && angle < 90 )
{
double angleInRadians = ( ( -angle * Math.PI ) / 180.0 );
double cosTheta = Math.abs( Math.cos( angleInRadians ) );
double sineTheta = Math.abs( Math.sin( angleInRadians ));
int dW = (int) ( width * cosTheta + height * sineTheta );
int dH = (int) ( width * sineTheta + height * cosTheta );
return new double[]{ dW, dH,
-width * sineTheta * sineTheta,
width * sineTheta * cosTheta };
}
else if ( angle > 90 && angle < 180 )
{
double angleInRadians = ( ( -angle * Math.PI ) / 180.0 );
double cosTheta = Math.abs( Math.cos( angleInRadians ) );
double sineTheta = Math.abs( Math.sin( angleInRadians ));
int dW = (int) ( width * cosTheta + height * sineTheta );
int dH = (int) ( width * sineTheta + height * cosTheta );
return new double[]{ dW, dH,
-( width + height * sineTheta * cosTheta ),
-height / 2 };
}
else if ( angle > 180 && angle < 270 )
{
double angleInRadians = ( ( -angle * Math.PI ) / 180.0 );
double cosTheta = Math.abs( Math.cos( angleInRadians ) );
double sineTheta = Math.abs( Math.sin( angleInRadians ));
int dW = (int) ( width * cosTheta + height * sineTheta );
int dH = (int) ( width * sineTheta + height * cosTheta );
return new double[]{ dW, dH,
-( width * cosTheta * cosTheta ),
-( height + width * cosTheta * sineTheta ) };
}
else if ( angle > 270 && angle < 360 )
{
double angleInRadians = ( ( -angle * Math.PI ) / 180.0 );
double cosTheta = Math.abs( Math.cos( angleInRadians ) );
double sineTheta = Math.abs( Math.sin( angleInRadians ));
int dW = (int) ( width * cosTheta + height * sineTheta );
int dH = (int) ( width * sineTheta + height * cosTheta );
return new double[]{ dW, dH,
( height * cosTheta * sineTheta ),
-( height * sineTheta * sineTheta ) };
}
return new double[]{ width, height, 0, 0 };
}
private static Image createRotatedImage( Object src, int width, int height, int angle )
{
angle = angle % 360;
if ( angle < 0 )
{
angle += 360;
}
double[] info = computedRotatedInfo( width, height, angle );
return renderRotatedObject( src, -angle, (int) info[0],
(int) info[1], info[2], info[3] );
}
private static Image renderRotatedObject( Object src,
double angle, int width, int height, double tx, double ty )
{
Display display = Display.getCurrent( );
Image dest = null;
GC gc = null;
Transform tf = null;
try
{
dest = new Image( Display.getCurrent( ), width, height );
gc = new GC( dest );
gc.setAdvanced( true );
gc.setAntialias( SWT.ON );
gc.setTextAntialias( SWT.ON );
tf = new Transform( display );
tf.rotate( (float) angle );
tf.translate( (float) tx, (float) ty );
gc.setTransform( tf );
if ( src instanceof TextLayout )
{
TextLayout tl = (TextLayout) src;
tl.draw( gc, 0, 0 );
}
else if ( src instanceof Image )
{
gc.drawImage( (Image) src, 0, 0 );
}
}
catch ( Exception e )
{
e.printStackTrace( );
}
finally
{
if ( gc != null && !gc.isDisposed( ) )
{
gc.dispose( );
}
if ( tf != null && !tf.isDisposed( ) )
{
tf.dispose( );
}
}
return dest;
}
}
Ensure that your RotatedTextImageUI class uses the new SwtGraphicsUtil class and that your ReportItemImageUI item points to the fully qualified RotatedTextImageUI class.
Run another test or run the report design with a grid. On the Layout view, the rotated text items now reflect the rotationAngle setting, as shown in
Figure 18‑27. Try changing the Rotation Angle property to see the effect.
Figure 18‑27 Report layout of RotatedText implementing Image UI
Preview the report to see the item rendered in an HTML context.
Using the Figure UI provider
The Image UI provides the basic functionality for implementing WYSIWYG support for the rotated report item.
The Figure UI provider is typically used in cases where the requirements are more complex. The Figure UI leverages the IFigure interface from Graphical Editing Framework (GEF) and provides more flexibility and interactivity than the Image UI.
Table 18‑10 shows a comparison between Figure UI and Image UI.
Table 18‑10 Comparing Figure UI and Image UI
Property | Figure UI | Image UI |
Interactivity | Supports listeners for UI events. | No interactivity support. |
Life Cycle | Three phases: Create Update Dispose Creates the Figure object once. Each time any model state changes, the Update action is invoked. This mechanism supports incremental and selective updates. When Update occurs, the figure instance can check the internal model state and decide what update to execute, full, partial, or none. | Two phases: Create Dispose Each time any model state changes, the Image UI recreates the image presentation. |
Presentation | Supports the creation of hierarchical UI structures, controlled by the GEF layout mechanism. | Uses one single Image for presentation. |
Usage | Requires knowledge of GEF framework. | Easy to use. |
A good use case for the Figure UI provider is one where a mouse middle‑button click controls the report item rotation angle. Each middle‑button click adds 45 degrees to the value of the rotation angle.
To implement the Figure UI provider, first remove any existing Label UI or Image UI provider in the extension points. Then, add the new Figure UI provider extension, and specify the implementer class as org.eclipse.birt.sample.reportitem.rotatedtext.RotatedTextFigureUI. The code for the class is in
Listing 18‑16.
Listing 18‑16 RotatedTextFigureUI class
public class RotatedTextFigureUI extends ReportItemFigureProvider
{
public IFigure createFigure( ExtendedItemHandle handle )
{
try
{
IReportItem item = handle.getReportItem( );
if ( item instanceof RotatedTextItem )
{
return new RotatedTextFigure( (RotatedTextItem) item );
}
}
catch ( ExtendedElementException e )
{
e.printStackTrace( );
}
return null;
}
public void updateFigure( ExtendedItemHandle handle,
IFigure figure )
{
try
{
IReportItem item = handle.getReportItem( );
if ( item instanceof RotatedTextItem )
{
RotatedTextFigure fig = (RotatedTextFigure) figure;
fig.setRotatedTextItem( (RotatedTextItem) item );
}
}
catch ( ExtendedElementException e )
{
e.printStackTrace( );
}
}
public void disposeFigure( ExtendedItemHandle handle,
IFigure figure )
{
( (RotatedTextFigure) figure ).dispose( );
}
}
The Figure UI provider creates a RotatedTextFigure instance. The RotatedTextFigure class implements the rendering following an algorithm similar to the Image UI provider. The only addition is using a listener to handle the mouse middle-button click event. The code for this class is in
Listing 18‑17.
Listing 18‑17 RotatedTextFigure class
public class RotatedTextFigure extends Figure
{
private String lastText;
private int lastAngle;
private Image cachedImage;
private RotatedTextItem textItem;
RotatedTextFigure( RotatedTextItem textItem )
{
super( );
this.textItem = textItem;
addMouseListener( new MouseListener.Stub( ) {
public void mousePressed( MouseEvent me )
{
if ( me.button == 2 )
{
try
{
RotatedTextFigure.this.textItem.setRotationAngle( normalize( RotatedTextFigure.this.textItem.getRotationAngle( )
+ 45 ) );
}
catch ( SemanticException e )
{
e.printStackTrace( );
}
}
}
} );
}
private int normalize( int angle )
{
angle = angle % 360;
if ( angle < 0 )
{
angle += 360;
}
return angle;
}
public Dimension getMinimumSize( int hint, int hint2 )
{
return getPreferredSize( hint, hint2 );
}
public Dimension getPreferredSize( int hint, int hint2 )
{
Display display = Display.getCurrent( );
GC gc = null;
try
{
String text = textItem.getText( );
int angle = textItem.getRotationAngle( );
gc = new GC( display );
Point pt = gc.textExtent( text == null ? "" : text );
//$NON-NLS-1$
double[] info = SwtGraphicsUtil.computedRotatedInfo(
pt.x, pt.y, angle );
if ( getBorder( ) != null )
{
Insets bdInsets = getBorder( ).getInsets( this );
return new Dimension(
(int) info[0] + bdInsets.getWidth( ),
(int) info[1] + bdInsets.getHeight( ) );
}
return new Dimension( (int) info[0], (int) info[1] );
}
finally
{
if ( gc != null && !gc.isDisposed( ) )
{
gc.dispose( );
}
}
}
protected void paintClientArea( Graphics graphics )
{
final Rectangle r = getClientArea( ).getCopy( );
String text = textItem.getText( );
int angle = textItem.getRotationAngle( );
if ( text == null )
{
text = ""; //$NON-NLS-1$
}
if ( !text.equals( lastText ) || angle != lastAngle
|| cachedImage == null || cachedImage.isDisposed( ) )
{
lastText = text;
lastAngle = angle;
if ( cachedImage != null && !cachedImage.isDisposed( ) )
{
cachedImage.dispose( );
}
cachedImage = SwtGraphicsUtil.createRotatedTextImage(
text, angle, null );
}
if ( cachedImage != null && !cachedImage.isDisposed( ) )
{
graphics.drawImage( cachedImage, r.x, r.y );
}
}
void setRotatedTextItem( RotatedTextItem item )
{
this.textItem = item;
}
void dispose( )
{
if ( cachedImage != null && !cachedImage.isDisposed( ) )
{
cachedImage.dispose( );
}
}
}
To test the RotatedText report item, insert a RotatedText item in the layout editor. Each time you middle-click the RotatedText item, the image rotates by 45 degrees.
Creating a report item builder
In the implementation so far, the only way to manipulate the property values of the RotatedText report item other than Rotation Angle is from Property view. Another more sophisticated and user‑friendly way to set the properties is to use a builder. A builder is a user interface, designed to populate the properties and create a new instance of a selected item. Some of the report items in BIRT, like the Chart, for example, have associated builders. The builders appear every time you double-click or add a report item to the layout.
To create a builder for the RotatedText item, add the builder UI extension and specify the implementer class as org.eclipse.birt.sample.reportitem.rotatedtext.RotatedTextBuilder.
The class RotatedTextBuilder extends the org.eclipse.birt.report.designer.ui.extensions.IReportItemBuilderUI interface. The code is in
Listing 18‑18.
Listing 18‑18 RotatedTextBuilder class
public class RotatedTextBuilder extends ReportItemBuilderUI
{
public int open( ExtendedItemHandle handle )
{
try
{
IReportItem item = handle.getReportItem( );
if ( item instanceof RotatedTextItem )
{
RotatedTextEditor editor = new RotatedTextEditor(
Display.getCurrent( ).getActiveShell( ),
(RotatedTextItem) item );
return editor.open( );
}
}
catch ( Exception e )
{
e.printStackTrace( );
}
return Window.CANCEL;
}
}
The code instantiates an object of RotatedTextEditor class to populate the actual UI. The code of the RotatedTextEditor class is in
Listing 18‑19.
Listing 18‑19 RotatedTextEditor class
class RotatedTextEditor extends TrayDialog
{
protected RotatedTextItem textItem;
protected Text txtText;
protected Scale sclAngle;
protected Label lbAngle;
protected RotatedTextEditor( Shell shell,
RotatedTextItem textItem )
{
super( shell );
this.textItem = textItem;
}
protected void configureShell( Shell newShell )
{
super.configureShell( newShell );
newShell.setText( "Rotated Text Builder" ); //$NON-NLS-1$
}
protected void createTextArea( Composite parent )
{
Label lb = new Label( parent, SWT.None );
lb.setText( "Text Content:" ); //$NON-NLS-1$
txtText = new Text( parent, SWT.BORDER );
GridData gd = new GridData( GridData.FILL_HORIZONTAL );
gd.horizontalSpan = 2;
txtText.setLayoutData( gd );
}
protected Control createDialogArea( Composite parent )
{
Composite composite = new Composite( parent, SWT.NONE );
GridLayout layout = new GridLayout( 3, false );
layout.marginHeight = convertVerticalDLUsToPixels(
IDialogConstants.VERTICAL_MARGIN );
layout.marginWidth = convertHorizontalDLUsToPixels(
IDialogConstants.HORIZONTAL_MARGIN );
layout.verticalSpacing = convertVerticalDLUsToPixels(
IDialogConstants.VERTICAL_SPACING );
layout.horizontalSpacing = convertHorizontalDLUsToPixels(
IDialogConstants.HORIZONTAL_SPACING );
composite.setLayout( layout );
composite.setLayoutData(new GridData( GridData.FILL_BOTH ));
createTextArea( composite );
Label lb = new Label( composite, SWT.None );
lb.setText( "Rotation Angle:" ); //$NON-NLS-1$
sclAngle = new Scale( composite, SWT.None );
sclAngle.setLayoutData( new GridData(
GridData.FILL_HORIZONTAL ) );
sclAngle.setMinimum( 0 );
sclAngle.setMaximum( 360 );
sclAngle.setIncrement( 10 );
lbAngle = new Label( composite, SWT.None );
GridData gd = new GridData( );
gd.widthHint = 20;
lbAngle.setLayoutData( gd );
sclAngle.addSelectionListener( new SelectionListener( ) {
public void widgetDefaultSelected( SelectionEvent e )
{
lbAngle.setText( String.valueOf(
sclAngle.getSelection( ) ) );
}
public void widgetSelected( SelectionEvent e )
{
lbAngle.setText( String.valueOf(
sclAngle.getSelection( ) ) );
}
} );
applyDialogFont( composite );
initValues( );
return composite;
}
private void initValues( )
{
txtText.setText( textItem.getText( ) );
sclAngle.setSelection( textItem.getRotationAngle( ) );
lbAngle.setText( String.valueOf(
textItem.getRotationAngle( ) ) );
}
protected void okPressed( )
{
try
{
textItem.setText( txtText.getText( ) );
textItem.setRotationAngle( sclAngle.getSelection( ) );
}
catch ( Exception ex )
{
ex.printStackTrace( );
}
super.okPressed( );
}
}
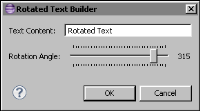
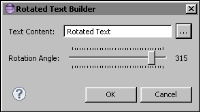
The RotatedText builder UI, as shown in
Figure 18‑28, consists of a Text control and a Scale control, corresponding to the text content and rotation angle properties. The builder appears every time you add a RotatedText item to the layout or double-click a RotatedText item in the layout.
Figure 18‑28 RotatedText builder
Creating a context menu
Another attractive and convenient UI feature is the context menu. The context menu displays links to specific actions and appears when a user right-clicks a selected object with the mouse.
To support a custom context menu, implement the extension org.eclipse.birt.report.designer.ui.menuBuilders. The implementer class implements the org.eclipse.birt.report.designer.ui.extensions.IMenuBuilder interface, as shown in
Figure 18‑29.
Figure 18‑29 Adding the menuBuilders extension
As shown in
Figure 18‑30, the RotatedText elementName binds the menuBuilders extension to the model extension. The implementer class name is org.eclipse.birt.sample.reportitem.rotatedtext.RotatedTextMenuBuilder.
Figure 18‑30 Setting the menuBuilder properties
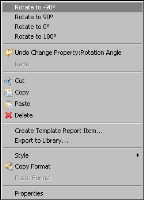
The menuBuilder extension for RotatedText item contains four custom actions to perform quick rotations at angle values of -90, 90, 0, and 180 degrees. The code is shown in
Listing 18‑20.
Listing 18‑20 RotatedTextMenuBuilder class
public class RotatedTextMenuBuilder implements IMenuBuilder
{
public void buildMenu( IMenuManager menu, List selectedList )
{
if ( selectedList != null && selectedList.size( ) == 1
&& selectedList.get( 0 ) instanceof ExtendedItemHandle )
{
ExtendedItemHandle handle =
(ExtendedItemHandle) selectedList.get( 0 );
if ( !RotatedTextItem.EXTENSION_NAME.equals(
handle.getExtensionName( ) ) )
{
return;
}
RotatedTextItem item = null;
try {
item = (RotatedTextItem) handle.getReportItem( );
} catch ( ExtendedElementException e )
{
e.printStackTrace( );
}
if ( item == null )
{
return;
}
Separator separator = new Separator(
"group.rotatedtext" ); //$NON-NLS-1$
if ( menu.getItems( ).length > 0 )
{
menu.insertBefore( menu.getItems( )[0].getId( ),
separator );
}
else {
menu.add( separator );
}
menu.appendToGroup( separator.getId( ),
new RotateAction( item, -90 ) );
menu.appendToGroup( separator.getId( ),
new RotateAction( item, 90 ) );
menu.appendToGroup( separator.getId( ),
new RotateAction( item, 0 ) );
menu.appendToGroup( separator.getId( ),
new RotateAction( item, 180 ) );
}
}
static class RotateAction extends Action
{
private RotatedTextItem item;
private int angle;
RotateAction( RotatedTextItem item, int angle )
{
this.item = item;
this.angle = angle;
setText( "Rotate to " + angle + "\u00BA" );
//$NON-NLS-1$ //$NON-NLS-2$
}
public void run( )
{
try
{
item.setRotationAngle( angle );
}
catch ( SemanticException e )
{
e.printStackTrace( );
}
}
}
}
Run the designer to test the context menu. Right-click any RotatedText report item in the layout editor. The context menu appears as shown in
Figure 18‑31.
Figure 18‑31 Testing the RotatedText item context menu
Creating a property editor
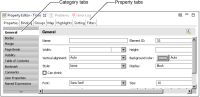
The property editor in BIRT Report Designer provides a user‑friendly interface for property editing. The property editor controls two types of settings, generic settings for all report items, and specific settings for each report item.
Property Editor, as shown in
Figure 18‑32, appears as a separate view having a tabbed style in BIRT Report Designer.
Figure 18‑32 Property Editor for a table element
The property tabs, positioned horizontally, organize the property settings into several pages. The category tabs, positioned vertically, group the properties in a single page into different categories. By default, only the first Properties tab supports categories. You can alter the style and overwrite the logic behind this user interface.
You can create a similar property editor for the RotatedText report item. The new property editor should create a user interface for the rotated text and rotated angle properties and reuse the generic property user interface for report items.
This example uses the FormToolkit class from the org.eclipse.ui.forms library that is separate and must be added to the plug-in dependencies and project libraries.
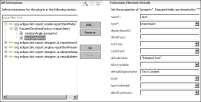
To support custom property pages, implement the org.eclipse.birt.report.designer.ui.elementAdapters extension, which is a generic extension point used by BIRT Report Designer to support property page and other UI extensions.
In the BIRT model, the org.eclipse.birt.report.model.api.ExtendedItemHandle class represents all custom extended report items. Specify the adaptable class as org.eclipse.birt.report.model.api.ExtendedItemHandle.
The next step is to specify the adapter settings, as shown in
Figure 18‑33.
Figure 18‑33 Adapter extension
Table 18‑11 lists and explains the adapter settings.
Table 18‑11 Adapter settings
Property | Value | Description |
id | ReportDesign.AttributeView.RotatedTextPageGenerator | The adapter unique identifier. |
type | org.eclipse.birt.report.designer.ui.views.IPageGenerator | The Java class type to which this adapter adapts. |
class | | The Java class for the adapter. The class must have a constructor without any arguments. When using the factory mode, leave it blank. |
factory | org.eclipse.birt.sample.reportitem.rotatedtext.views.RotatedTextPageGeneratorFactory | The Java class for the adapter factory. The class implements the org.eclipse.core.runtime.IAdapterFactory interface. |
singleton | false | Specifies whether the adapter object is a singleton. For a singleton, the adapter object is cached and reused for all matching adaptable objects. Here, because you are using the factory mode, set it to false. |
priority | 1 | Specifies the priority for the adapter. The user interface uses this priority to sort multiple adapters defined for same adaptable. Use the default value. |
overwrite | | Specifies a semicolon separated id list that this adapter overwrites. Leave it blank. |
comments | | An additional field to contain description text for the adapter. |
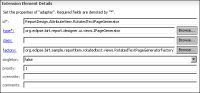
The adapter settings describe the generic behavior of the property editor. The next step is to create custom property pages for the RotatedText item, and set additional constraints for the adaptable object. To accomplish this task, create an enablement element using type test under the adapter node. In the settings, as shown in
Figure 18‑34, specify the test property as ExtendItemHandle.extensionName and the value as RotatedText. This approach restricts the adaptable object to be the RotatedText report items only.
Figure 18‑34 Enablement element settings
The code of the factory class is shown in
Listing 18‑21.
Listing 18‑21 RotatedTextPageGeneratorFactory class
public class RotatedTextPageGeneratorFactory implements IAdapterFactory
{
public Object getAdapter( Object adaptableObject, Class adapterType )
{
return new RotatedTextPageGenerator( );
}
public Class[] getAdapterList( )
{
return new Class[]{
IPageGenerator.class
};
}
}
The factory class creates a generator instance per call. Each generator implements the org.eclipse.birt.report.designer.ui.views.IPageGenerator interface. Extend the org.eclipse.birt.report.designer.ui.views.attributes.AbstractPageGenerator class to use the basic support for categorized styles created by this class.
The implementation of the RotatedTextPageGenerator class is shown in
Listing 18‑22. The class overwrites the General category page in the Properties tab and reuses some of the built-in categories like Border, Margin, and Page Break. The code also adds a Custom property tab to the property editor. The RotatedTextPageGenerator class overwrites three methods, buildItemContent( ), createTabItems( ), and refresh( ). The methods createTabItems( ) and buildItemContent( ) implement the custom logic. The createTabItem( ) method overwrites the creation logic for the General category page to add the reused built-in pages and the new Custom property page. The buildItemContent( ) method contains the code to create the Custom property page.
Listing 18‑22 RotatedTextPageGenerator class
public class RotatedTextPageGenerator
extends AbstractPageGenerator
{
private static final String CUSTOM_PAGE_TITLE = "Custom";
//$NON-NLS-1$
private IPropertyTabUI generalPage;
protected void buildItemContent( CTabItem item )
{
if ( itemMap.containsKey( item )
&& itemMap.get( item ) == null )
{
String title = tabFolder.getSelection( ).getText( );
if ( CUSTOM_PAGE_TITLE.equals( title ) )
{
TabPage page = new RotatedTextCustomPage( ).getPage( );
if ( page != null )
{
setPageInput( page );
refresh( tabFolder, page, true );
item.setControl( page.getControl( ) );
itemMap.put( item, page );
}
}
}
else if ( itemMap.get( item ) != null )
{
setPageInput( itemMap.get( item ) );
refresh( tabFolder, itemMap.get( item ), false );
}
}
public void refresh( )
{
createTabItems( input );
generalPage.setInput( input );
addSelectionListener( this );
( (TabPage) generalPage ).refresh( );
}
public void createTabItems( List input )
{
if ( generalPage == null
|| generalPage.getControl( ).isDisposed( ) )
{
tabFolder.setLayout( new FillLayout( ) );
generalPage = AttributesUtil.buildGeneralPage( tabFolder,
new String[]{
null,
AttributesUtil.BORDER,
AttributesUtil.MARGIN,
AttributesUtil.SECTION,
AttributesUtil.VISIBILITY,
AttributesUtil.TOC,
AttributesUtil.BOOKMARK,
AttributesUtil.USERPROPERTIES,
AttributesUtil.NAMEDEXPRESSIONS,
AttributesUtil.ADVANCEPROPERTY
},
new String[]{ "General" }, //$NON-NLS-1$
new String[]{ "General" }, //$NON-NLS-1$
new AttributesUtil.PageWrapper[]{
new RotatedTextGeneralPage( )
},
input );
CTabItem tabItem = new CTabItem( tabFolder, SWT.NONE );
tabItem.setText( ATTRIBUTESTITLE );
tabItem.setControl( generalPage.getControl( ) );
}
this.input = input;
generalPage.setInput( input );
addSelectionListener( this );
( (TabPage) generalPage ).refresh( );
createTabItem( CUSTOM_PAGE_TITLE, ATTRIBUTESTITLE );
if ( tabFolder.getSelection( ) != null )
{
buildItemContent( tabFolder.getSelection( ) );
}
}
}
The General category page contains two text controls for editing: one for the text content and one for the rotation angle of the RotatedText report item.
Listing 18‑23 shows the code.
Listing 18‑23 RotatedTextGeneralPage class
public class RotatedTextGeneralPage
extends AttributesUtil.PageWrapper
{
protected FormToolkit toolkit;
protected Object input;
protected Composite contentpane;
private Text txtText, txtAngle;
public void buildUI( Composite parent )
{
if ( toolkit == null )
{
toolkit = new FormToolkit( Display.getCurrent( ) );
toolkit.setBorderStyle( SWT.NULL );
}
Control[] children = parent.getChildren( );
if ( children != null && children.length > 0 )
{
contentpane = (Composite) children[children.length - 1];
GridLayout layout = new GridLayout( 2, false );
layout.marginLeft = 8;
layout.verticalSpacing = 12;
contentpane.setLayout( layout );
toolkit.createLabel( contentpane, "Text Content:" );
//$NON-NLS-1$
txtText = toolkit.createText( contentpane, "" );
//$NON-NLS-1$
GridData gd = new GridData( );
gd.widthHint = 200;
txtText.setLayoutData( gd );
txtText.addFocusListener( new FocusAdapter( ) {
public void focusLost(
org.eclipse.swt.events.FocusEvent e )
{
updateModel( RotatedTextItem.TEXT_PROP );
};
} );
toolkit.createLabel( contentpane, "Rotation Angle:" );
//$NON-NLS-1$
txtAngle = toolkit.createText( contentpane, "" );
//$NON-NLS-1$
gd = new GridData( );
gd.widthHint = 200;
txtAngle.setLayoutData( gd );
txtAngle.addFocusListener( new FocusAdapter( ) {
public void focusLost(
org.eclipse.swt.events.FocusEvent e )
{
updateModel( RotatedTextItem.ROTATION_ANGLE_PROP );
};
} );
}
}
public void setInput( Object input )
{
this.input = input;
}
public void dispose( )
{
if ( toolkit != null )
{
toolkit.dispose( );
}
}
private void adaptFormStyle( Composite comp )
{
Control[] children = comp.getChildren( );
for ( int i = 0; i < children.length; i++ )
{
if ( children[i] instanceof Composite )
{
adaptFormStyle( (Composite) children[i] );
}
}
toolkit.paintBordersFor( comp );
toolkit.adapt( comp );
}
protected RotatedTextItem getItem( )
{
Object element = input;
if ( input instanceof List && ( (List) input ).size( ) > 0 )
{
element = ( (List) input ).get( 0 );
}
if ( element instanceof ExtendedItemHandle )
{
try
{
return (RotatedTextItem) (
(ExtendedItemHandle) element ).getReportItem( );
}
catch ( Exception e )
{
e.printStackTrace( );
}
}
return null;
}
public void refresh( )
{
if ( contentpane != null && !contentpane.isDisposed( ) )
{
if ( toolkit == null )
{
toolkit = new FormToolkit( Display.getCurrent( ) );
toolkit.setBorderStyle( SWT.NULL );
}
adaptFormStyle( contentpane );
updateUI( );
}
}
public void postElementEvent( )
{
if ( contentpane != null && !contentpane.isDisposed( ) )
{
updateUI( );
}
}
private void updateModel( String prop )
{
RotatedTextItem item = getItem( );
if ( item != null )
{
try
{
if (RotatedTextItem.ROTATION_ANGLE_PROP.equals( prop ))
{
item.setRotationAngle(
Integer.parseInt( txtAngle.getText( ) ) );
}
else if ( RotatedTextItem.TEXT_PROP.equals( prop ) )
{
item.setText( txtText.getText( ) );
}
}
catch ( Exception e )
{
e.printStackTrace( );
}
}
}
protected void updateUI( )
{
RotatedTextItem item = getItem( );
if ( item != null )
{
String text = item.getText( );
txtText.setText( text == null ? "" : text );
txtAngle.setText( String.valueOf( item.getRotationAngle( ) ) );
}
}
}
The RotatedTextGeneralPage class uses FormToolkit to achieve the same look and feel as the built-in pages in the property editor. Alternatively, you can design your own UI styles.
The Custom property page, shown in
Listing 18‑24, implements a read-only version of the General category page just to illustrate the extension mechanism.
Listing 18‑24 RotatedTextCustomPage class
public class RotatedTextCustomPage extends RotatedTextGeneralPage
{
private Label lbText, lbAngle;
public void buildUI( Composite parent )
{
if ( toolkit == null )
{
toolkit = new FormToolkit( Display.getCurrent( ) );
toolkit.setBorderStyle( SWT.NULL );
}
Control[] children = parent.getChildren( );
if ( children != null && children.length > 0 )
{
contentpane = (Composite) children[children.length - 1];
GridLayout layout = new GridLayout( 2, false );
layout.marginTop = 8;
layout.marginLeft = 8;
layout.verticalSpacing = 12;
contentpane.setLayout( layout );
toolkit.createLabel( contentpane, "Text Content:" );
//$NON-NLS-1$
lbText = toolkit.createLabel( contentpane, "" );
//$NON-NLS-1$
GridData gd = new GridData( );
gd.widthHint = 200;
lbText.setLayoutData( gd );
toolkit.createLabel( contentpane, "Rotation Angle:" );
//$NON-NLS-1$
lbAngle = toolkit.createLabel( contentpane, "" );
//$NON-NLS-1$
gd = new GridData( );
gd.widthHint = 200;
lbAngle.setLayoutData( gd );
}
}
protected void updateUI( )
{
RotatedTextItem item = getItem( );
if ( item != null )
{
String text = item.getText( );
lbText.setText( text == null ? "" : text ); //$NON-NLS-1$
lbAngle.setText( String.valueOf( item.getRotationAngle( ) ) );
}
}
}
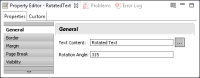
The newly designed property editor is shown in
Figure 18‑35. The General category page displays the two editable properties.
Figure 18‑35 General category page for the RotatedText item
The reused Border category brings up the built-in border property page where the report developer can change the report item border settings. The changes immediately appear in the layout editor.
The Custom page, shown in
Figure 18‑36, displays the read-only properties.
Figure 18‑36 Custom property page for the RotatedText item
Binding the report item to data
BIRT report items access data only through column bindings. Column bindings form an intermediate layer between data set data and report items that display data. Column bindings can also access data derived from functions or user-defined formulas.
To support data bindings, the RotatedText property must be binding-aware, so the text value can change dynamically. The implementation involves changes in the model, the presentation, and the user interface of the RotatedText report item. The user interface modifications include changes in the RotatedText item builder and the property editor.
Changes in the model definition
To support data binding for the text property, change the model extension definition. The property type of the text is an expression; ensure that there are quotation marks around the default value, as shown in
Figure 18‑37. This indicates that the property supports expressions and has valid JavaScript literal string syntax.
Figure 18‑37 Setting the text property definition to an expression
Changes in the report item presentation
To support expressions, the code of the onRowSets( ) method of RotatedTextPresentationImpl class must be changed, as shown in
Listing 18‑25. The new code adds logic to handle the text property as an expression. The code evaluates the text value under the current engine context to get the final string result.
Listing 18‑25 onRowSets method of the RotatedTextPresentationImpl class
public Object onRowSets( IBaseResultSet[] results )
throws BirtException
{
if ( textItem == null )
{
return null;
}
int angle = textItem.getRotationAngle( );
String text = textItem.getText( );
// XXX added to support expression
if ( results != null && results.length > 0 )
{
if ( results[0] instanceof IQueryResultSet
&& ( (IQueryResultSet) results[0] ).isBeforeFirst( ) )
{
( (IQueryResultSet) results[0] ).next( );
}
text = String.valueOf( results[0].evaluate( text ) );
} else
{
text = String.valueOf( context.evaluate( text ) );
}
// end new code
BufferedImage rotatedImage =
SwingGraphicsUtil.createRotatedTextImage( text, angle,
new Font( "Default", 0, 12 ) ); //$NON-NLS-1$
ByteArrayInputStream bis = null;
try
{
ImageIO.setUseCache( false );
ByteArrayOutputStream baos = new ByteArrayOutputStream( );
ImageOutputStream ios =
ImageIO.createImageOutputStream( baos );
ImageIO.write( rotatedImage, "png", ios ); //$NON-NLS-1$
ios.flush( );
ios.close( );
bis = new ByteArrayInputStream( baos.toByteArray( ) );
}
catch ( IOException e ) {
e.printStackTrace( );
}
return bis;
}
Changing the report item UI to support expressions
To update the user interface you must make changes in two places—the builder and the property page.
Adding data binding to the builder
To enable report developers to use the standard BIRT expression builder to construct a data-binding expression, the report item builder must provide a button to launch the expression builder. Place the button beside the text control, as shown in
Figure 18‑38.
Figure 18‑38 RotatedText builder
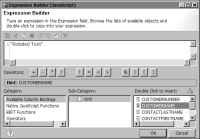
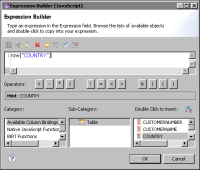
The standard BIRT expression builder, shown in
Figure 18‑39, provides JavaScript support and access to any data sets defined for the report design.
Figure 18‑39 The standard BIRT expression builder
The code of the RotatedTextBuilder class changes, as shown in
Listing 18‑26. The newly created RotatedTextEditor2 class overwrites the UI creation logic for the new expression button. It also calls a new getModelHandle( ) method from the RotatedTextItem class.
Listing 18‑26 RotatedTextBuilder class
public class RotatedTextBuilder extends ReportItemBuilderUI
{
public int open( ExtendedItemHandle handle )
{
try {
IReportItem item = handle.getReportItem( );
if ( item instanceof RotatedTextItem )
{
RotatedTextEditor editor = new RotatedTextEditor2(
Display.getCurrent( ).getActiveShell( ),
(RotatedTextItem) item );
return editor.open( );
}
}
catch ( Exception e ) {
e.printStackTrace( );
}
return Window.CANCEL;
}
}
class RotatedTextEditor2 extends RotatedTextEditor
{
protected RotatedTextEditor2( Shell shell,
RotatedTextItem textItem )
{
super( shell, textItem );
}
protected void createTextArea( Composite parent )
{
Label lb = new Label( parent, SWT.None );
lb.setText( "Text Content:" ); //$NON-NLS-1$
txtText = new Text( parent, SWT.BORDER );
GridData gd = new GridData( GridData.FILL_HORIZONTAL );
txtText.setLayoutData( gd );
Button btnExp = new Button( parent, SWT.PUSH );
btnExp.setText( "..." ); //$NON-NLS-1$
btnExp.setToolTipText( "Invoke Expression Builder" );
//$NON-NLS-1$
btnExp.addSelectionListener( new SelectionAdapter( ) {
public void widgetSelected( SelectionEvent event )
{
openExpression( txtText );
}
} );
}
private void openExpression( Text textControl )
{
String oldValue = textControl.getText( );
ExpressionBuilder eb = new ExpressionBuilder(
textControl.getShell( ), oldValue );
eb.setExpressionProvider( new ExpressionProvider(
textItem.getModelHandle( ) ) );
String result = oldValue;
if ( eb.open( ) == Window.OK )
{
result = eb.getResult( );
}
if ( !oldValue.equals( result ) )
{
textControl.setText( result );
}
}
}
Adding data binding to the property page
A similar change must be made to the property page. The General property page needs a button, beside the text control, that calls the expression builder. The code implementing the change to the RotatedTextGeneralPage class is shown in
Listing 18‑27.
Listing 18‑27 RotatedTextGeneralPage class
public class RotatedTextGeneralPage
extends AttributesUtil.PageWrapper
{
//.........
public void buildUI( Composite parent )
{
if ( toolkit == null )
{
toolkit = new FormToolkit( Display.getCurrent( ) );
toolkit.setBorderStyle( SWT.NULL );
}
Control[] children = parent.getChildren( );
if ( children != null && children.length > 0 )
{
contentpane = (Composite) children[children.length - 1];
GridLayout layout = new GridLayout( 3, false );
layout.marginLeft = 8;
layout.verticalSpacing = 12;
contentpane.setLayout( layout );
toolkit.createLabel( contentpane, "Text Content:" );
//$NON-NLS-1$
txtText = toolkit.createText( contentpane, "" );
//$NON-NLS-1$
GridData gd = new GridData( );
gd.widthHint = 200;
txtText.setLayoutData( gd );
txtText.addFocusListener( new FocusAdapter( ) {
public void focusLost(
org.eclipse.swt.events.FocusEvent e )
{
updateModel( RotatedTextItem.TEXT_PROP );
};
} );
Button btnExp = toolkit.createButton( contentpane, "...",
SWT.PUSH ); //$NON-NLS-1$
btnExp.setToolTipText( "Invoke Expression Builder" );
//$NON-NLS-1$
btnExp.addSelectionListener( new SelectionAdapter( ) {
public void widgetSelected( SelectionEvent e )
{
openExpression( txtText );
}
} );
toolkit.createLabel( contentpane, "Rotation Angle:" );
//$NON-NLS-1$
txtAngle = toolkit.createText( contentpane, "" );
//$NON-NLS-1$
gd = new GridData( );
gd.widthHint = 200;
gd.horizontalSpan = 2;
txtAngle.setLayoutData( gd );
txtAngle.addFocusListener( new FocusAdapter( ) {
public void focusLost(
org.eclipse.swt.events.FocusEvent e )
{
updateModel( RotatedTextItem.ROTATION_ANGLE_PROP );
};
} );
}
}
private void openExpression( Text textControl )
{
RotatedTextItem item = getItem( );
if ( item != null )
{
String oldValue = textControl.getText( );
ExpressionBuilder eb = new ExpressionBuilder(
textControl.getShell( ), oldValue );
eb.setExpressionProvider( new ExpressionProvider(
item.getModelHandle( ) ) );
String result = oldValue;
if ( eb.open( ) == Window.OK )
{
result = eb.getResult( );
}
if ( !oldValue.equals( result ) )
{
textControl.setText( result );
updateModel( RotatedTextItem.TEXT_PROP );
}
}
}
//..........
}
The new appearance of the General property page is shown in
Figure 18‑40.
Figure 18‑40 Final appearance of the RotatedText item’s General property page
To test the implementation, run a new report design instance and create a new report, as explained earlier in this section in
Deploying and testing the rotated label report item plug-in. Insert a Classic Models data source and data set. Create a table having two columns, and bind the table to the data set. Insert a group and replace the group value with the RotatedText report item in the group header row.
Specify the expression of the RotatedText item using Expression Builder, as shown in
Figure 18‑41.
Figure 18‑41 Defining a data-binding expression for the RotatedText item
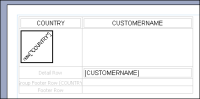
Add a border around the RotatedText report item. The design should look like
Figure 18‑42.
Figure 18‑42 Report layout showing the final RotatedText item
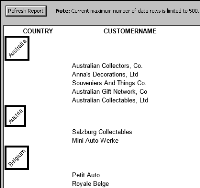
The preview in the report designer, shown in
Figure 18‑43, displays values from the database for the RotatedText report item. The text data comes from the column bindings and automatically changes per row or, in this case, per group.
Figure 18‑43 Report preview showing data values in RotatedText items