Creating the CSV ODA user interface plug-in project
You can create the CSV ODA user interface plug-in project, org.eclipse.birt.report.data.oda.csv.ui, using the Eclipse PDE. The Eclipse PDE provides a wizard to assist you in setting up a plug-in project and creating the framework for a plug-in extension.
The New Plug-in Project wizard simplifies the process of specifying a plug-in project, automatically adds the required extension points, and sets the dependencies. The wizard also generates the plug-in manifest file, plugin.xml, and optionally, the Java plug-in run-time class.
The wizard creates all the implementation Java classes. It also puts TODO tags in the generated source code for customizing code along with guiding comments.
After using the wizard to create the plug-in, review the settings, make adjustments to the settings, and add the code to the Java class stubs to implement the desired functionality.
The following section describes how to create the plug-in project using the New Plug-in Project wizard.
How to create the CSV ODA user interface plug-in project
1 From the Eclipse menu, choose File➛New➛Project. New Project appears.
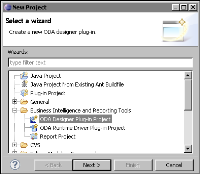
2 On New Project—Select a wizard, open Business Intelligence and Reporting Tools, and select ODA Designer Plug-in Project, as shown in
Figure 20‑7.
Figure 20‑7 Specifying the CSV ODA Designer plug-in project
3 Choose Next.
4 In Plug-in Project, modify the settings as shown in
Table 20‑5. Choose Next.
Table 20‑5 Settings for the CSV ODA user interface plug-in project options
Section | Option | Value |
Plug-in Project | Project name | org.eclipse.birt.report.data.oda.csv.ui |
| Use default location | Selected |
| Location | Not available when you select Use default location |
Project Settings | Create a Java project | Selected |
| Source folder | src |
| Output folder | bin |
Target Platform | Eclipse version | 3.5 or greater |
| OSGi framework | Deselected |
Working Sets | Add project to working set | Deselected |
5 In Plug-in Content, modify the settings, where needed, as shown in
Table 20‑6. Choose Finish.
Table 20‑6 Settings for the CSV ODA user interface plug-in content options
Section | Option | Value |
Properties | ID | org.eclipse.birt.report.data.oda.csv.ui |
| Version | 1.0.0.qualifier |
| Name | CSV File ODA |
| Vendor | yourCompany.com or leave blank |
| Execution Environment | JavaSE-1.7 |
Options | Generate an activator, a Java class that controls the plug‑in’s life cycle | Selected |
| Activator | org.eclipse.birt.report.data.oda.csv.ui.UiPlugin |
| This plug-in will make contributions to the user interface | Selected |
| Enable API analysis | Deselected |
Rich Client Application | Would you like to create a 3.x rich client application? | No |
6 In Templates, choose ODA Data Source Designer. Choose Next.
7 In ODA Data Source Designer, specify values for the following options used to generate the ODA plug-in, as shown in
Table 20‑7. Choose Finish.
Table 20‑7 Settings for the CSV ODA UI plug-in content options
Option | Value |
Java Package Name | org.eclipse.birt.report.data.oda.csv.ui.impl |
ODA Runtime Driver Plug‑in Id | org.eclipse.birt.report.data.oda.csv |
ODA Runtime Data Source Element Id | org.eclipse.birt.report.data.oda.csv |
ODA Runtime Driver Class | org.eclipse.birt.report.data.oda.csv.impl.CSVFileDriver |
ODA Runtime Data Set Element Id | org.eclipse.birt.report.data.oda.csv.dataSet |
Data Source Display Name | CSV Data Source |
Data Set Display Name | CSV Data Set |
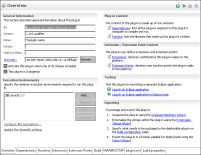
The CSV ODA user interface plug-in project appears in Eclipse Package Explorer.
Double-click plugin.xml to open it in PDE Manifest Editor. The plug-in Overview page looks like the one shown on
Figure 20‑8.
Figure 20‑8 Viewing the CSV ODA user interface plug‑in