Testing the Hibernate ODA user interface plug-in
To test the Hibernate ODA user interface plug-in, after exporting it, use a run-time configuration of the Eclipse PDE Workbench.
How to launch the Hibernate ODA user interface plug-in
1 From the Eclipse SDK menu, choose Run—Run Configurations. On Run Configurations, right-click Eclipse Application. Choose New.
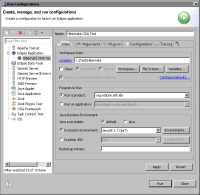
2 Create a configuration to launch an Eclipse application by performing the following tasks:
1 In Name, type:
Hibernate ODA Test
2 On Main, in Location, type:
C:\Test\Hibernate
Figure 20‑24 Creating a configuration to launch an Eclipse application
3 Choose the Arguments tab and ensure that the following arguments are entered:

Program arguments:
-os ${target.os} -ws ${target.ws} -arch ${target.arch}
-nl ${target.nl} -consoleLog
VM arguments:
-Dosgi.requiredJavaVersion=1.6 -Xms40m -Xmx512m
-XX:MaxPermSize=256M
4 Add the Hibernate ODA plug-ins to the launch configuration.
1 In Run Configurations, choose Plug-ins.
2 In Launch with, choose:
plug-ins selected below only
from the drop-down list.
3 In Plug-ins, check the following plug-ins:
org.eclipse.birt.data.oda.hibernate
org.eclipse.birt.data.oda.hibernate.ui
5 Choose Run to launch the run-time workbench.
6 In the run-time workbench, choose the Report Design perspective.
7 In Report Design, create a new report project, and create a new blank report.
How to specify a data source and data set
1 In Report Design, choose Data Explorer. Data Explorer appears.
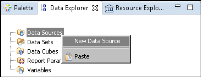
2 In Data Explorer, right-click Data Sources, and choose New Data Source, as shown in
Figure 20‑25. New Data Source appears.
Figure 20‑25 Choosing New Data Source
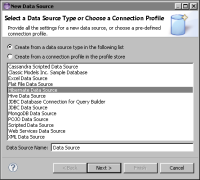
In New Data Source, choose Create from a data source type in the following list, and select Hibernate Data Source as the data source type, as shown in
Figure 20‑26. Choose Next.
Figure 20‑26 Selecting Hibernate Data Source
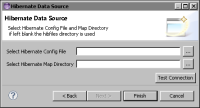
Hibernate Data Source appears, as shown in
Figure 20‑27. In Hibernate Data Source, select the Hibernate configuration file and mapping directory or leave these items blank if you use the hibfiles directory. Choose Finish.
Figure 20‑27 Configuring the Hibernate data source
Data Explorer appears with the new data source in Data Sources.
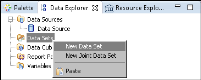
3 In Data Explorer, right-click Data Sets, and choose New Data Set, as shown in
Figure 20‑28.
Figure 20‑28 Choosing New Data Set
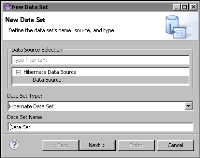
Figure 20‑29 New Data Set
Choose Next. Hibernate Data Set appears.
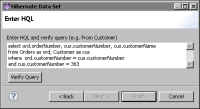
4 In Edit Data Set, perform the following tasks:
1 In Enter HQL and verify query, type:
select ord.orderNumber, cus.customerNumber,
cus.customerName
from Orders as ord, Customer as cus
where ord.customerNumber = cus.customerNumber
and cus.customerNumber = 363
Figure 20‑30 Editing the HQL query
2 Choose Verify Query.
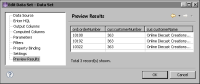
3 Choose Finish. Edit Data Set appears. Choose Preview Results. Preview Results appears as shown in
Figure 20‑31.
Figure 20‑31 Previewing the data set
Choose OK. Data Explorer appears.
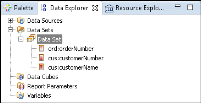
5 In Data Explorer, expand Data Sets. The new data set lists three columns, as shown in
Figure 20‑32.
Figure 20‑32 Data Set in Data Explorer
6 To build a report that uses the data set, perform the following tasks:
1 In Data Explorer, drag Data Set to the layout editor. The layout appears, as shown in
Figure 20‑33.
Figure 20‑33 Report design in the layout editor
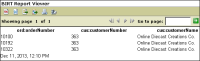
2 To view the output for the report design, choose Run
➛View Report
➛In Web Viewer. The report appears, as shown in
Figure 20‑34.
Figure 20‑34 Preview of the report design