A Google gadget file typically includes the following components:
Module tag
This tag includes all gadget contents except the XML file declaration that begins the file.
ModulePrefs tag
This tag contains gadget characteristics and required features.
Content tag
This tag contains CSS, HTML, and JavaScript code used in the gadget.
CDATA section
This section avoids XML parsing and the escape of special characters in HTML and JavaScript code.
Listing 35‑1 shows an example Google gadget that displays HTML content.
Listing 35‑1 Example Google gadget displaying HTML code <<img>>
<?xmlversion="1.0"encoding="UTF-8" ?>
<Module>
<ModulePrefsheight="300"title="gadget example"/>
<Contenttype="html"><![CDATA[
<script type="text/javascript">
<!-- JavaScript code -->
</script>
<!-- HTML code -->
<div id="my_div"
style="background-color:green;height:100%">
<b>My sample gadget</b>
</div>]]>
</Content>
</Module>
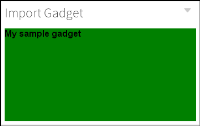
Figure 35‑2 shows the result of the previous code when displayed in an import gadget on the dashboard.
Figure 35‑2 Viewing a sample Google gadget
You can use CSS, HTML, and JavaScript content that normally goes inside BODY tags of an HTML file in a Google gadget. Google gadgets generate their own HTML, HEAD, and BODY tags so it is not necessary for a gadget developer to use these tags in the gadget. If external files such as JavaScript libraries and images are required in the gadget, use the URI of the external file.
About gadget views
Google gadgets can optionally use views to match content with the location the gadget is viewed. For example, the default view can contain content to appear when the gadget is in a column layout with other gadgets and the canvas view can contain different content or CSS styles to appear when the gadget expands to fill the screen.
The view parameter is part of the content element, as shown in the following code:
<Contenttype="html"view="default">
The following Google gadget views are supported:
default
canvas
If a view is not defined, the default view is used. Dashboards requires at least one content element with a supported view or one content element without any view defined. For example, if the following code is the only content element in a Google gadget, the Google gadget does not load in the import gadget:
<Contenttype="html"view="home">
For more information about building Google gadgets with these features, see the Google Gadget Developer’s Guide at the following URL:
https://developers.google.com/gadgets/docs/ui
About gadget features
Google gadgets use features to request a special API that enables the gadget to function. The code for these APIs are stored on the server displaying the Google gadget, in this case on BIRT iHub. The gadget developer uses less code because the requested feature is loaded by BIRT iHub. For example, instead of adding JavaScript code to parse data, the parse function can load as a feature.
The Google gadget must contain a <require> element with the feature name, as shown in the following code:
<Requirefeature="pubsub" />
This code requests the pubsub feature, which enables Google gadgets to communicate between each other and enables Google gadgets to receive user‑selected values from Actuate gadgets.
When the feature is available, the gadget loads the API associated with the feature from BIRT iHub. If the requested feature is not available, an error message appears. If an externally hosted Google gadgets does not appear in the import gadget, check if required features are available in BIRT iHub.
The following Google gadget features are supported along with the Google gadget Core JavaScript API:
Flash
Minimessage
Pubsub
Tabs
For more information about building Google gadgets with these features, see the Google Gadget API reference at the following URL:
Use the Flash feature to embed Flash movies in Google gadgets. The following code shows the Flash feature being used in a Google gadget:
<?xmlversion="1.0"encoding="UTF-8" ?>
<Module>
<ModulePrefstitle="Flash demo"height="300">
<Requirefeature="flash" />
</ModulePrefs>
<Contenttype="html">
<![CDATA[
<div id="flashcontainer"></div>
<script type="text/javascript">
var url = "http://www.mywebsite.com/swfs/main.swf";
gadgets.flash.embedFlash(url, "flashcontainer", {
swf_version: 6,
id: "flashid"
})
</script>
]]>
</Content>
</Module>
Optionally, gadget developers can use the object tag to embed the Adobe Flash content in HTML code. For more information about using Adobe Flash, see Displaying Adobe Flash content.
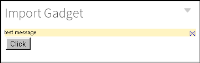
Using the minimessage feature
Use the minimessage feature to display a temporary message to users. Figure 35‑3 shows the minimessage feature in a gadget.
Figure 35‑3 Using the minimessage feature
The following code shows the minimessage feature used in a Google gadget:
The pubsub feature of a Google gadget is also called the publish and subscribe gadget framework. This framework enables gadgets to send and receive messages from one Google gadget to another and to link Google gadgets to Actuate gadgets. For more information about linking gadgets, see Linking Google gadgets.
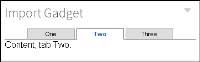
Using the tabs feature
Use the tabs feature to organize the gadget content with tabs. Figure 35‑4 shows the tabs feature in a gadget.
Figure 35‑4 Using the tabs feature
The following code shows the tabs feature in a Google gadget:
<?xmlversion="1.0"encoding="UTF-8" ?>
<Module>
<ModulePrefstitle="tabs demo">
<Requirefeature="tabs" />
</ModulePrefs>
<Contenttype="html">
<