Templates must be published in specific locations for Report Studio to display them. BIRT Designer Professional publishes the templates to the BizRDTemplates folder that it creates in the Resources folder of the volume. Report Studio displays templates by categories. When you publish a template, you can create a new category or select an existing category in which to display your template.
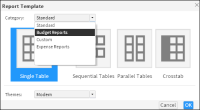
You can, for example, organize templates by report types (budget reports, expense reports, stock purchase plan reports) or by departments in your organization (Human Resources, Sales, Customer Support). Figure 26‑9 shows an example of Report Studio displaying additional categories by report types. The Standard category appears at the top of the list because it is the default category supplied with Report Studio. All other categories that you create are listed in alphabetical order. You can designate a different template category as the default category, as described later in this section.
Typically, each template uses the following external resources that you must also publish to a specific location:
An image file that functions as the thumbnail image of the template
A library file containing the themes available to the report
If a template contains localized text and you have created resource files that translate text into different languages, you must also publish these (.properties) files. You publish all resources associated with a template when publishing the template. BIRT Designer Professional publishes these files to specific locations from which Report Studio can access them.
Figure 26‑9 Displaying available template categories in Report Studio
How to publish a report template
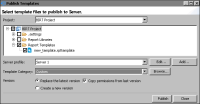
1 In BIRT Designer Professional, in Navigator, right-click the template file, then choose Publish➛Publish Templates. Publish Templates appears with the template file selected, as shown in Figure 26‑10.
Figure 26‑10 Publishing templates using BIRT Designer Professional
2 In Publish Templates, select Report Libraries to publish the themes and images associated with the template.
3 Select a server profile from the drop-down list. A server profile specifies the connection properties to connect to a specific iHub volume. To create a new server profile, complete the following steps:
1 Choose Add. Server Profile appears. In Server Profile, complete the following steps:
9 In Profile name, type a unique name that identifies the Cloud profile.
10 In Cloud Service URL, type the address for your cloud service.
11 Choose Login.
12 In Server Name, select the server to log in to.
13 In Volume, select a volume.
Choose Finish.
4 In Publish Templates, in Template Category, select an existing category from the drop-down list in which to publish the template. Alternatively, create a new category by choosing Browse, then specifying the name of the new category.
5 In Version, select a version option. To copy the privileges from the last published version of the template, select Copy permissions from last version.
6 Choose Publish, then after the file is published, choose Close.
The first time you publish a template to an iHub volume, you must grant users access to the appropriate template folders and files. For more information about assigning privileges for folders and files on an Actuate BIRT iHub iHub volume, see Managing Volumes and Users