You can create a hyperlink that links one report element to another element, either in the same report or in a different report. For example, a report can contain a summary listing with hyperlinks to detailed information. Similarly, a large report that consists of several subreports can contain a title page with hyperlinks to each subreport.
The report element that acts as the hyperlink is called the source report element. It must be a data, label, image, or chart element. The report element to which you link is called the target report element.
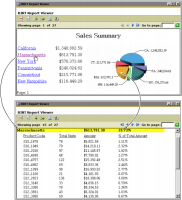
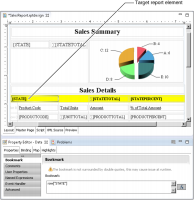
Figure 28‑1 shows two pages of a report in the BIRT report viewer, and how clicking a hyperlink on the first page jumps to content on the sixth page. The first page of the report displays sales summary information in a table and a chart. The state names in the table and the slices of the pie chart are hyperlinks. When the user clicks a hyperlink, the report viewer displays the detailed sales information for the selected state, as shown in Figure 28‑1.
Figure 28‑1 Clicking a hyperlink to go from one section in a report to another
Linking two sections in a report
To create a link from one report element to another element in the same report, use a bookmark and a hyperlink. First, define a bookmark for the target report element. Then, define a hyperlink for the source report element. Perform these tasks in this sequence because the hyperlink requires the bookmark information.
Defining a bookmark
As its name suggests, a bookmark is a marker for finding a place in a report. When defining a bookmark, you specify information that determines how BIRT generates the bookmark. The information can be one of the following:
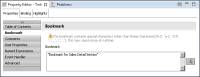
A name, such as “Bookmark 1” or “Bookmark for Sales Details Section”. If you type a name, you must enclose it within double quotation marks, as shown in Figure 28‑2.
Figure 28‑2 Using a name for the bookmark
Specify a name to link to a specific static location in the report. For example, to link to the beginning of a particular subreport in a report, select the label element that displays the title of the subreport, then create a bookmark using a name.
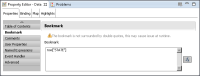
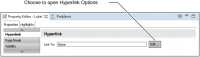
An expression, such as row["STATE"], as shown in Figure 28‑3.
Figure 28‑3 Using an expression for the bookmark
Specify an expression when you want to link to a location that is generated dynamically. The report shown in Figure 28‑1 is such an example. In the Sales Detail section, the data element that displays the state name has a bookmark. The bookmark expression, row["STATE"], generates a dynamic bookmark for each state in the section.
How to define a bookmark
1 Select the target report element.
2 In Property Editor, under Properties, choose Bookmark.
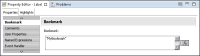
3 In Bookmark, type the name of the bookmark, as shown in Figure 28‑4, or create an expression. You can use any bookmark name that does not start with “__TOC_.” This string is reserved for internal use by BIRT.
Figure 28‑5 Bookmark definition for a selected data element
Defining a hyperlink
After creating the bookmark, define a hyperlink that goes to the bookmark. Specify the following information:
The type of hyperlink. To link two sections within a report, use Internal Bookmark.
The bookmark, or a link expression that changes the bookmark dynamically based on factors, such as report parameters, session values, or data values.
Use a link expression to link to bookmarks conditionally. For example, the details to which you link for each customer in a customer listing report may be different depending on the role of the person viewing the report. Someone in the sales department may need to see purchase order details, while someone in the shipping department may need to see bill of lading information. Adding a script to change the bookmark based on user role accomplishes this result.
A hyperlink can only be defined for a data, label, image, or chart element. The hyperlink options are the same for all these elements. The way in which you access the hyperlink options, however, differs for a chart and the other elements. For a chart, you use the interactivity editor in the chart builder to access the hyperlink options. For the other elements, you use the Hyperlink page of Property Editor.
How to create a hyperlink that links two sections in a report
1 Select the source report element, then perform one of the following tasks:
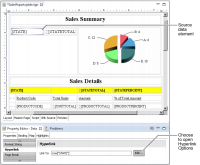
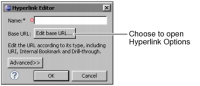
For a data, label, or image element, in Property Editor, under Properties, choose Hyperlink. In the Hyperlink page, shown in Figure 28‑6, choose Edit to open Hyperlink Options. Figure 28‑7 shows the Hyperlink page and the selected data element for the example report shown in Figure 28‑1.
Figure 28‑6 Hyperlink page
Figure 28‑7 Selected data element and Hyperlink page
For a chart, perform the following steps to open Hyperlink Options:
1 Double-click the chart to open the chart builder.
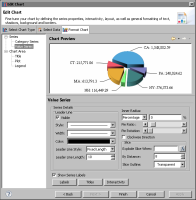
2 Select Format Chart, then choose the chart element for which to define a hyperlink. The chart element can be a value series, the chart area, the legend, the x- and y-axis, or a title. Figure 28‑8 shows an example of a pie chart’s value series selected.
Figure 28‑8 Edit chart displaying format options for value series
3 Choose Interactivity. In the interactivity editor, in Action, select Hyperlink. Choose Add.
4 Choose Edit Base URL to open Hyperlink Options, as shown in Figure 28‑9.
2 In Hyperlink Options, complete the following tasks:
1 In Select Hyperlink Type, select Internal Bookmark.
2 Choose one of the following procedures:
In Bookmark, select a bookmark from the drop-down list. The list displays all the bookmarks defined for the report. The bookmark you select appears in both Bookmark and Linked Expression, as shown in Figure 28‑10.
In Linked Expression, choose the expression builder button, then build an expression.
Figure 28‑10 shows an example of a hyperlink definition that uses a bookmark value.
Figure 28‑10 Hyperlink Options
3 Choose OK.
3 Preview the report and test the hyperlink. In the report viewer, a data or label element with a hyperlink appears as blue underlined text, and an image has a blue border. For a chart, a hyperlink does not have a different appearance, but a cursor shaped like a hand appears when you hover the mouse pointer over a hyperlink.
Linking to a section in a different report
Creating a link from one report to a different report is similar to creating a link between elements in the same report. Begin by creating a bookmark in the target report. Then, create a hyperlink in the source report. This type of hyperlink is called a drill-through hyperlink, and requires additional information, including:
The name of the target report. The target report can be one of the following file types:
Report design (.rptdesign). Specify a report design to run a report to display current data when the user clicks the hyperlink, or to generate a customized report based on a parameter value.
Report document (.rptdocument). A report document is a previously executed report that contains cached data. Report document is the recommended target report type if the report is very large or if the report data changes infrequently.
The bookmark in the target report to which to link. Alternatively, link to a table of contents entry in the target report. The table of contents, described later in this chapter, is another mechanism for navigating from one report section to another. If you do not specify a bookmark or a table of contents entry, the hyperlink goes to the beginning of the target report.
Whether to open the target report in the same window or in a new window.
The output format in which to display the target report.
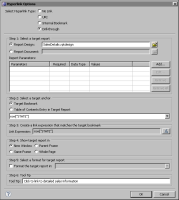
Figure 28‑11 shows an example of hyperlink options specified to link to a bookmark, row["STATE"], in a target report named SalesDetails.rptdesign.
Figure 28‑11 Hyperlink options for linking two reports
You can customize the data displayed by the target report and improve performance by using report parameters. For example, instead of generating a target report that shows sales details for all states, use a target report design that has a report parameter that filters data by state. The report displays sales details only for the state whose hyperlink the user clicks. Typically, generating a filtered report is faster than generating a report with all the data.
To generate such a report, perform the following tasks:
In the target report, create a report parameter to get the state value at run time.
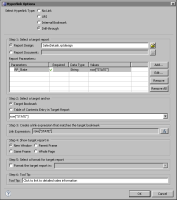
In the source report, define a hyperlink that runs the target report and passes the selected state value to the target report’s parameter. Figure 28‑12 shows a hyperlink definition where the row["STATE"] value is passed to the report parameter, RP_State, in the target report SalesDetail.rptdesign. When the target report you specify contains report parameters, click the cell under Parameters in Hyperlink Options to view a list of the parameters.
Figure 28‑12 Hyperlink options for a link that passes a parameter
How to link two reports
1 In the source report, select the source report element. Property Editor displays the properties of the selected report element.
2 In Property Editor, under Properties, select Hyperlink. The hyperlink properties appear, as shown in Figure 28‑13.
Figure 28‑13 Hyperlink properties
3 Choose Edit.
4 In Hyperlink Options, complete the following tasks:
1 In Select hyperlink type, choose Drill-through.
2 In Select a target report, complete one of the following tasks:
Select Report Design then choose the Browse For File button and navigate to the target report design.
Select Report Document then choose the Browse For File button and navigate to the target report document.
If the target report has parameters, Report Parameters is enabled.
3 To set the value for a report parameter in the target report, perform the following steps:
1 Select the field below the Parameters column heading.
2 Select a parameter name from the drop-down list in this field.
3 Select the field below the Required column heading. A check mark appears if the target report requires a value for this parameter.
4 Select the field below the Values column heading.
5 Type an expression in this field, or choose the ellipsis button to build an expression.
To set the values for remaining parameters in the target report design, perform these steps in further empty rows in Report Parameters.
4 In Select a target anchor, complete one of the following tasks:
Select Target Bookmark then select a bookmark from the drop-down list.
Select Table of Contents Entry in Target Report then select a table of contents entry from the drop-down list.
5 In Create a link expression that matches the target bookmark, choose the expression builder button and build an expression, for example, row["CUSTOMERNAME"].
6 In Show target report in, select an option indicating the window or frame in which to display the target report.
7 To choose an output format that is not HTML, select Format the target report in. Then, in Format the target report in, select one of the available options.
8 In Tool Tip, type a help message that describes the hyperlink. This message appears when the user places the mouse pointer over the hyperlink.
Figure 28‑14 shows sample entries in Hyperlink Options.
You can use a hyperlink to open a document or a web page. These links provide users with easy access to additional sources of information, creating more interactive reports. For example, use a hyperlink to:
Open a company web page when a user chooses a label.
Open a text file that contains detailed copyright information when a user chooses a label that displays a copyright statement.
Open an image file or play a movie clip when a user chooses a thumbnail image in the report.
This type of hyperlink uses a uniform resource identifier (URI) to locate a document, image, or web page.
How to link to external content using a URI
1 Select the report element, such as a label or image, for which to define a hyperlink.
2 In Property Editor, under Properties, choose Hyperlink.
3 In the Hyperlink page, choose Edit.
4 In Hyperlink Options, specify the following values:
1 Choose URI as the hyperlink type.
2 In Location, specify the URI, using one of the following methods:
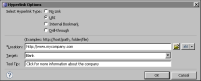
To type a specific URI, choose the arrow button next to the expression builder button, and choose Constant. Type the URI. The following are examples:
http://www.mycompany.com
http://mysite.com/legal_notices/copyright.html
http://mysite.com/images/executives.jpg
file:/C:/copyright/statement.txt
To specify an expression that evaluates to a URI at report run time, choose the expression builder button to construct the expression. Use an expression to construct a URI dynamically when the full URI is not known at design time or if the URI changes depending on data retrieved from a data source.
3 In Target, specify where to open the target document. The choices correspond to the target attributes for an HTML anchor tag. Select Blank to open the target document in a new window. Select Parent, Self, or Top to open the target document in the same window.
4 In Tool Tip, optionally type the text to display when the user hovers the mouse pointer over the hyperlink.
Figure 28‑15 shows an example of linking to a web page.